
Saturday 5 March 2011
Monday 27th Decemeber 2010.
Ok, so ive been on the hunt now for my next project car for a while.
Im sitting in my living room, drinking a brew and dunking my chocolate bourbons. Ive busted out the laptop and jumped onto Pistonheads. Flicking through, a fiesta's caught my eye 1 mile from my house? Deffinately worth a ring!. Who'd of thought i can see the sellers house out my bedroom window? Sorted!
Tuesday 28th Decemeber 2010.
Been to view the car & i cant fault it.
Mitch; the owner has owned it for 4 years. Its been his first car, and a £200 deposit later, my first Ford.
Buzzing like a beeee!
Monday 03rd January 2011.
Ive just collected the car.
Got home insured it, showered and now im off out.
Trahhh!
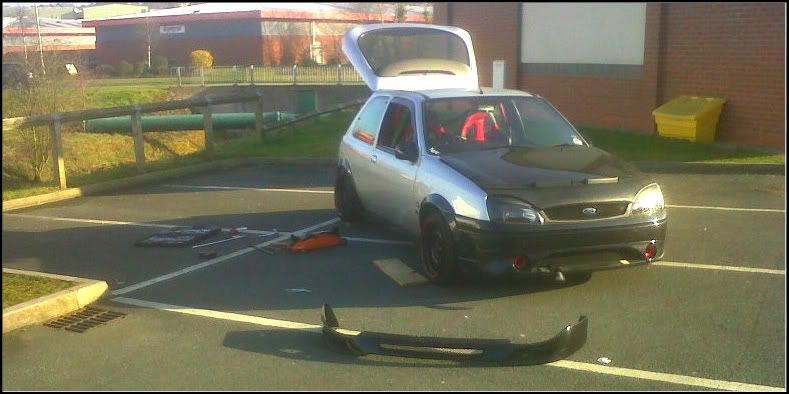
Wednesday 05th January 2011.
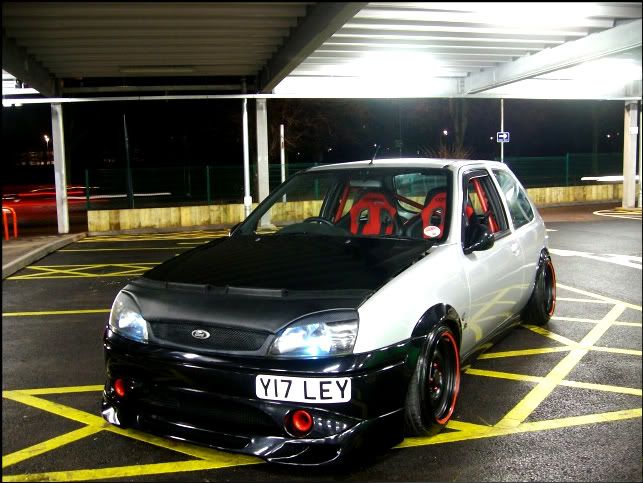
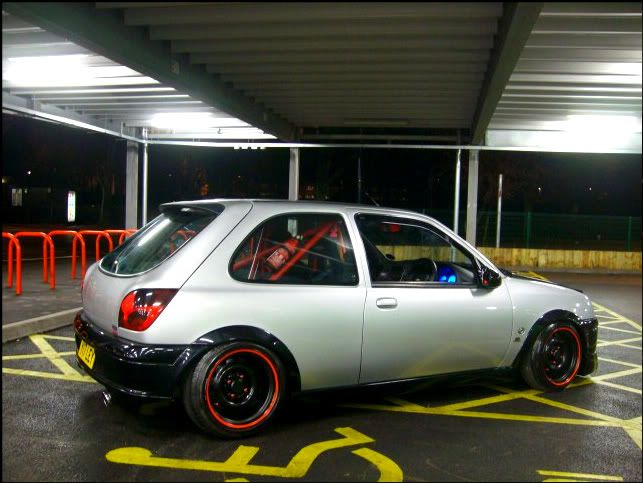
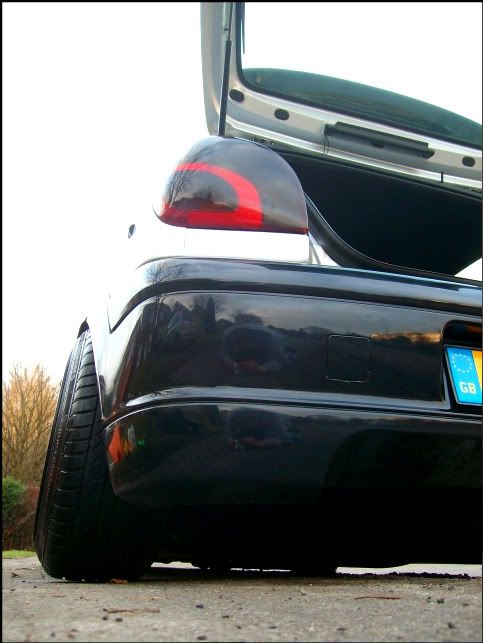
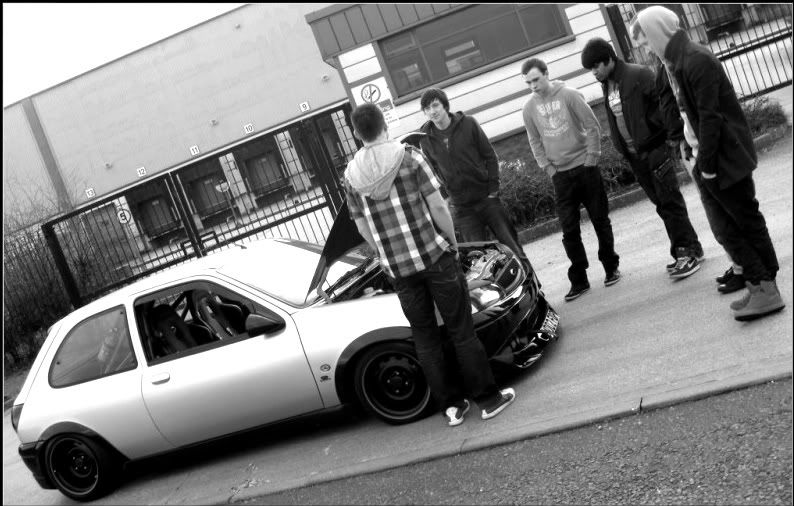
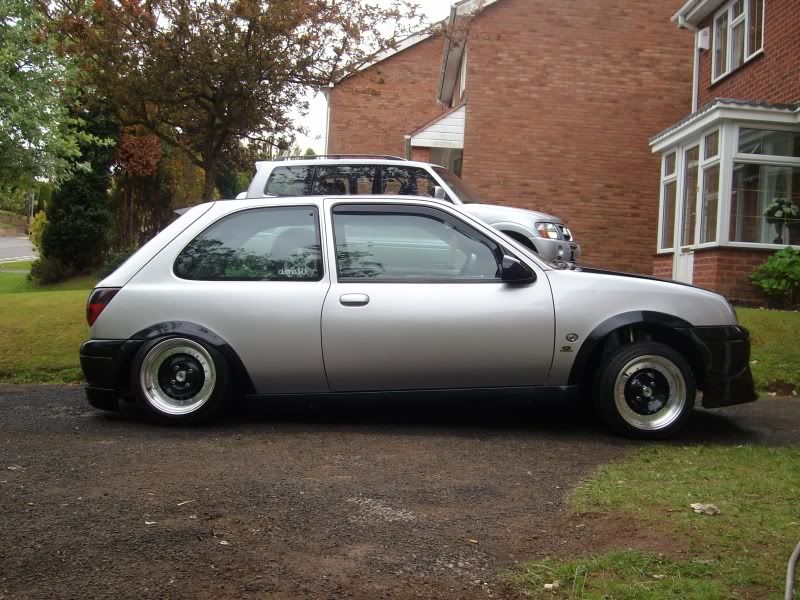
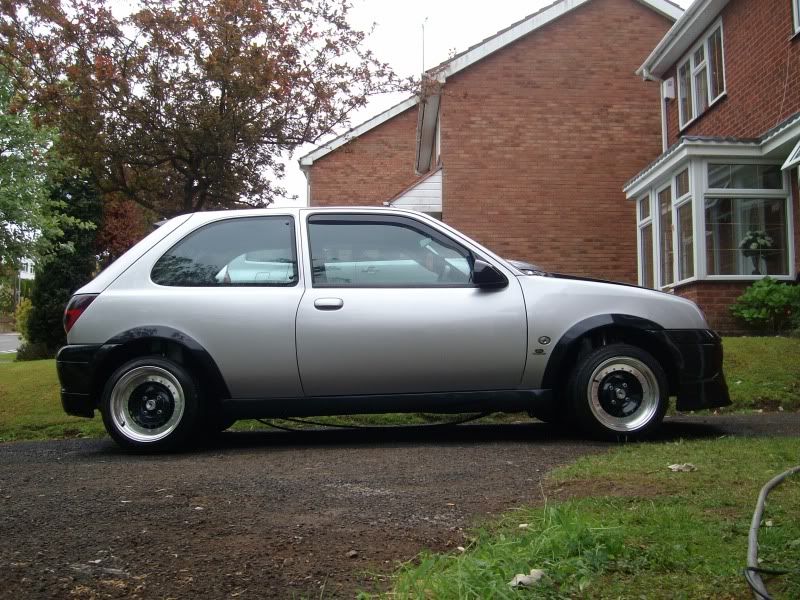
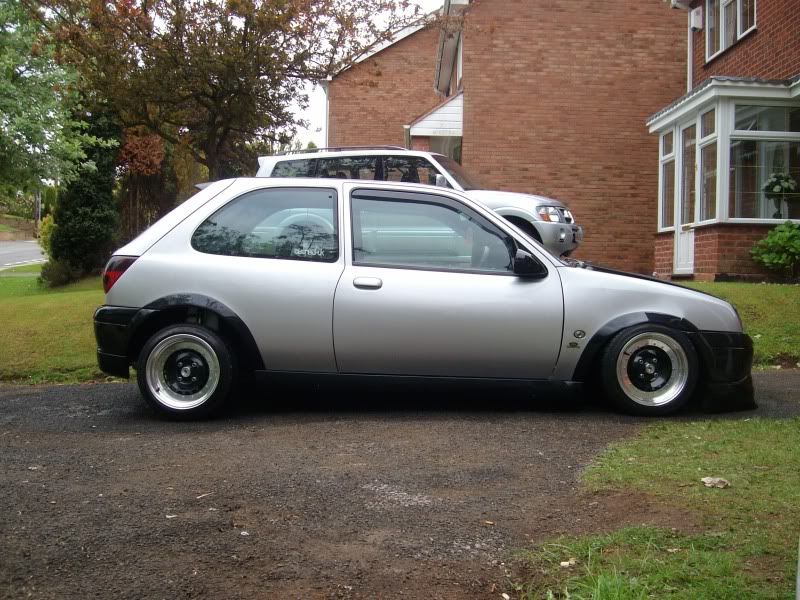
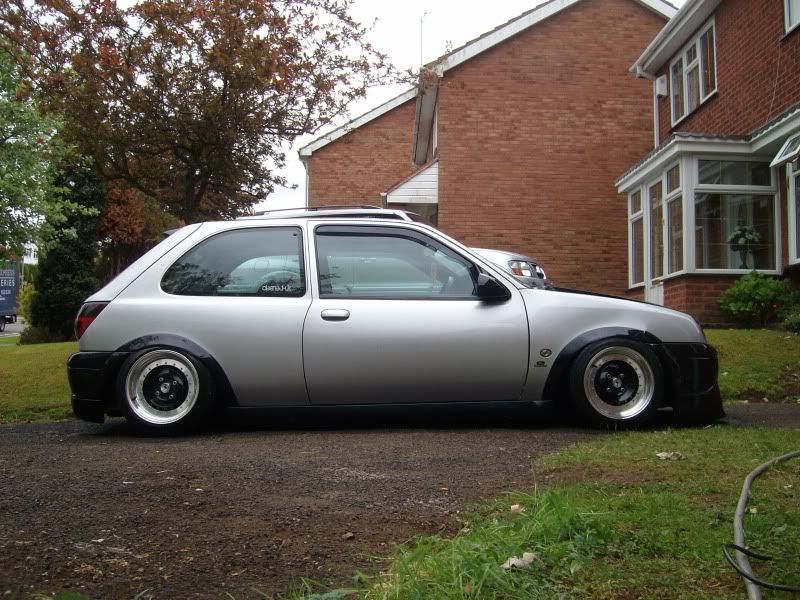
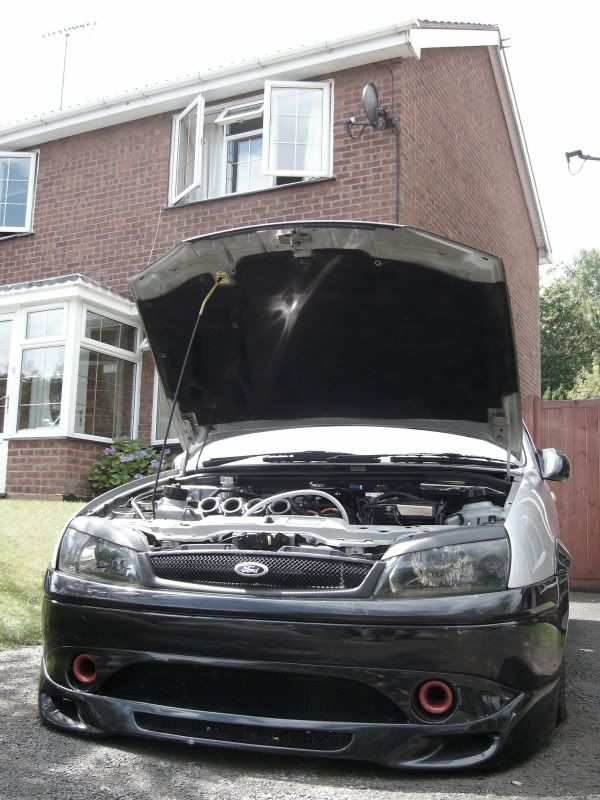
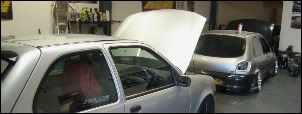
Just been to get some pictures at stafford's new train station multistory car park.
I thought it was free to get in/out if you were in there under an hour. But its cost me £8! Joke.
Anyway, ill let the pictures talk for themselves..
Wednesday 19th January 2011
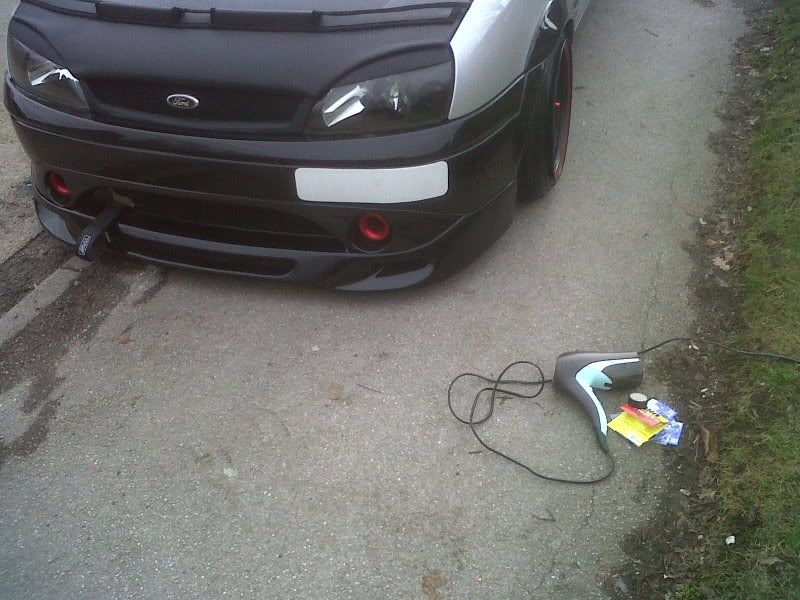
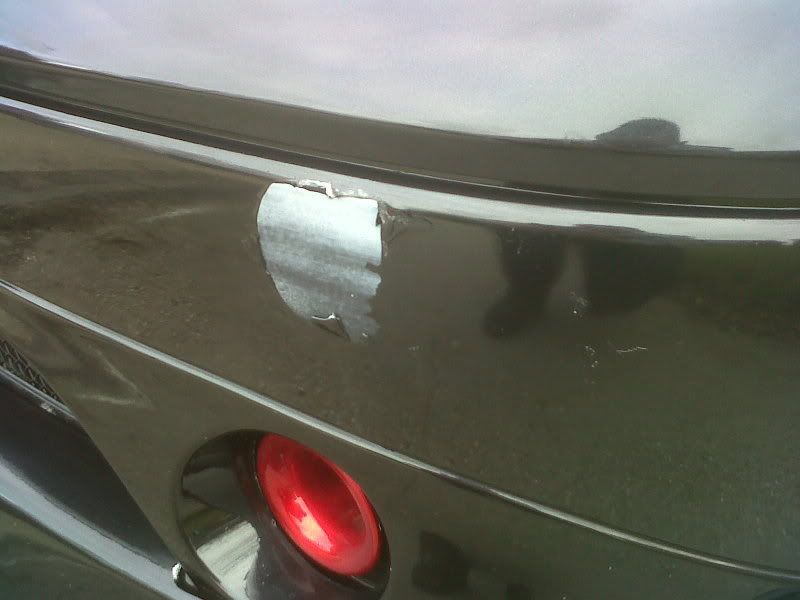
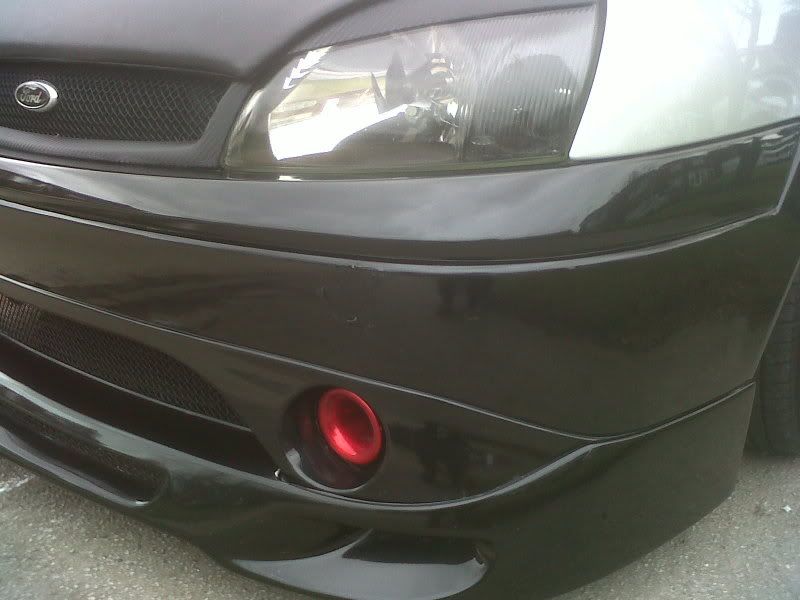
OH NOES!. Its pulled the paint off the front bumper too...Bollox :(
Saturday 22nd January 2011
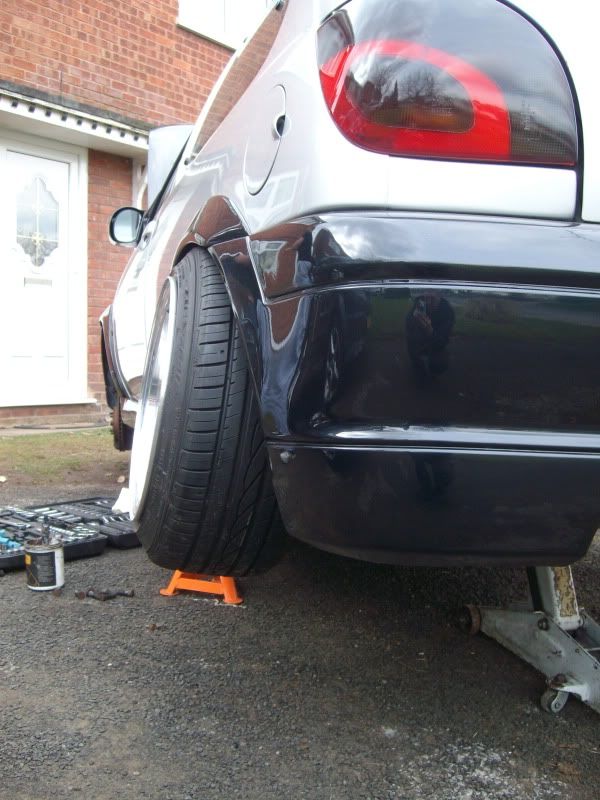
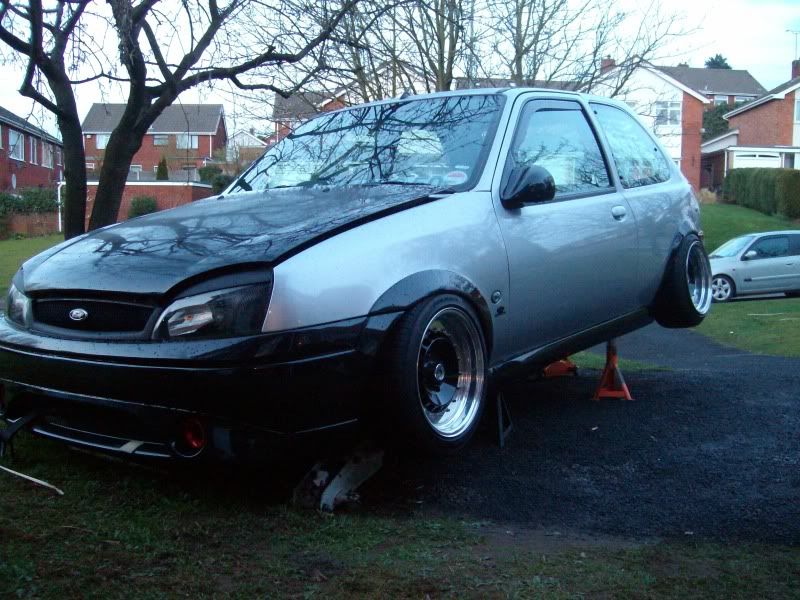
Ok, because the Fk Silverline coilovers are wound pretty much to the bottom of the struts, i cant get the car on the drive. Therefore im having to park it on the curb out front of my house.
I guess 3 weeks of scrubbing it onto the curb is now taking its toll...
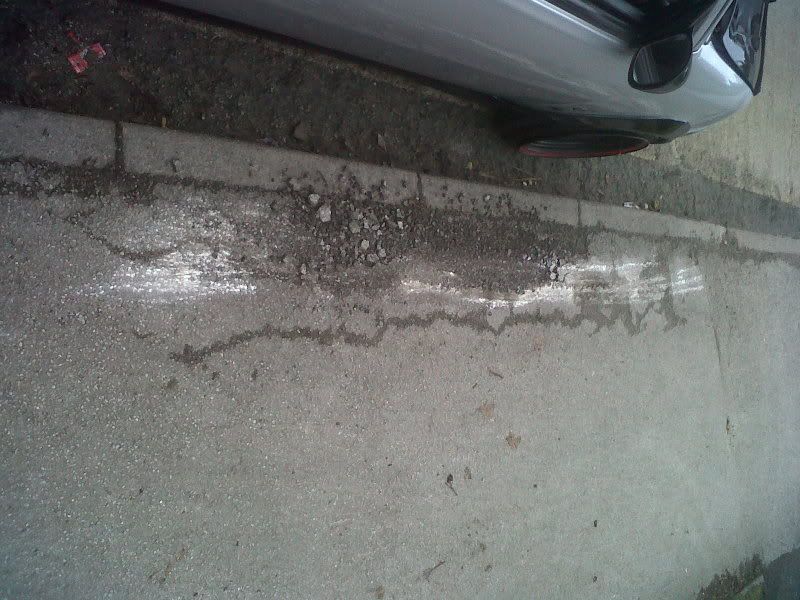
Weeeew, Smashes concrete? ...Bad boyyyyyyyyy!
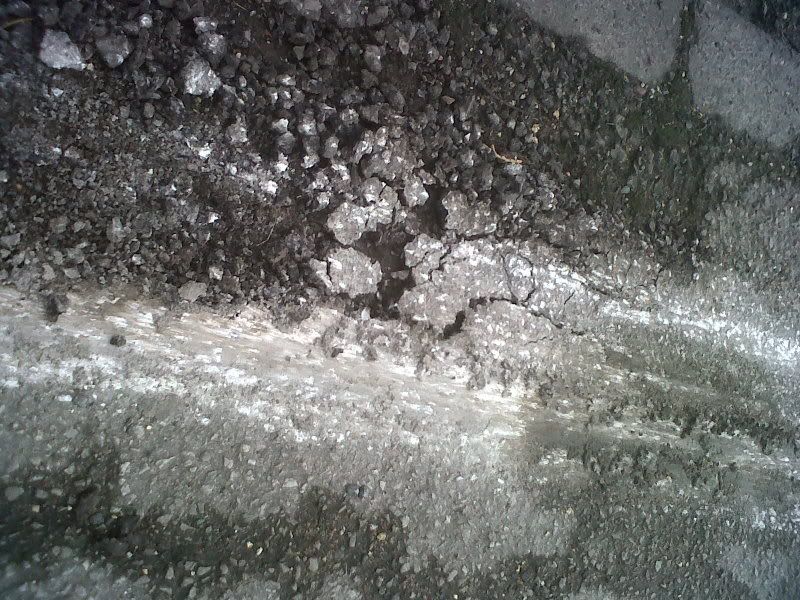
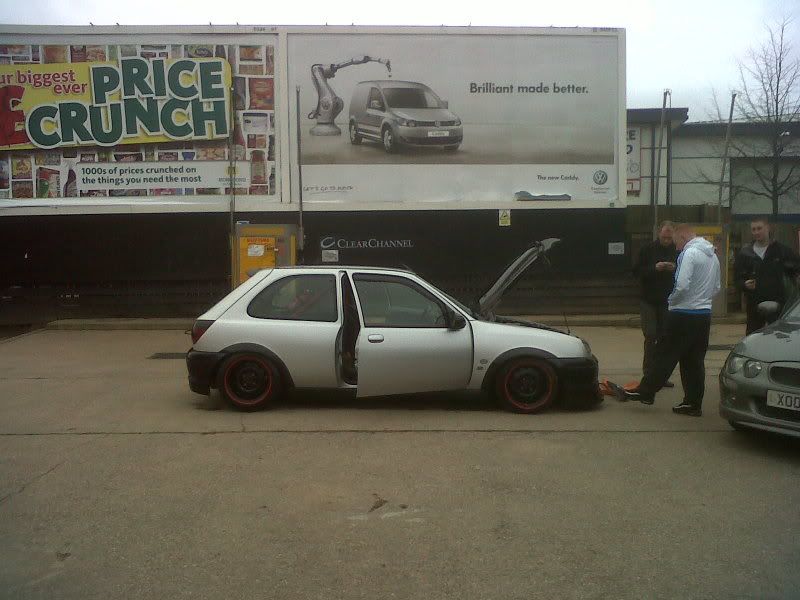
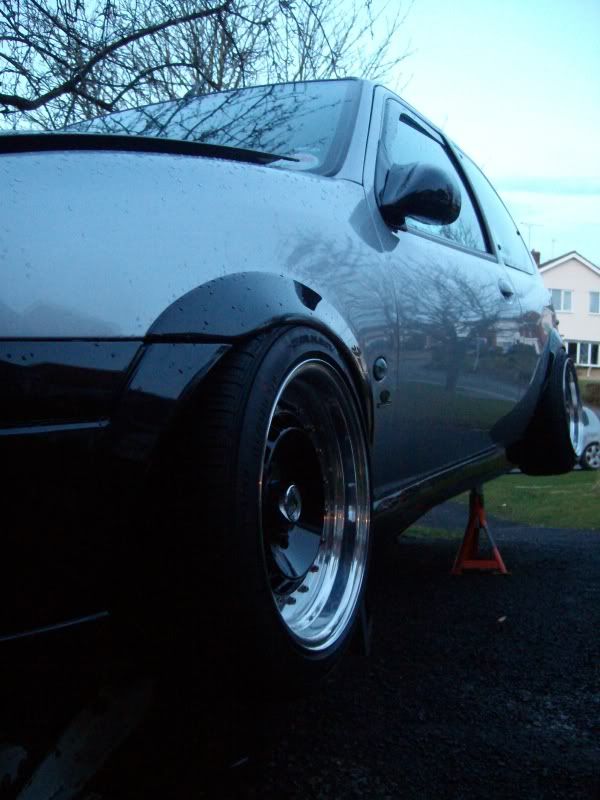
Image Polished Lips.
14 x 8J Front, with 195/45/R14 Falken Tyres.
14 x 9J Rear's, with 195/45/R14 Falken Tyres.
Saturday 29th January
Sunday 30th January 2011.

Monday 07th March 2011.


Thursday 10th March 2011.
So today, ive concentrated on my headlights & Wiring.
First of all was the headlights.
Whoever had split the headlights previously, had painted the headlight black, however permant marker coloured in the center of the headlight! WHAT A JOKE! So, first of all was to split the headlights and get these painted...
And the finish article(s) ?
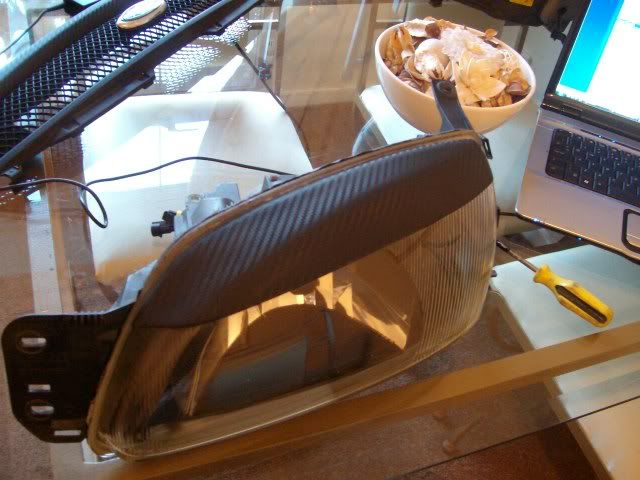


Anyway with that finally off, it was time to give it a lick of paint. So out came the satin black id used to give my rear beam its final coat. I havent got a picture of that now, however i will get one tomorrow :)
Tuesday 29th March 2011.
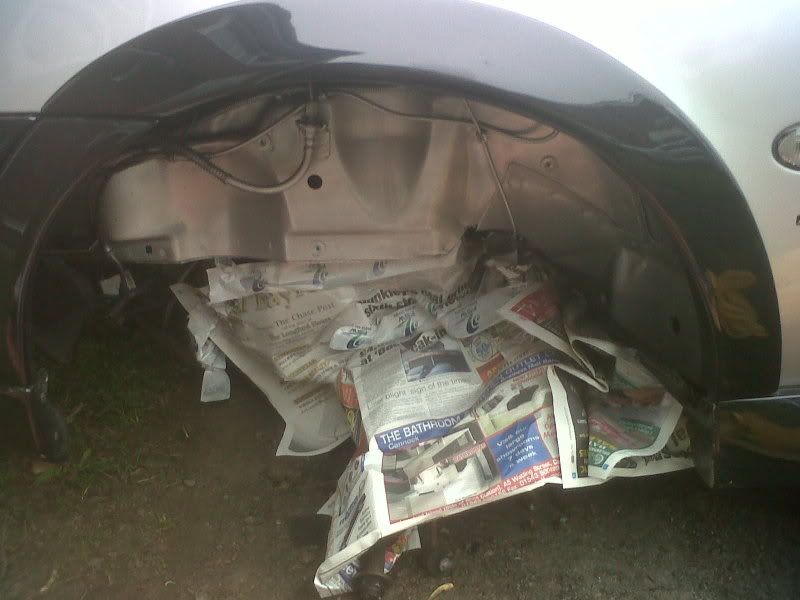
Progress has slowed down alot recently. Mainly due to funding however there's still small bits i can be getting on with :D Tonight ive had stock take at work, but egar to get some more done ready to start reassembling the boring bits and get on with the fun, ive cleaned and painted all my arch liners up :)
So, as they came out the car. Full of shit from the winter roads, and the loss in colour. Im guessing these were once upon a time black, but theyre looking a not very nice shade of faded grey.


And now with my dressed up kit on...Noiceeee! ...
Wednesday 20th April 2011.
Sunday 24th April 2011.


And inside? Oh yes...2x front & 2x rear hydraulic struts..


As per Facebook...
Picking your fiesta's arse up after a day of being Tank...
Sitting on the bonnet of your car and making it touch the floor after a day of being Bigrage

Wednesday 15th June 2011.
No real update, but ive just been tagged in a load of photo's on facebook.
This picture was taken just before i took it off the road, the weekend before i think?.
Looking different much? :D

![]()
![]()
![]()
![]()
![]()
![]()
![]()
![]()
![]()
![]()
![]()
![]()
![]()
Saturday 20th August 2011.
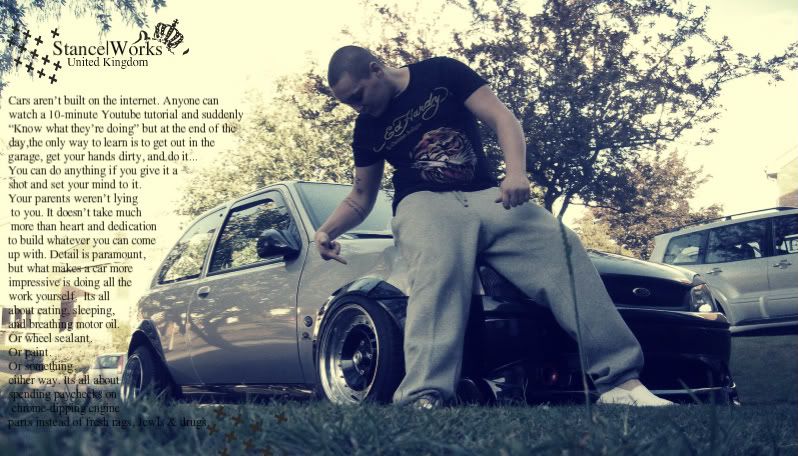
Cars aren’t built on the internet. Anyone can watch a 10-minute Youtube tutorial and suddenly “Know what they’re doing” but at the end of the day,
the only way to learn is to get out in the
garage, get your hands dirty, and do it...
You can do anything if you give it a
shot and set your mind to it.
Your parents weren’t lying
to you. It doesn’t take much
more than heart and dedication
to build whatever you can come
up with. Detail is paramount,
but what makes a car more
impressive is doing all the
work yourself. Its all about
eating, sleeping, and
breathing motor oil.
Or wheel sealant.
Or paint.
Or something,
either way. Its all about
spending paychecks on
chrome-dipping engine
parts instead of fresh rags, Jewls & drugs.''

Tuesday 06th September 2011.
And how it looks Now...I think its came a long way...Sometimes i feel like im wasting my time and messing for the sake of messing..but when you compare two pictures like this...This is when you notice all your hard work, and it looks like its slowly paying off....Maybe?...There's still more i can do ;)

Ok, so ive been on the hunt now for my next project car for a while.
Im sitting in my living room, drinking a brew and dunking my chocolate bourbons. Ive busted out the laptop and jumped onto Pistonheads. Flicking through, a fiesta's caught my eye 1 mile from my house? Deffinately worth a ring!. Who'd of thought i can see the sellers house out my bedroom window? Sorted!
Tuesday 28th Decemeber 2010.
Been to view the car & i cant fault it.
Mitch; the owner has owned it for 4 years. Its been his first car, and a £200 deposit later, my first Ford.
Buzzing like a beeee!
Monday 03rd January 2011.
Ive just collected the car.
Got home insured it, showered and now im off out.
Trahhh!
Wednesday 05th January 2011.
Just been to get some pictures at stafford's new train station multistory car park.
I thought it was free to get in/out if you were in there under an hour. But its cost me £8! Joke.
Anyway, ill let the pictures talk for themselves..
Friday 07 January 2011
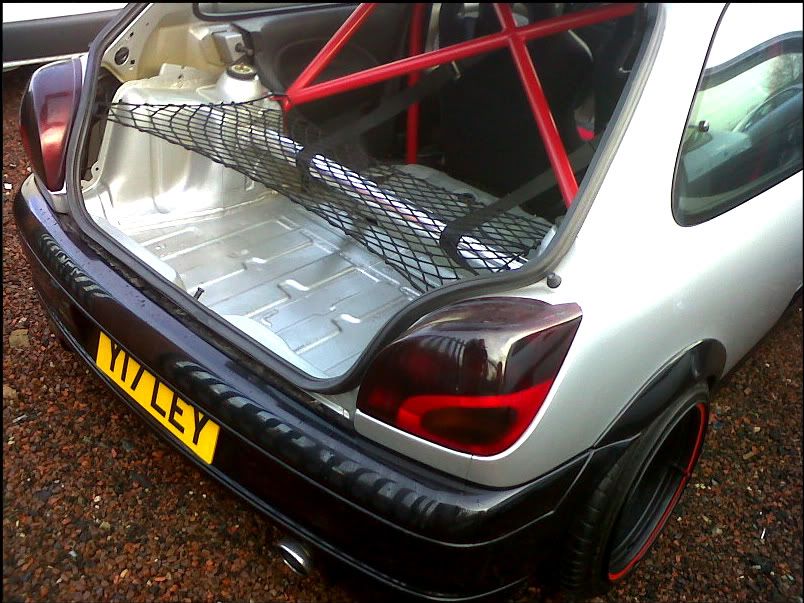
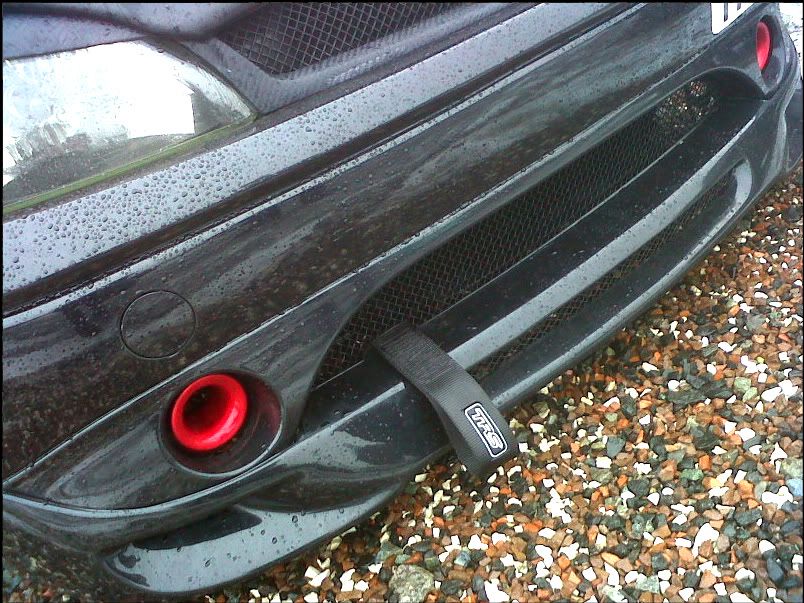
Just bought my first new additions for the car.
Citroen C4 cargo net, to put my coat etc on :)
And my TRS towing strap to be Scene Yooooo!
Ok so the cars gone back onto its origional registration; as Mitch wanted his private plate back.
Today i went and bought some new letters/numbers for the front stick on number plate. Got home, busted out the hairdryer and removed the origional lettering.
However, with the new registration being longer than the origional, not all the digits would fit..So just decided to remove it all together ....
OH NOES!. Its pulled the paint off the front bumper too...Bollox :(
Absolutely gutted, looks like which ever bodyshop has painted/smoothed the bumper hasnt prepped it correctly and removing the plate, even with the help of the warm air pulled off the paint 
So, as a temp fix ive got a black touch up stick in the same colour and done my best to cover it up...Doesnt stand out now and you can hardly tell, An Excellent temp fix until i can get it booked in the bodyshop eventually.Saturday 22nd January 2011
Ok, because the Fk Silverline coilovers are wound pretty much to the bottom of the struts, i cant get the car on the drive. Therefore im having to park it on the curb out front of my house.
I guess 3 weeks of scrubbing it onto the curb is now taking its toll...
Weeeew, Smashes concrete? ...Bad boyyyyyyyyy!
Sunday 23rd January 2011
Stanced Yoooooo!
Friday 28th January 2011.
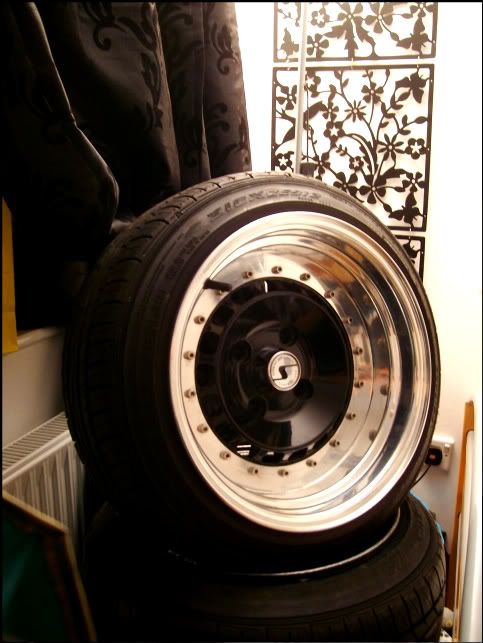
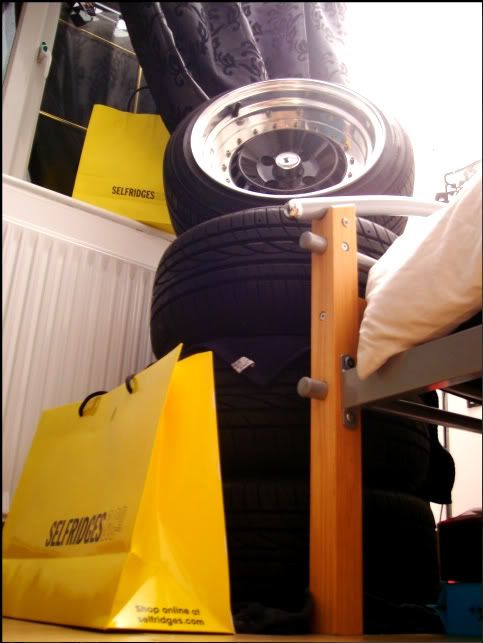
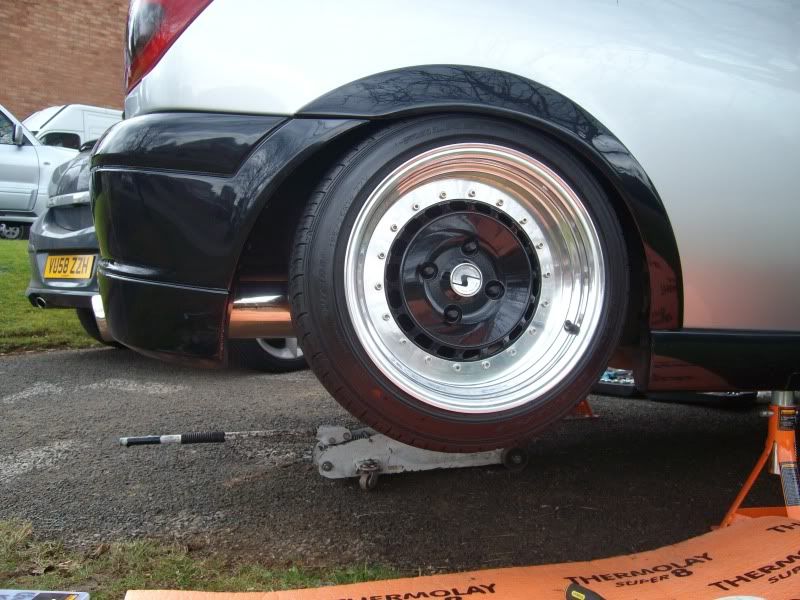
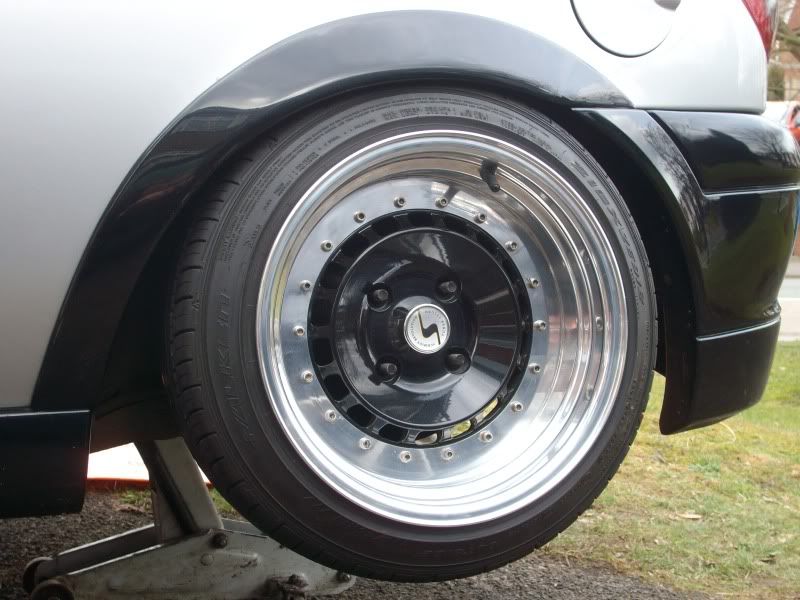
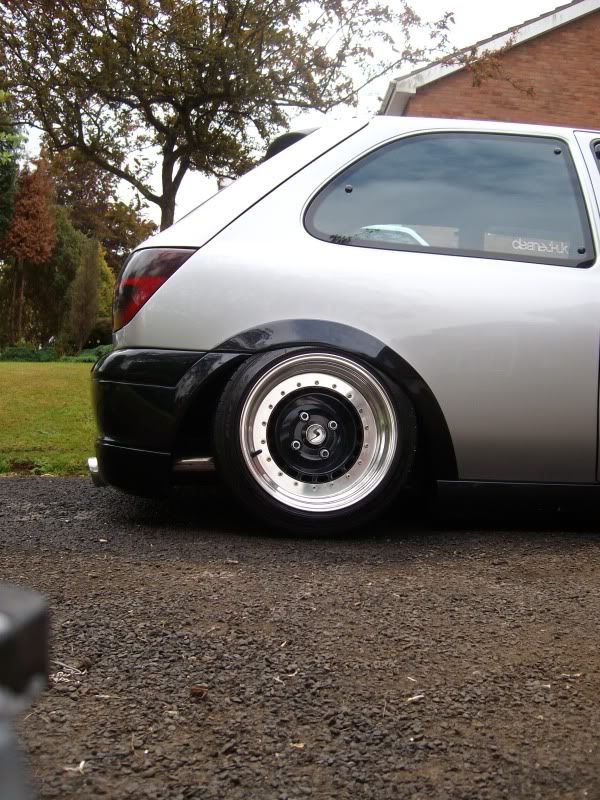
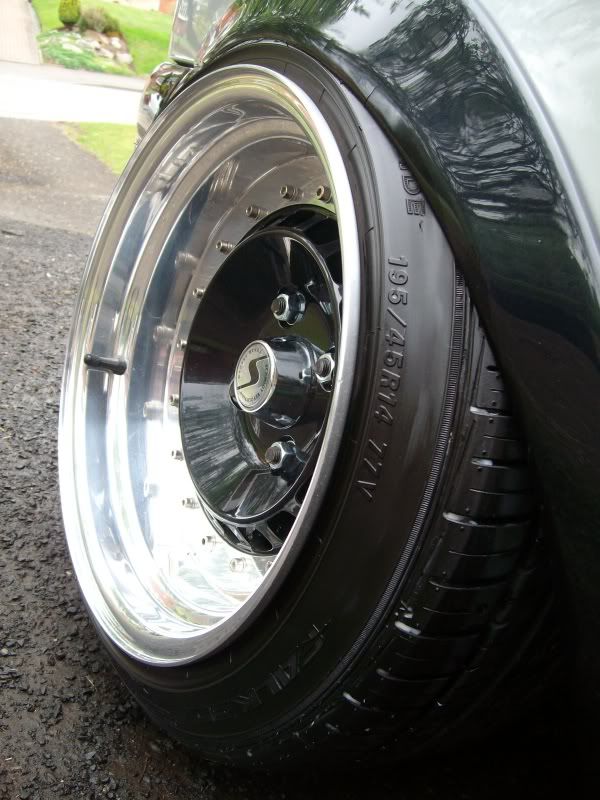
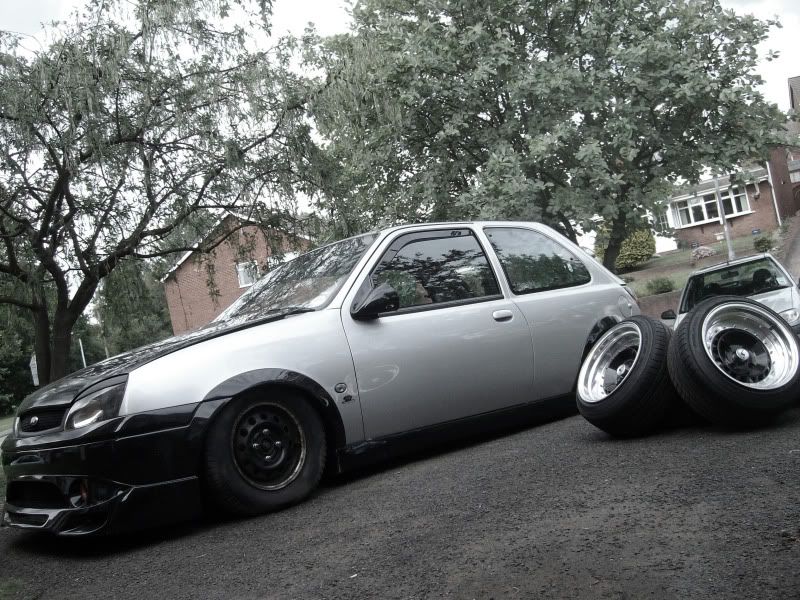
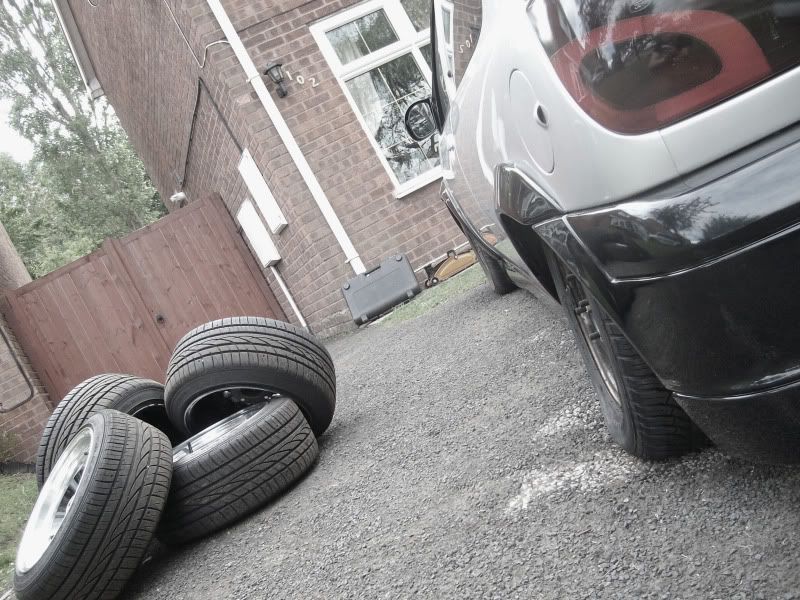
Just been to collect my new wheels.
Schmidt Th-Lines.
Powdercoated Black Centers.Image Polished Lips.
14 x 8J Front, with 195/45/R14 Falken Tyres.
14 x 9J Rear's, with 195/45/R14 Falken Tyres.
Just what i wanted it...However looking at them against the car, im now unsure :s.
We'l just have to see when theyre eventually on ay?
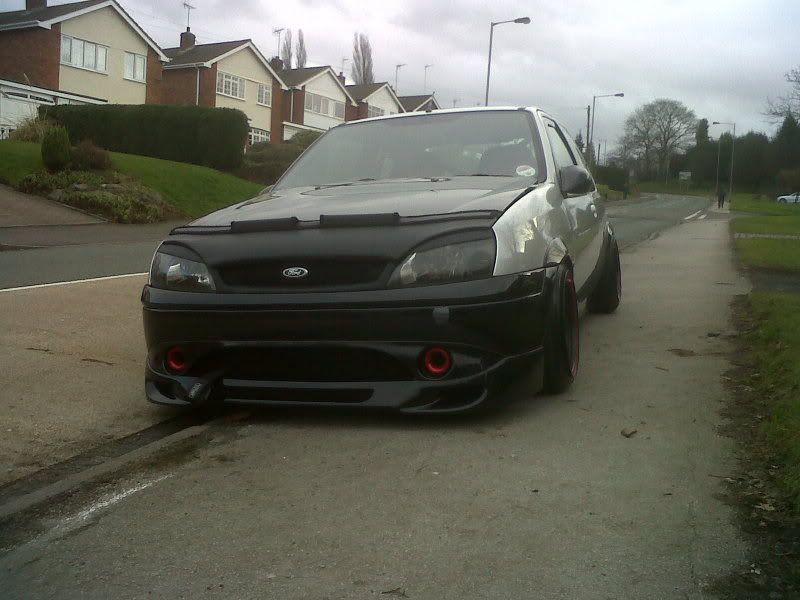
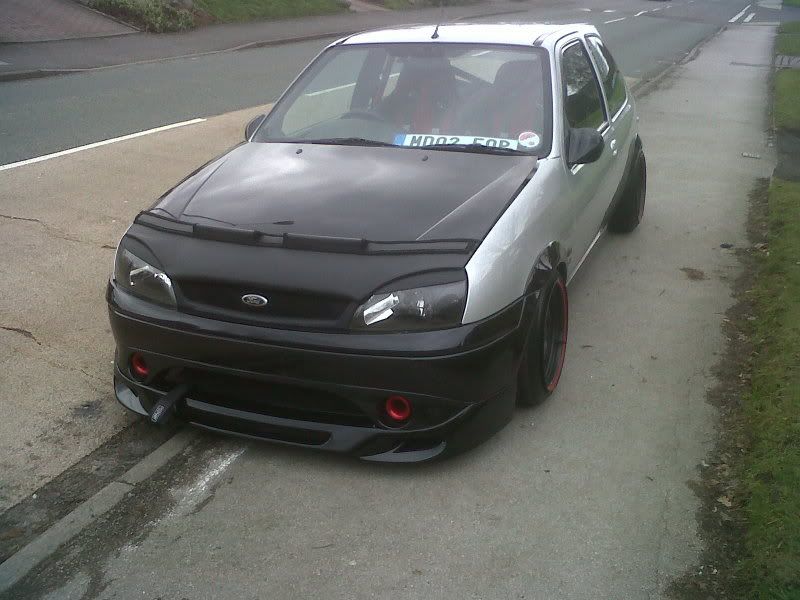
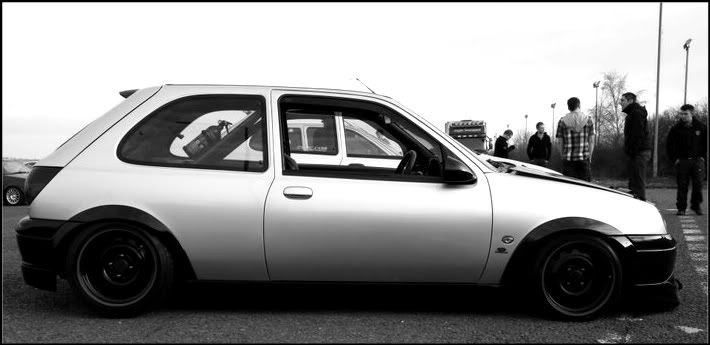
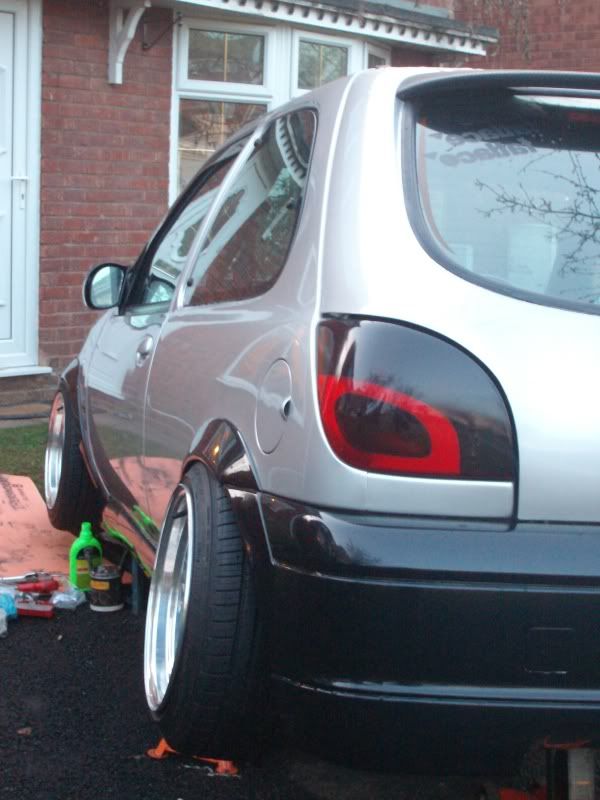
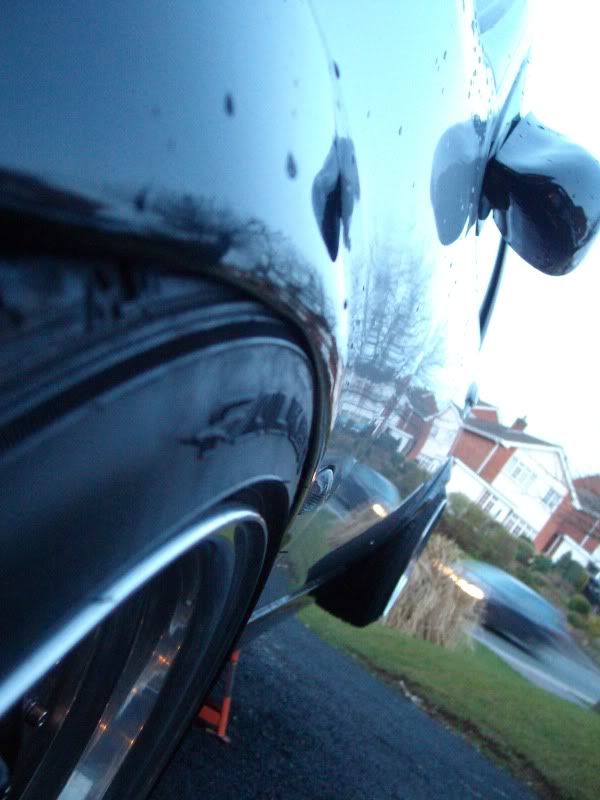
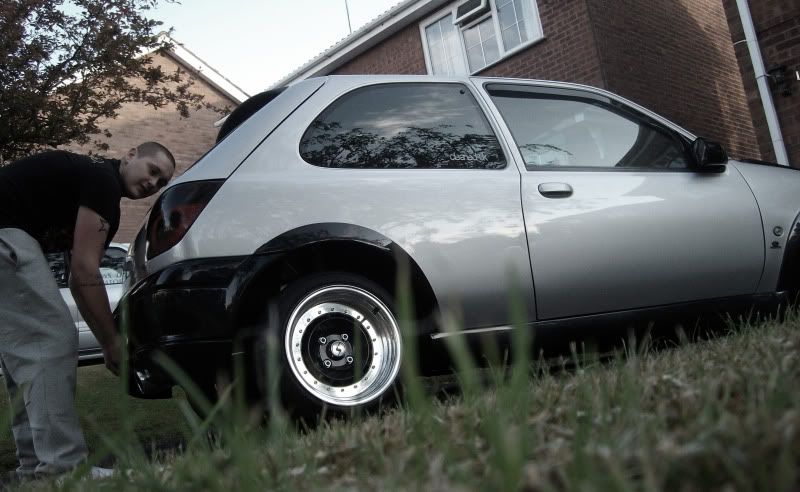
Just got in from washing the Fiesta for the ZSOC meet Monday. I thought it were about time to get some decent pictures of it. Buts lets face it, with a £50 digital camera from Asda, it wasnt going to happen. So, just some clean pictures on the curb...
We've got some Camberzzzzzzzz!
Is that light i can see under the wheel? It's enough until the schmidts go on...Then were going to have to run abit more im feeling. Scene yo!
Monday 31st January 2011.
Ok, so been to the ZSOC meet today...Car went down a treet!
Here's a few pics from the guys on the forum :D
Sunday 13th February 2011
Ok, so its been a few weeks since ive done anything to the fiesta.
Been doing some saving, and just collected my new addition to the build.
Vauxhall corsa VXR recaro's from a 10 plate car.
Abolsutely pristein condition...Booom!
Now im unsure what direction to go in.
Wether to keep the cage in the rear & run the Recaro's with my harness's...
Or to remove the cage, get some rear seats trimmed to match and go for a full on 'class' build.
Ive got to weigh up the options and see where i want to go!?
Saturday 05th March 2011.
Ok, no real progress today, but ive offered one of the schmidts up in day light, to get a rough idea of how its going to look with them on.
After abit of research on the t'internet, ive found a company that gold plates items, so im seriously considering getting the centers plated and a few other things around the car.? Dont know how its going to look though so its going to be a Photoshop tinggggg!
Even as they are though; initially how i wanted to run them, i think it looks bang tidy :)
Sunday 06th March 2011.
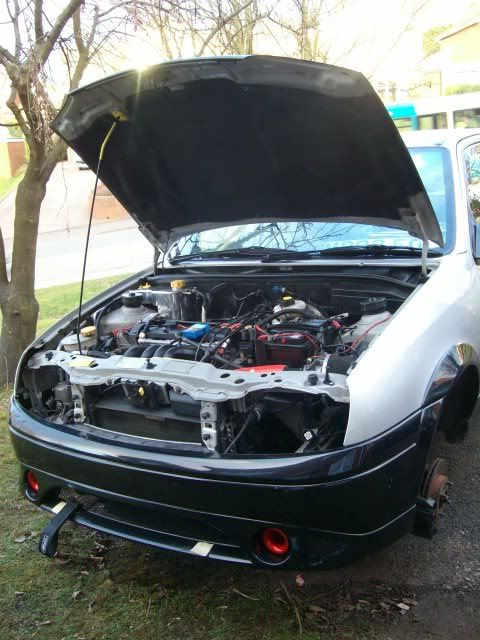
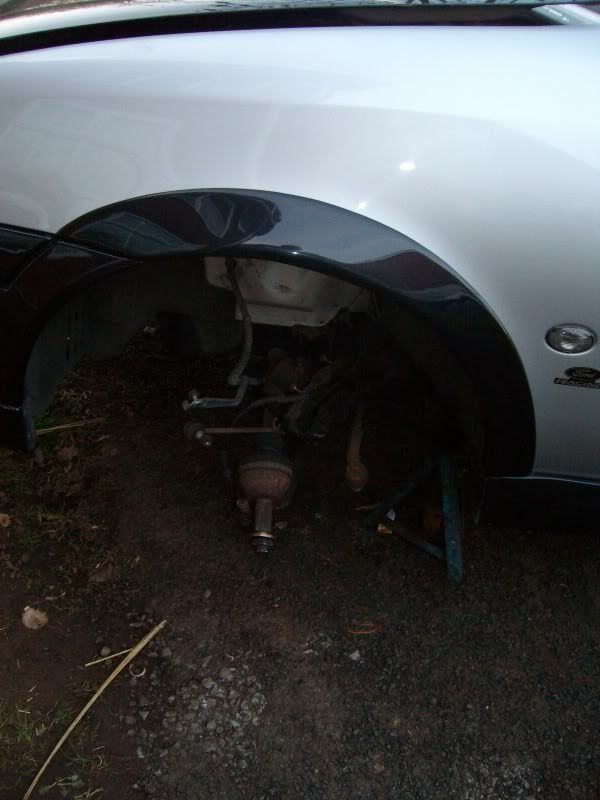
After some serious thinking over the last few days, the car isnt going to get anywhere with it being driven daily. Things are being broken due to the static drop...things are wearing. So today, ive raised the ride height, and removed the splitter so i can get it onto my drive.
And back in its new home for the forseable future...Look at the fucking height of it!. Looks shocking with the height, and the front splitter removed.
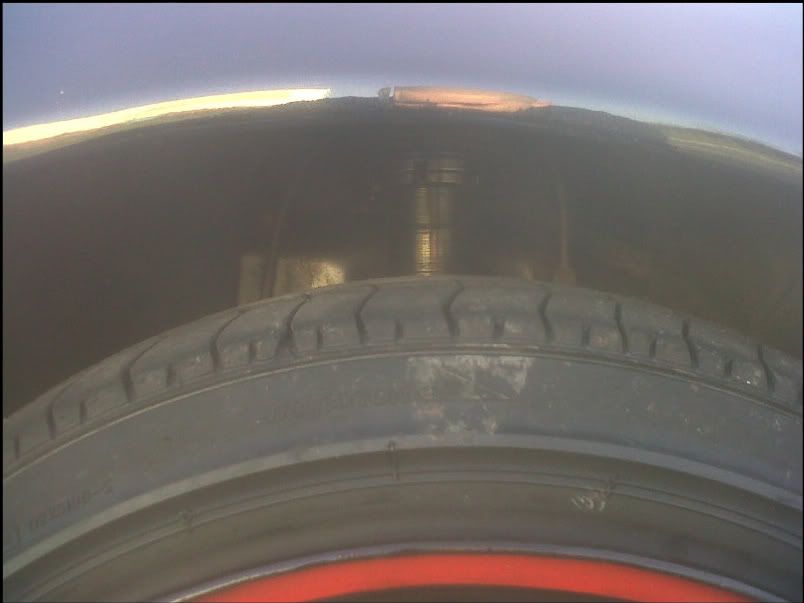
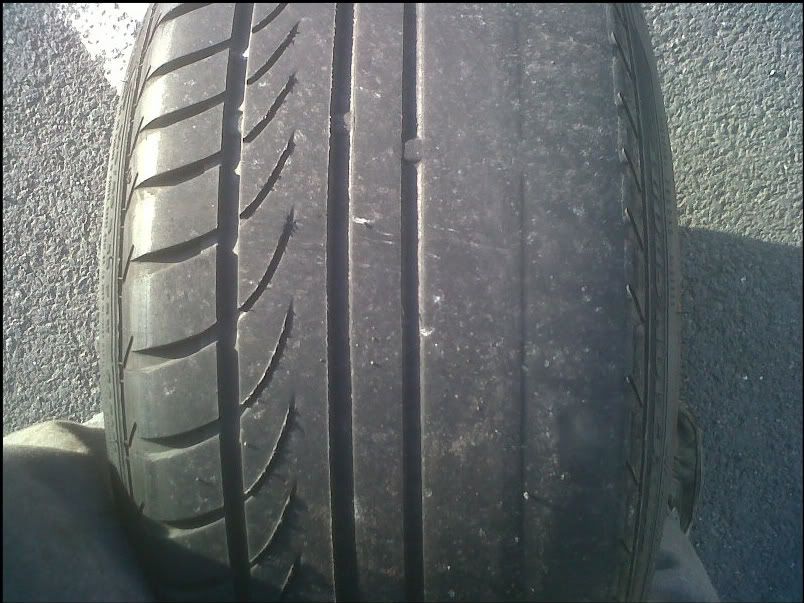
Whilst i was adjusting my coilovers, it became apparent i have been illegally rolling. Due to my camber, there litterally isnt any rubber left on the inside of the tyres...
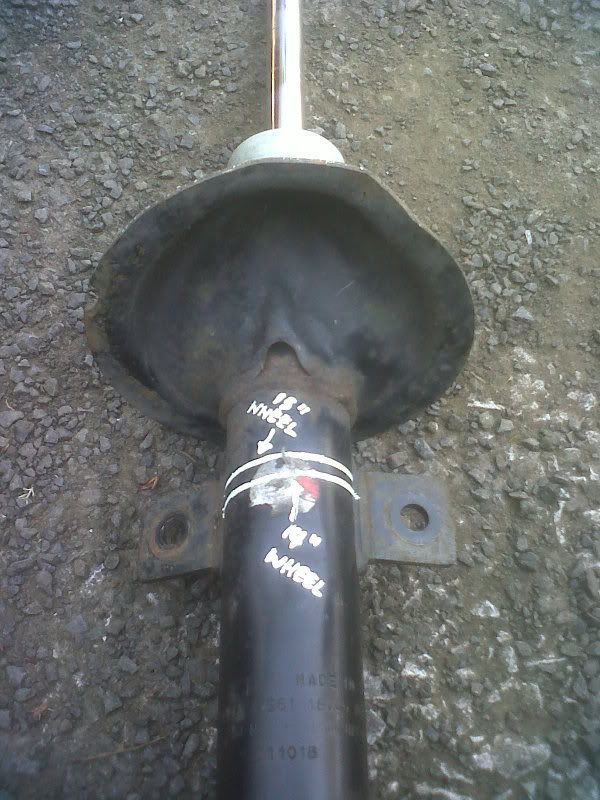
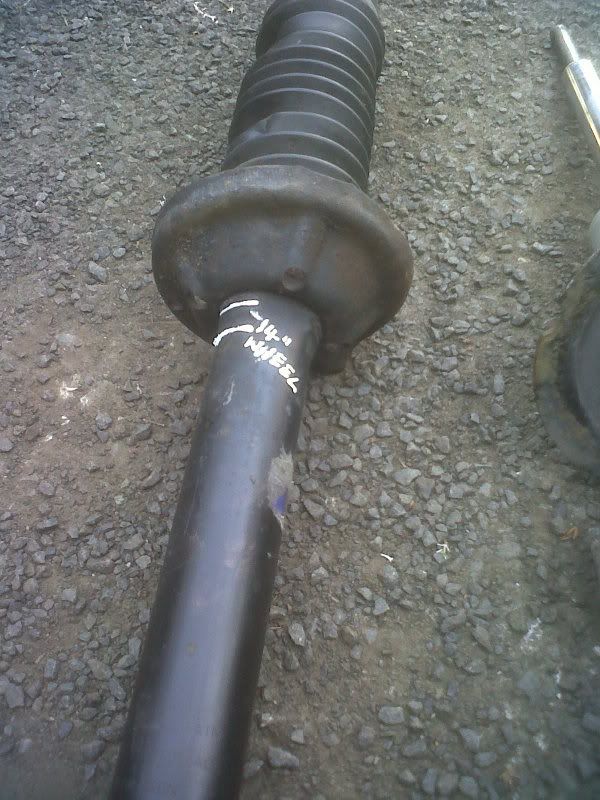
8J wheel...
9J wheel...
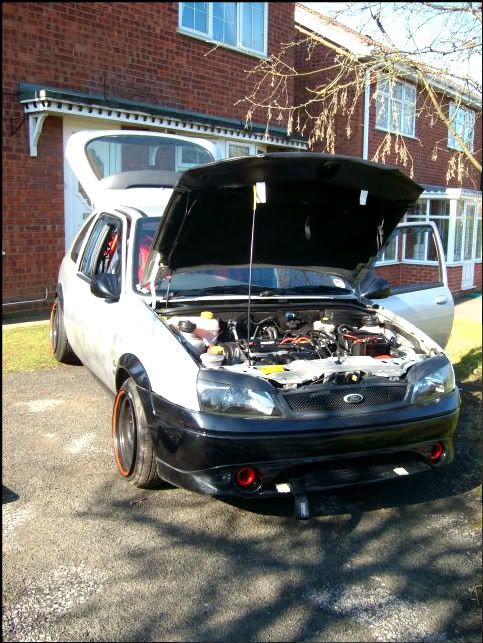
Right, so i woke up this morning buzzing that ive got a week of work. Looked out the window and i couldnt of asked for better weather. Sun is shining, birds are singing...Lets get to work :)
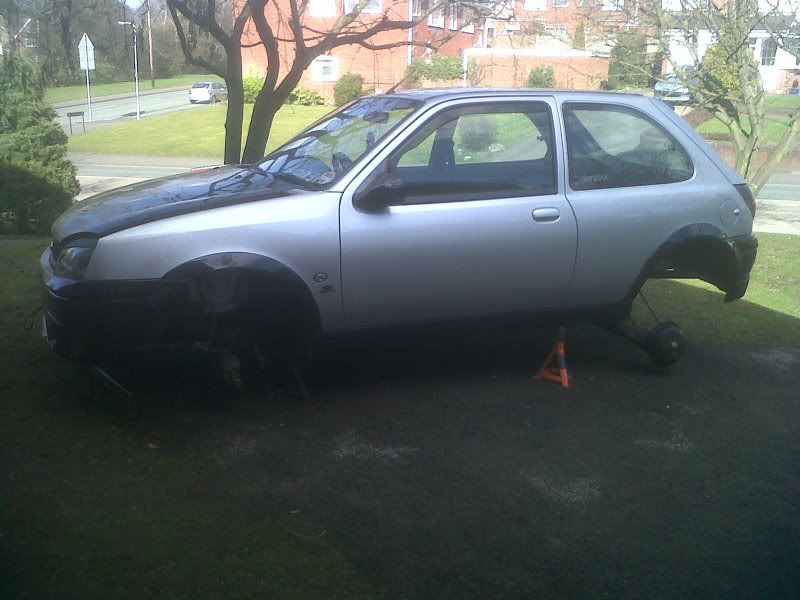
So, i went out to the car, and this is how it started off...
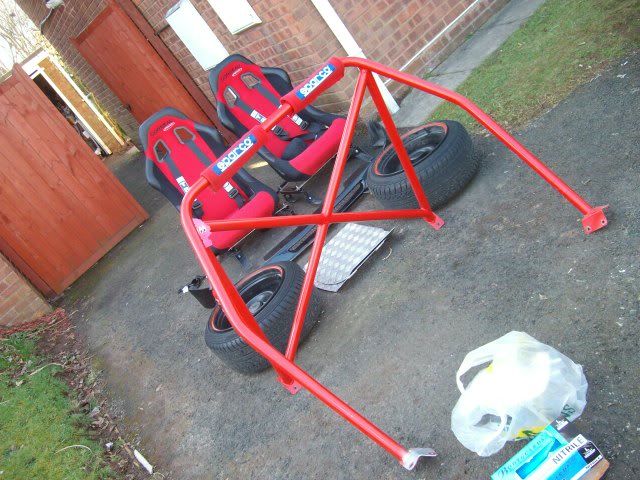
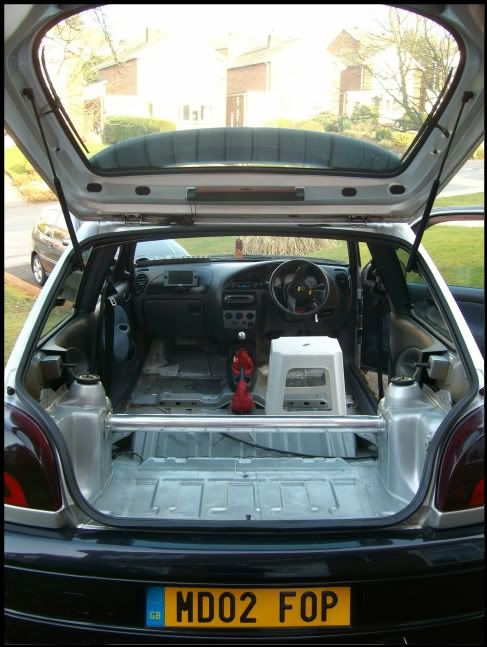
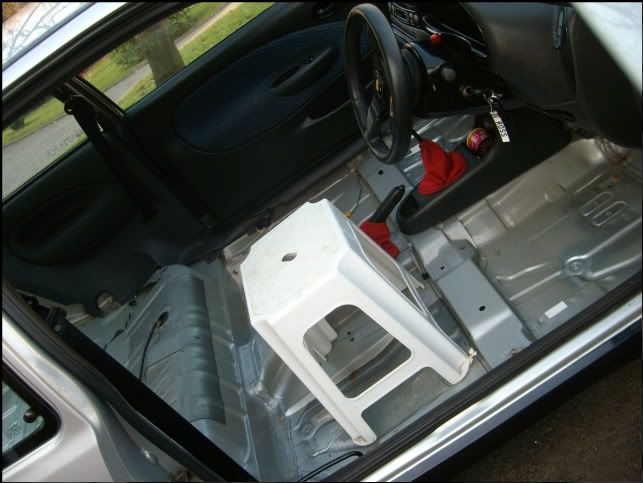
So, todays task. Interior.
I first of all started by removing my seats and harness's. Whoever had put them in used a mix match of bolts/nuts so i needed a different size spanner for each one. Sound.
Notice some of the surface rust in picture number one. Ill be sanding this down maybe tomorrow or wednesday, and giving it a coat of hammerite. It wont need any major work as its only surface, and with the interior being stripped has just made me wonder wether its just of water sitting ontop of the chassis. Nothing to worry about, and its just for peace of mind for when the carpet goes down :)
Ok, so with the seats and harness's out, it was time to remove the cage :)
Bit of a pain to do myself, as i couldnt reach into the arch and inside of the car at once, but i managed to sort it :D Boom!
Then i gave the interior a good hoover, and clean. Unfortuately i have no pictures of this, but its just a clean bare interior chassis :) Ok, so thats todays tasks out the way, but with the sun shining, and the heat still burning me, i couldnt pack away just yet. So, seems as the car was dirty, i gave it a quick wash...Something i probley should have done first. Dont want to let the dirt sit on it whilst its just sitting on there do we Briannnn!
Then i thought it would be rude not to give the drums a quick paint. You wont see them through the wheels, but its just something i wanted to do.
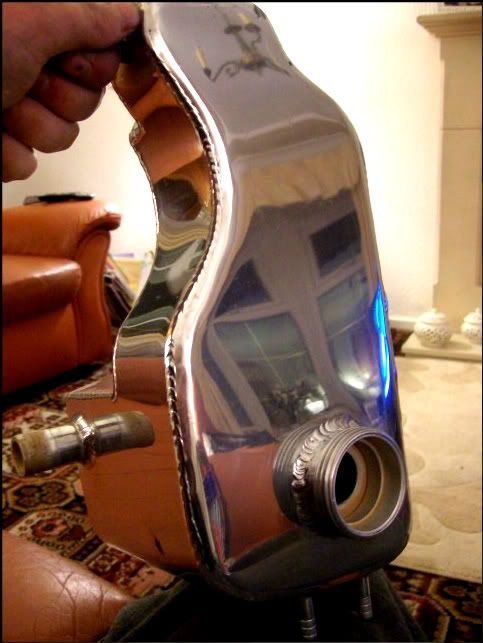
Ok, so its now just gone 9Pm and ive just been polishing my new Radtec alloy header tank watching Coronation street with a bottle of Stella. Only a quick picture to show the relection so far, it still needs a lot more elbow grease. Im using my moms Brasso at the moment, but ill have to go get some Autosol tomorrow, as the fine grit in there should remove some of the imperfections on it.
Tomorrow's efforts, ill be removing the Fk Silverline coilovers, cleaning all my wheel arches/liners, painting my calipers and fitting my new header tank :)
Tuesday 08th March 2011
Ok so im fucked. Just absolutely nakered.
I really havent got alot done today, but ive done abit.
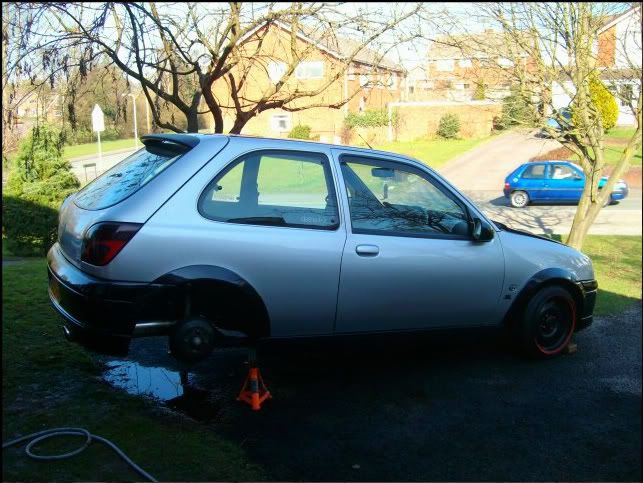
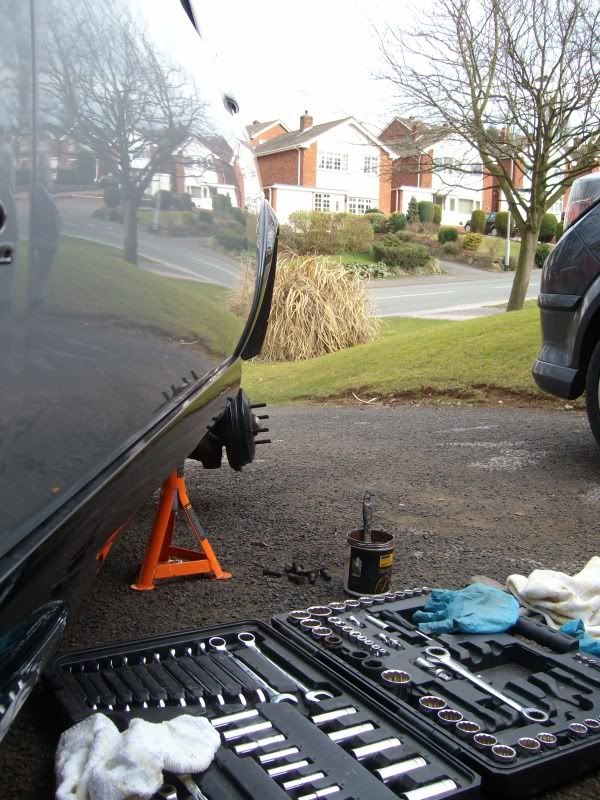
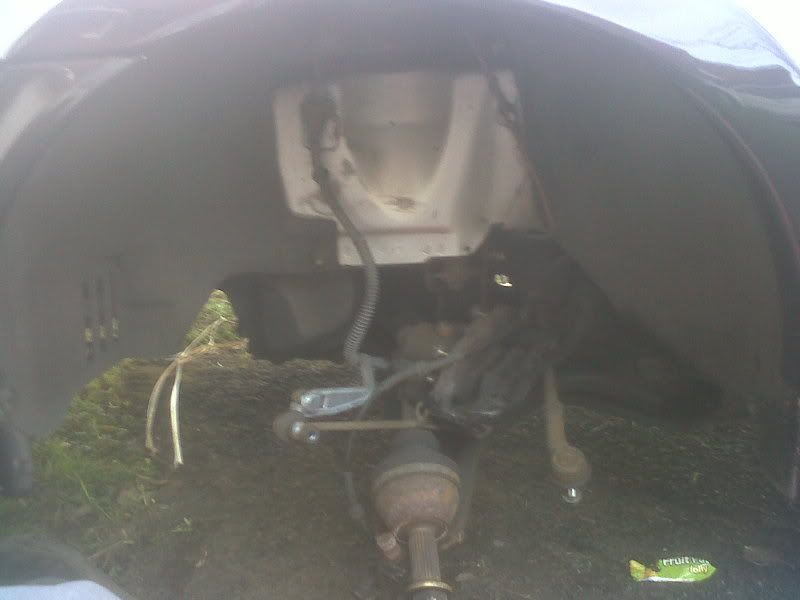
First of all, i tried to get the front on axel stands, but the rear axel stands started to tip. Where the car was parked i had no chance of getting the front in the air, so i had to turn it round to face the other way. But with no seats in to drive, it proved a little difficult. So we compromised...
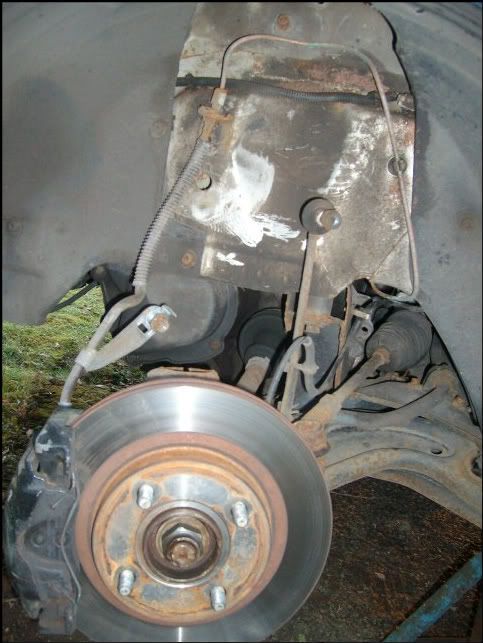
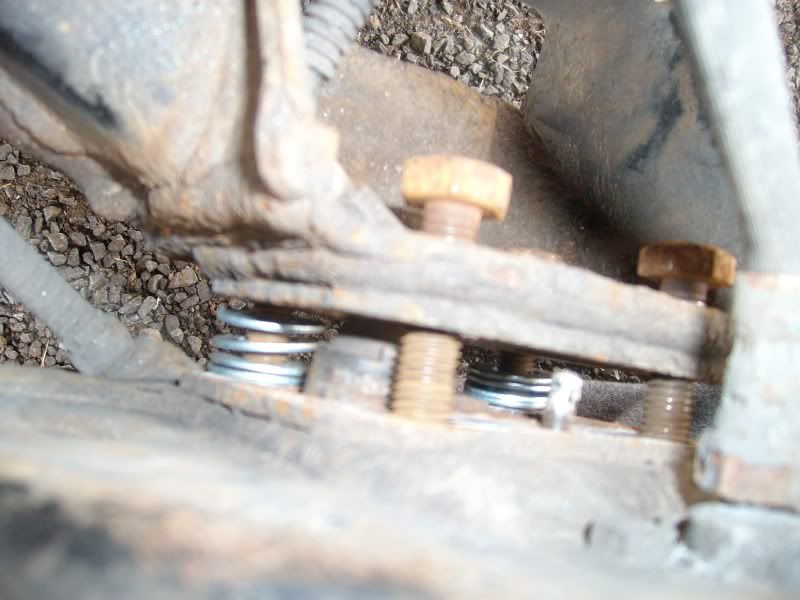
Ok, so with the car turned around, and the front off the floor. It was time to remove all 4 wheels, and remove my coilovers...
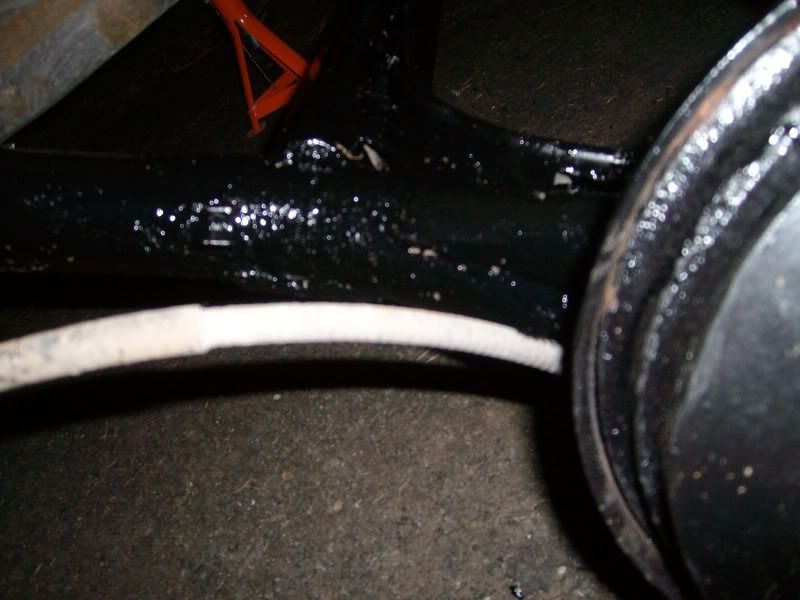
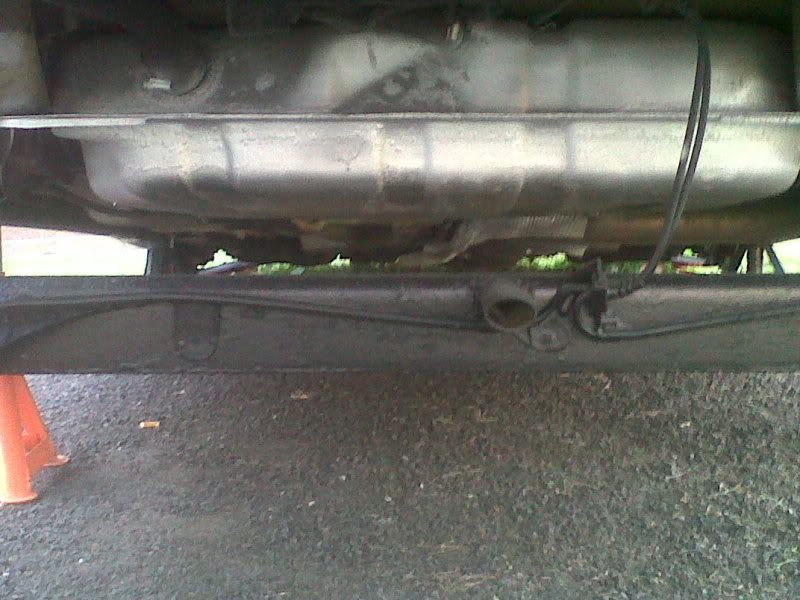
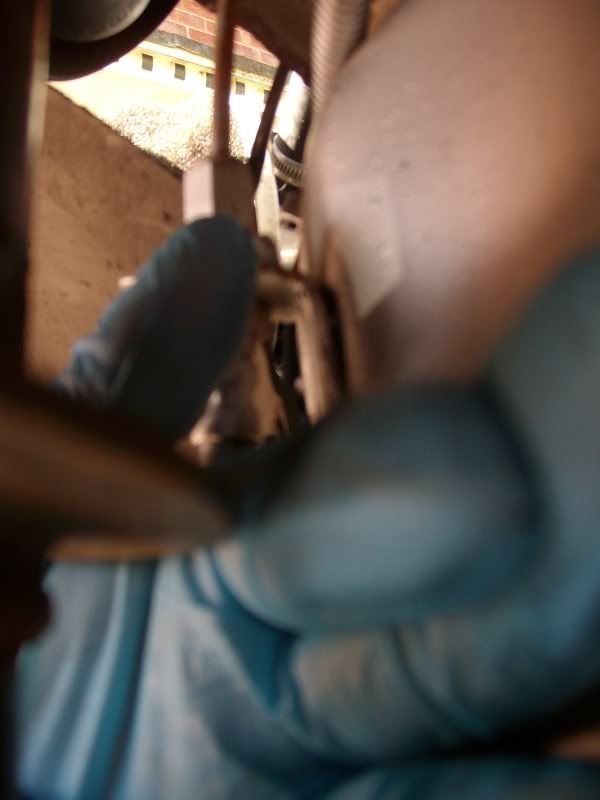
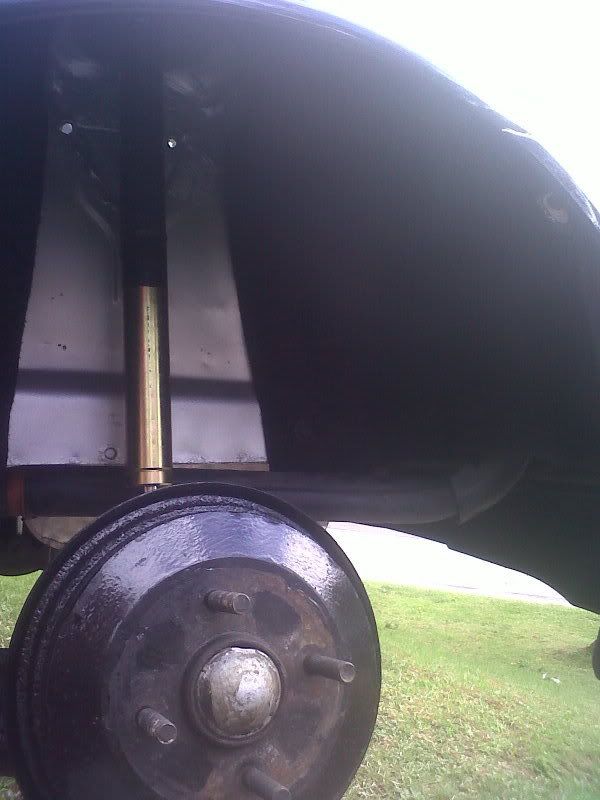
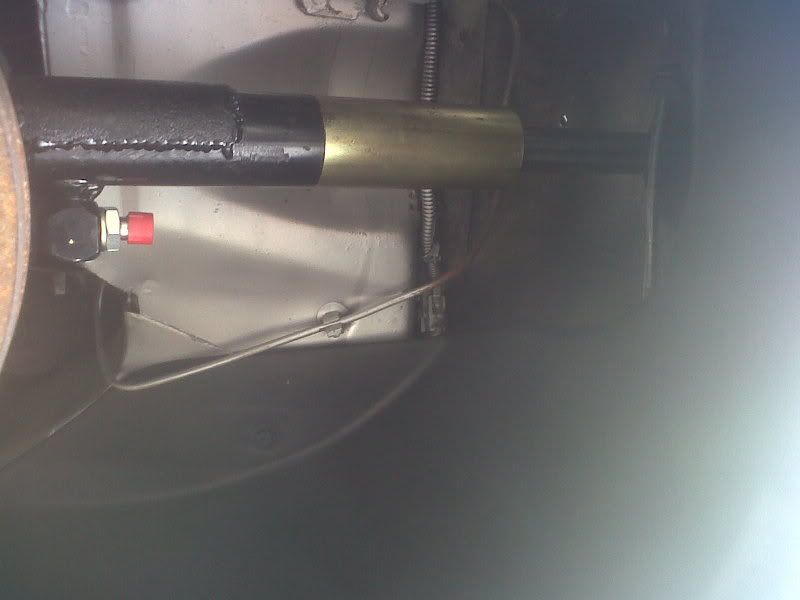
When we were removing my coilovers, we noticed that both front brake lines had a split in them. They had been rubbing on the inner chassis leg (Notice just above the gearbox, you can see the rub marks...) This could have been seriously dangerous, so its a good job ive decided to do what ive done now. Even so, its a good reason to get some braided Goodridge on the blend yo!
So the night dark was starting to come in, and i wanted to try and get my polished header tank on the car. With the coilovers off, i made a start. With the old one pouring coolant all over me, and refusing to come off the braket on the O/S chassis leg, it eventually came away to make way for the polished header tank :p
Now non of the hoses fit correctly, due to the hose clips not gripping it perfectly, so im going to try and get some jubilee clips to clamp them down better tomorrow. Also if you notice on the right hand side of the tank, theyre's another port coming off to run a whirl pot. Something im not planning on doing, so ill have to get some piping tomorrow to block it off.
Still, looks PIMP though..The bay needs a good clean, and the wiring needs sorting and tidying up but all in due course!
All sorted for today, and how the cars now going to be sitting for the next considerable months! :)
More updates tomorrow! :)
Wednesday 09th March 2011
Ok so i woke up with the intention of working on the car again today.
First thing though, was to package up a few items ive sold from the car and head to the postoffice.
However once i got home the weather didnt hold up and its started to rain. :(
Im not going to work on it today, instead do abit of research into my suspension. I literally want the car to touch the floor, so choosing the right kit is essential. Also the choice of air or hydraulics is something else ive got to consider. Ill be on the phone to Rayvern in abit if they answer the phone as all ive got all day is the answer phone, to discuss this further :D
But for now, just three pictures from a Cleaned-Uk meet 2 weeks ago in Northampton.


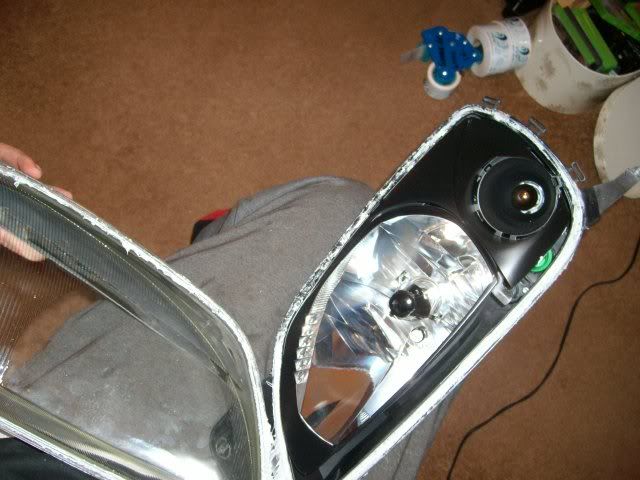
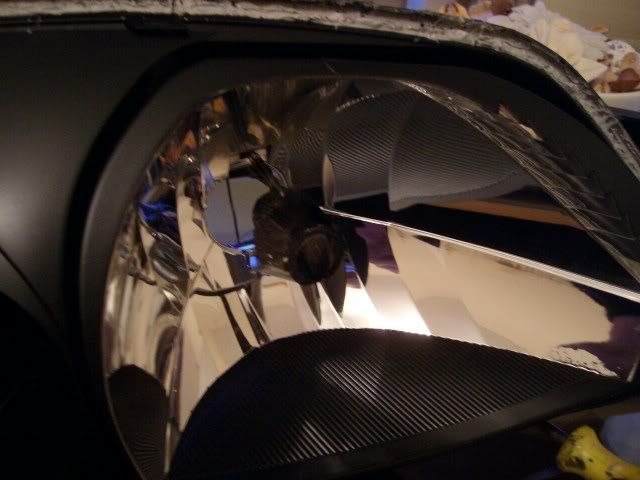
So today, ive concentrated on my headlights & Wiring.
First of all was the headlights.
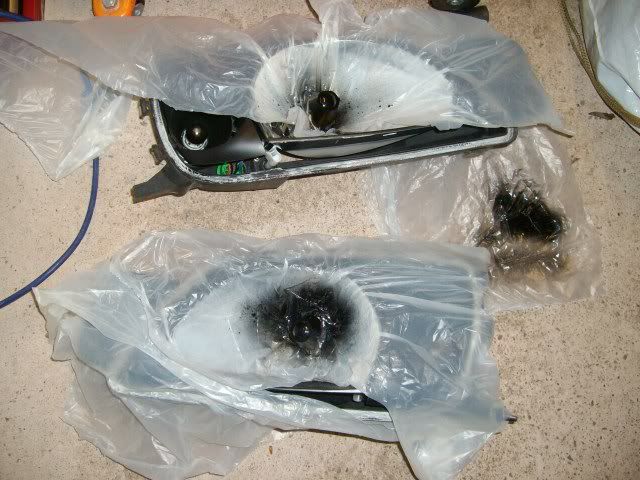
Whoever had split the headlights previously, had painted the headlight black, however permant marker coloured in the center of the headlight! WHAT A JOKE! So, first of all was to split the headlights and get these painted...
And if you look closely here you can see the colouring in...
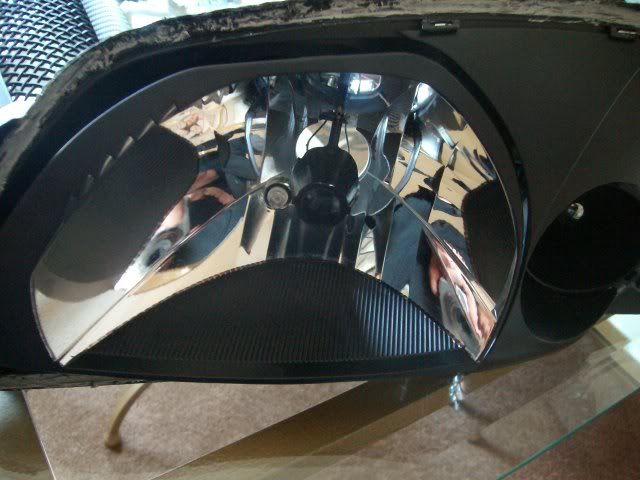
So, With them masked up and two layer's of Volkswagen Metalic black were looking a million times better!
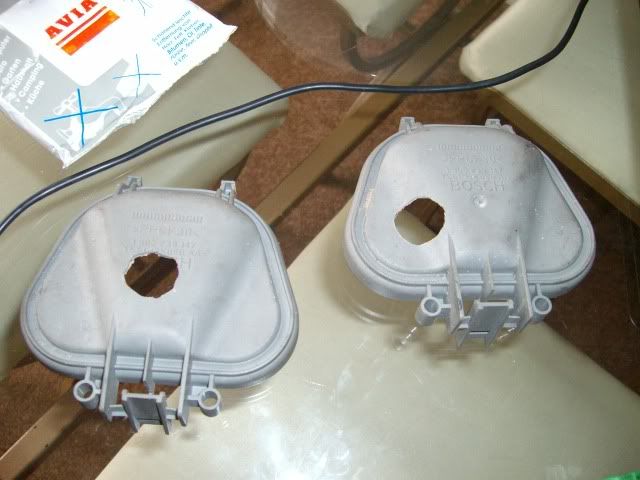
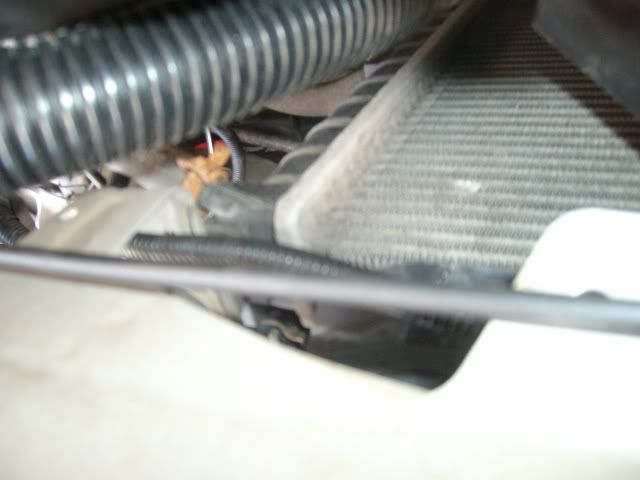
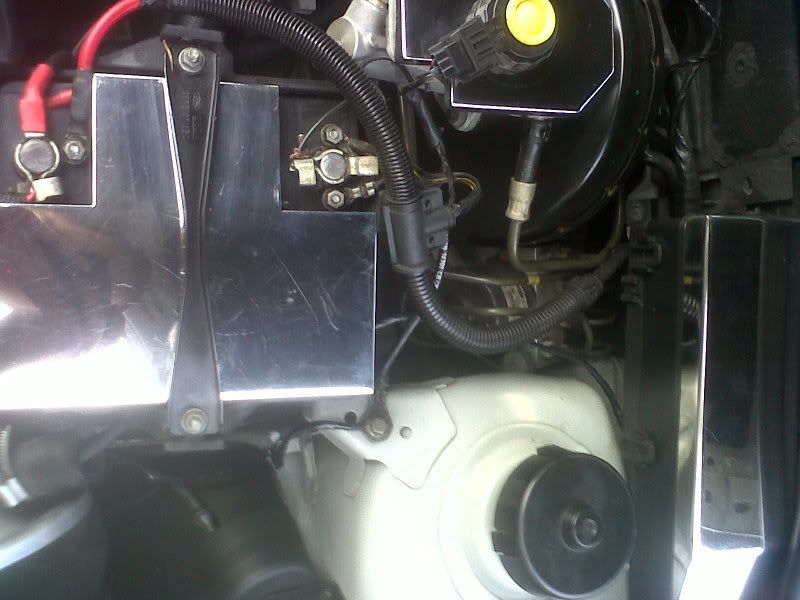
Ok, so now with the headlights back together, i then tackled the rear of the lights. Origionally the HID wiring was just poking down the side of the cover. I therefore to make it abit more comfortable, cut a hole in the back of the casing to pass the HID wiring through. To keep it fresh in there, and stop it steaming up, ive included some saches from a fresh pair of trainers. This should keep it fresh and stop any mishappens.
Sorted. I then turned my attention to the wiring in the car. The origional ballests etc and all HID wiring were just slapped ontop of engine components, and with me going for the cleaned look, wanted to get asmuch hidden as possible. So ive decided to tuck the ballests and wiring away in the flitches/arches etc where theyre not visable.
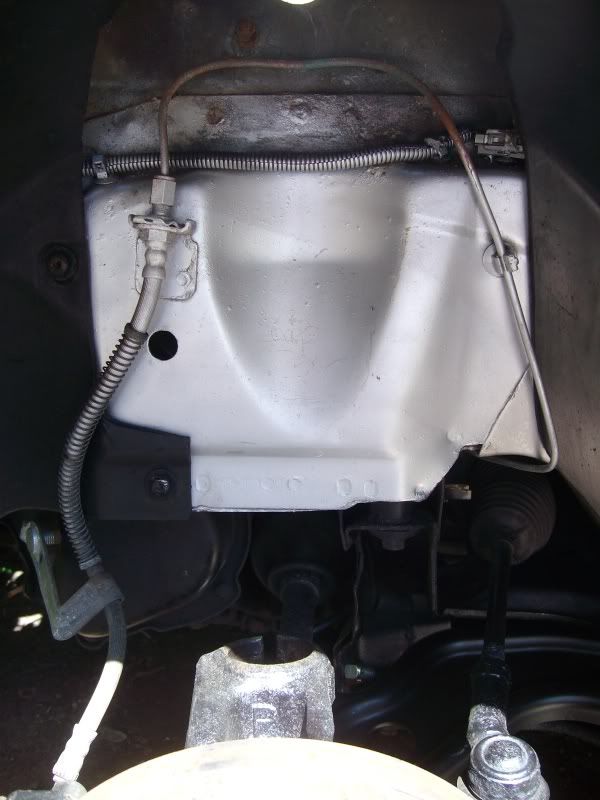
First of all i started with the O/S. I ran the wiring from the N/S under the slam panel (above the radiator) and then down into the flitch. The O/S ballest location with some of the wiring routing.
Ran across the top of the radiator, under the slam panel.
Then the high/low bean control box taped to the loom.
The new Ballest location...
And as the O/S wiring looks now...
and the O/S Wiring location...
And a fully tucked HID wiring bay :P No ballests or random wiring floating about...
Friday 11th March 2011.
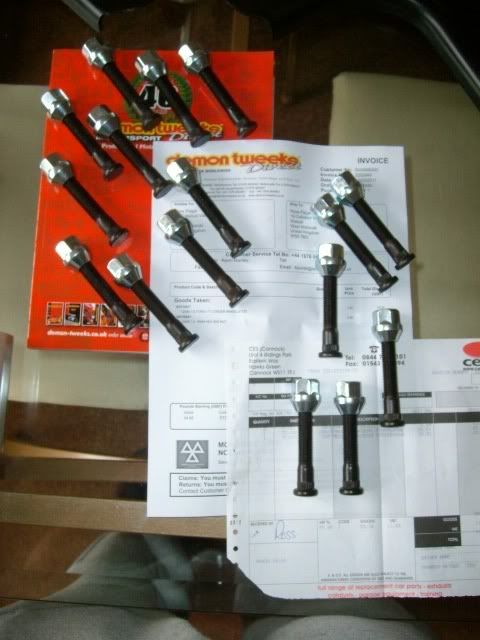
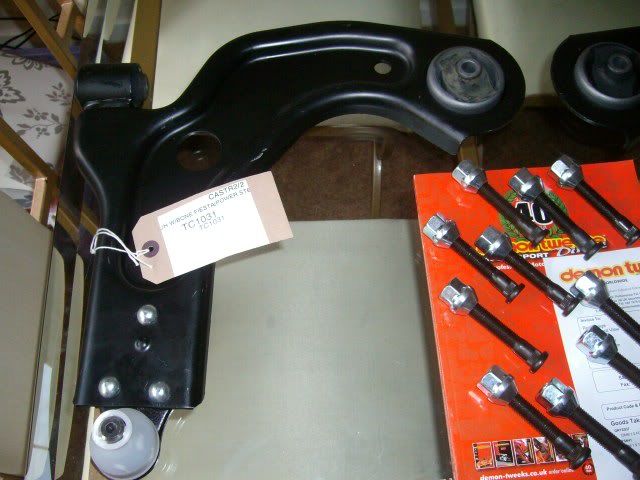
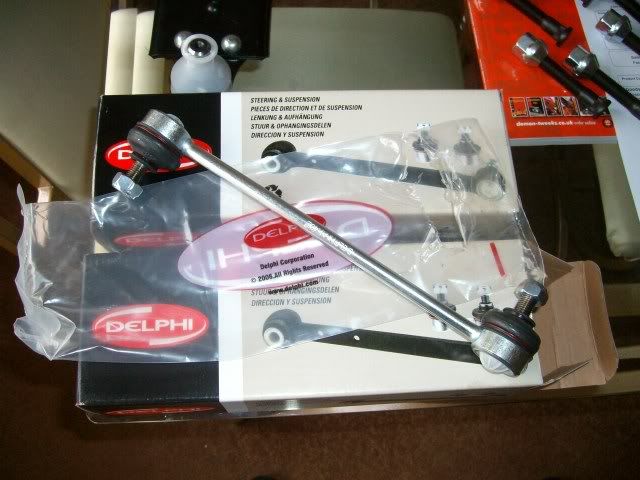
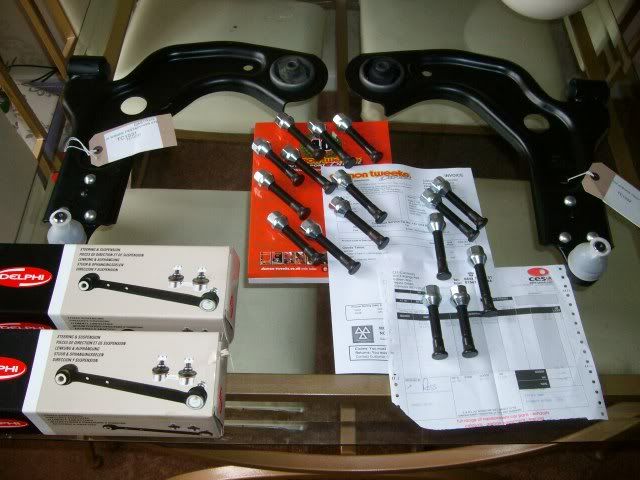
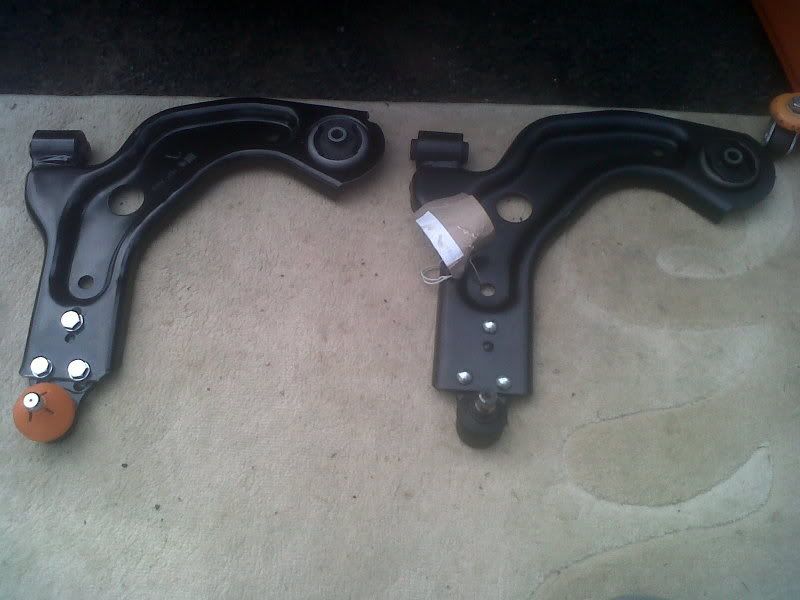
Ok, so today ive decided ive kinda reached a wall with what i can do next with my car. So i decided to take a day out and go to Demon Tweeks in wales to go collect a few more bits :)
Picked up my Motorsport Stud Conversion, my replacement lower arms & my replacement droplinks.
Stud Conversion..
Lower arms
Drop Links
And the whole lot together, todays purchase's!
Saturday 12th March 2011.
Ouch, ive just hit my head on the fireplace plugging in the laptop charger.
Yes lump, how are weeee!
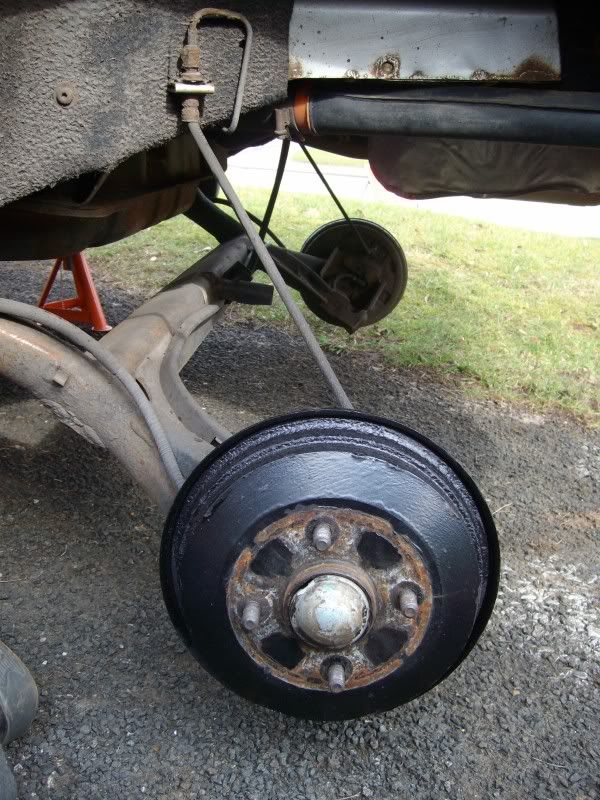
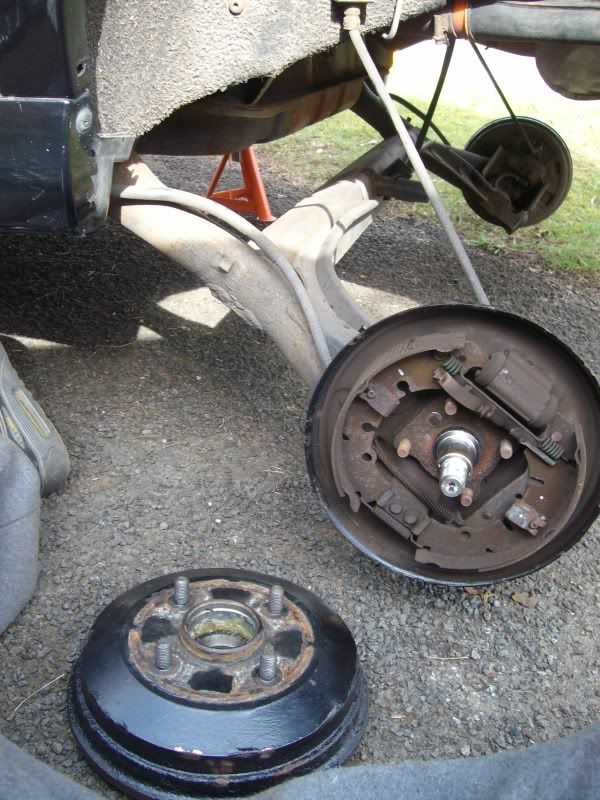
Today, ive fitted my rear stud conversion & cambered the rear wheels. :)
So, as we started off, the drums and axel.
(Please note, yes that is the brake lines holding the beam up. The front ones are fucked and ive ordered some goodridge ones, so it really doesnt matter if these break.)
So, first things first, to get the drum off....
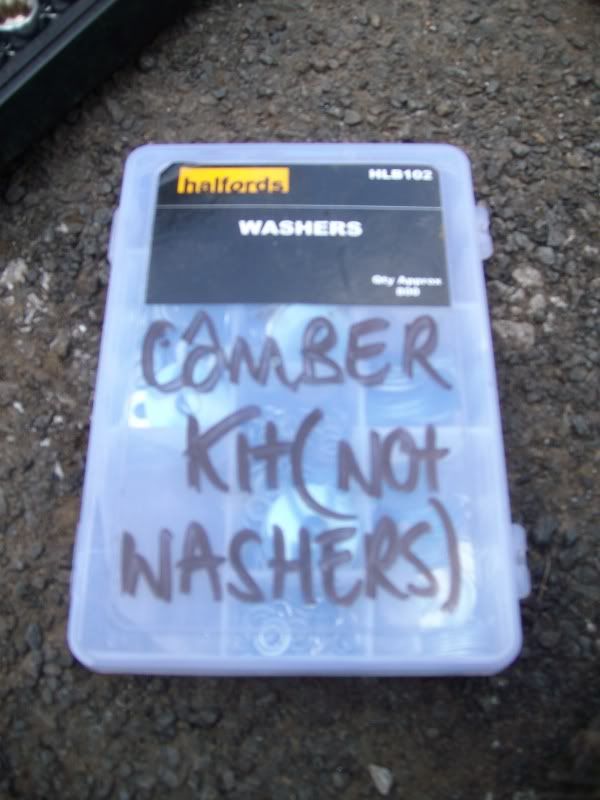
Ok, so before i replaced the longer studs, i decided to tackle the camber. So out with the washers, sorry i mean camber kit...
So, alot of people slate obtaining camber with washers, however ive seen it used within the motorsport industry. Im not going to go into it, but after many camber shims ive seen broken, and having used this method in the past decided it the route to go down.
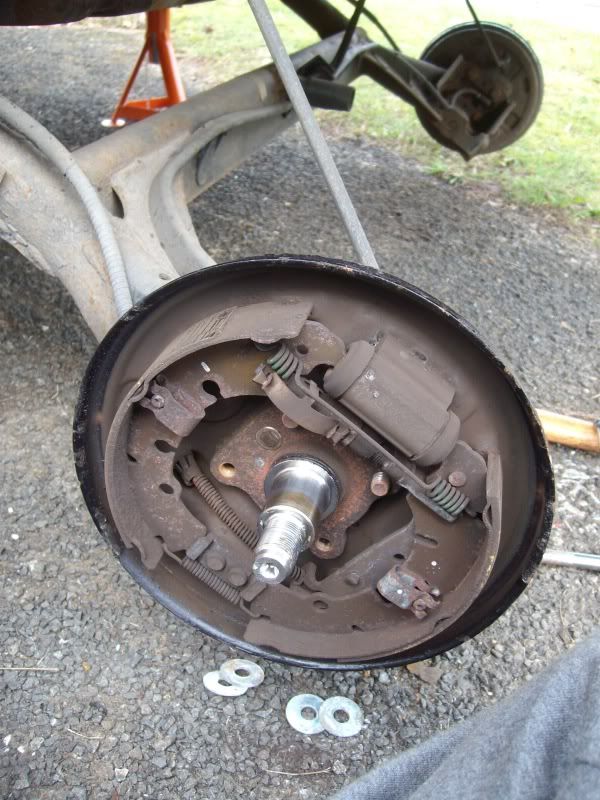
Ok, so i wanted some Crazy camber, so decided to push the boundries with 8 washers in the stub axel, 4 either side.
So once the stub axel above was all tightened up, it left the stub axel at a serious negative camber. I then decided to press my new studs into the drum..25mm longer than the origional studs that should allow me to run a 10mm spacer if needed and still have plenty of thread left to hold on the wheel.
And all built up, gave a nice stance to the hub :)
I then repeated this procedure for the other side, and then thought it would be rude not to try my rear 9J wheels on. So, on they went, and i jacked the beam up to get the stance the air ride is going to give...
So with the offset on the wheels, the camber id just applied this was the end result!
Looking great i think...And the idea of running a 10mm spacer on the rear is slowly dissapearing after admiring a stance like this...Perfect in my opinion! .Maybe a 5mm one just to poke the tread right to the edge of the arch?
Monday 14th March 2011.
So ive returned back to work now, so progress is going to be as and when in the week until i have the weekends off to get to work! I also get payed friday too, so it means ive got a few more spondooooolies to spend on frankie :) Well id like to say that, but after tonights efforts my money's pretty tied up :(
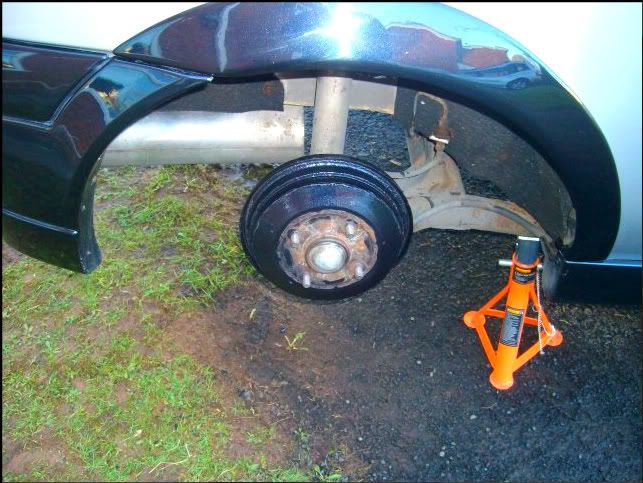
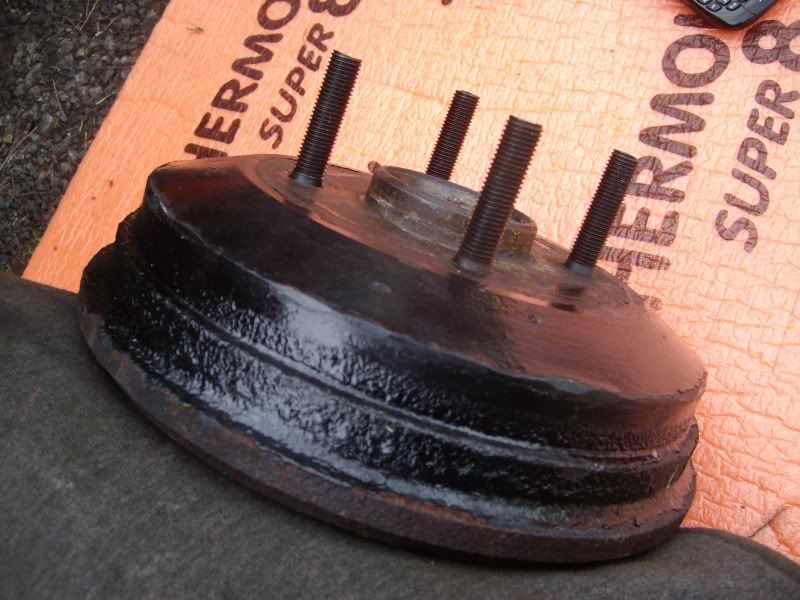
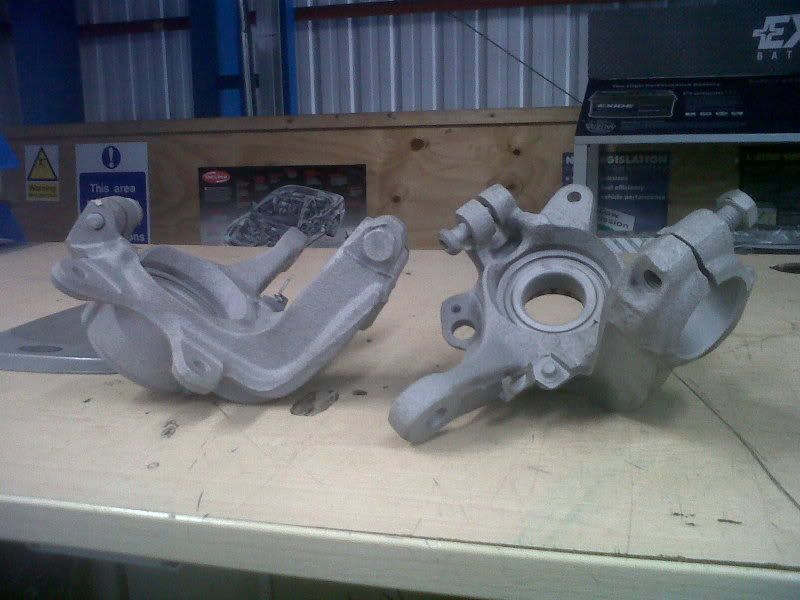
So, i finished work, got home and decided to strip the hubs off my car , ready to fit the new studs on the front. All came off fine apart from the ABS sensors. They look like the origional ones, and were stuck to say the least. First of all the 8mm bolts that help them onto the hubs were rounded, and secondly the sensors had corroded themselves to the hubs and snapped as soon as i attempted to remove them.
Pricing them up on the internet, genuine for ones are £139.99 each for the front, and £169 for the rear ,so ive really dropped a clanger there.
I thought when i origionally purchased the car that it was a well looked after car, with excellent mechanics etc, however upon inspections and the rebuild, its shocking. Looks pretty at a glance however needs alot of work to get it mechanically sound and looking well. Kinda feel like giving up, ringing the tat man and making a loss. However once its all done, ill have a car that will have 100% mechanically been rebuilt, 100% perfect, and up to show and shine winning standards.
Anyway, enough chatter, here's this evenings progress...
Removal of the front hubs..
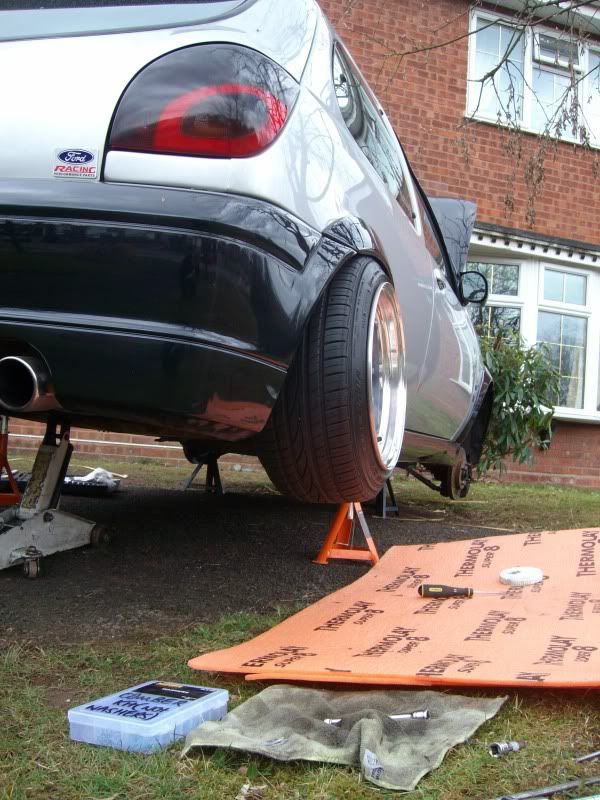
Both the front hubs were off, i then decided to paint the rear beam and get it looking better...
I need to give the rear beam another coat of paint tomorrow, going to do it with an aresol though i think aposed to the black paint on hammerite i used this evening! Ill also be painting my arches and removing the arch liners for a good clean :)
Tuesday 21st march 2011.
Not much has happened since my last update. Purley finding the time amongst other commitments, and the financial part of it has slowed me down alittle, however this doesnt mean ive seased progress!
As i bought my new replacement lower arms, i decided the weekend to remove the old shagged ones...
So as i went out to the car, it looked like this....
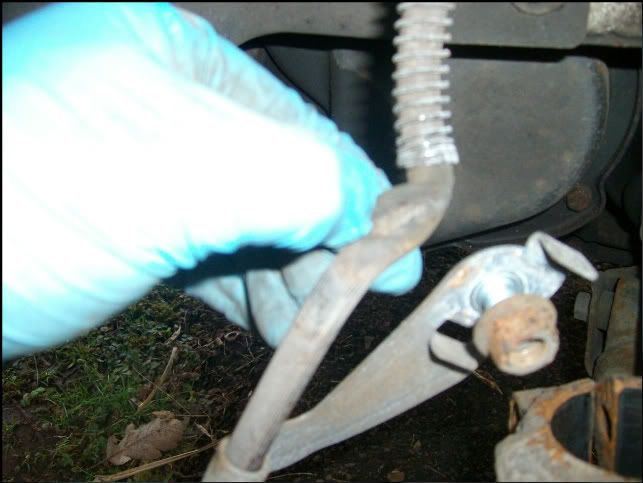
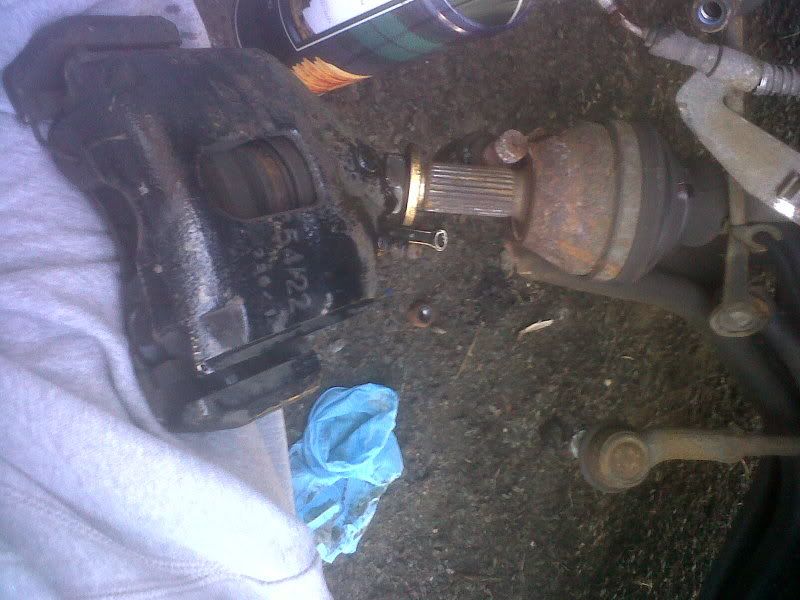
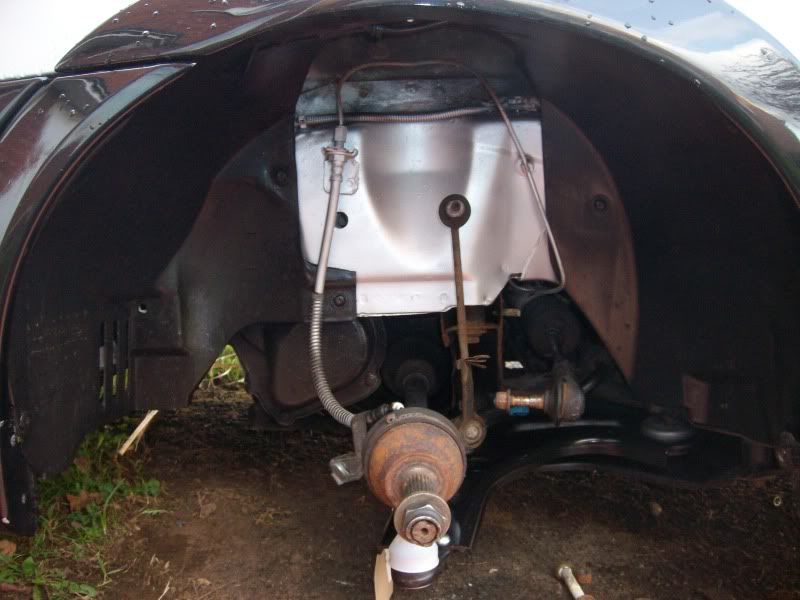
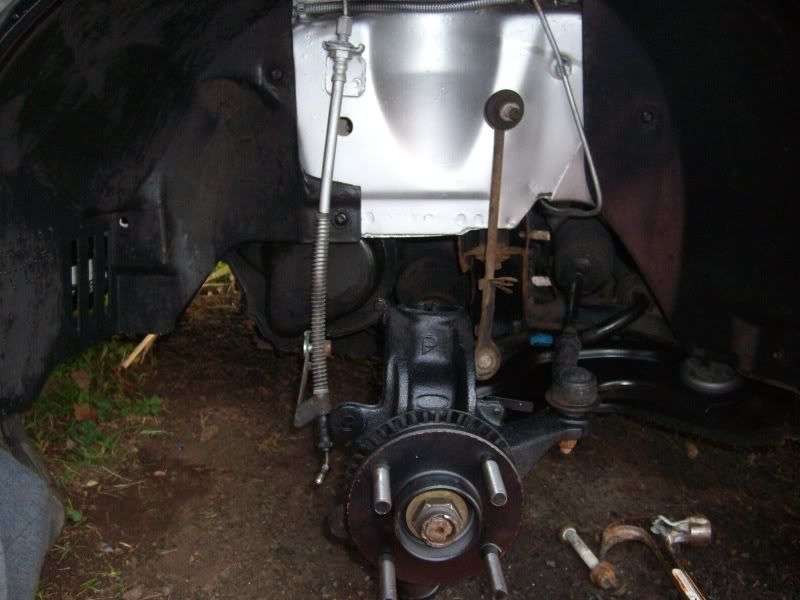
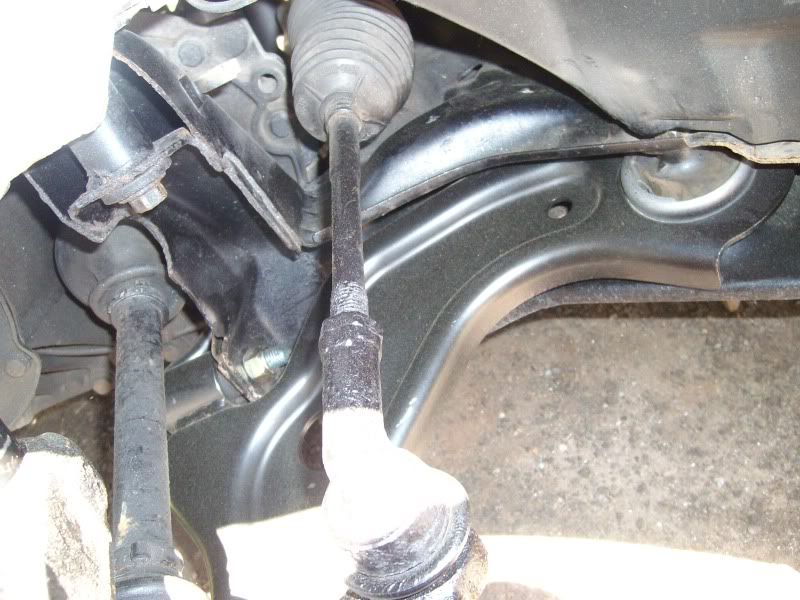
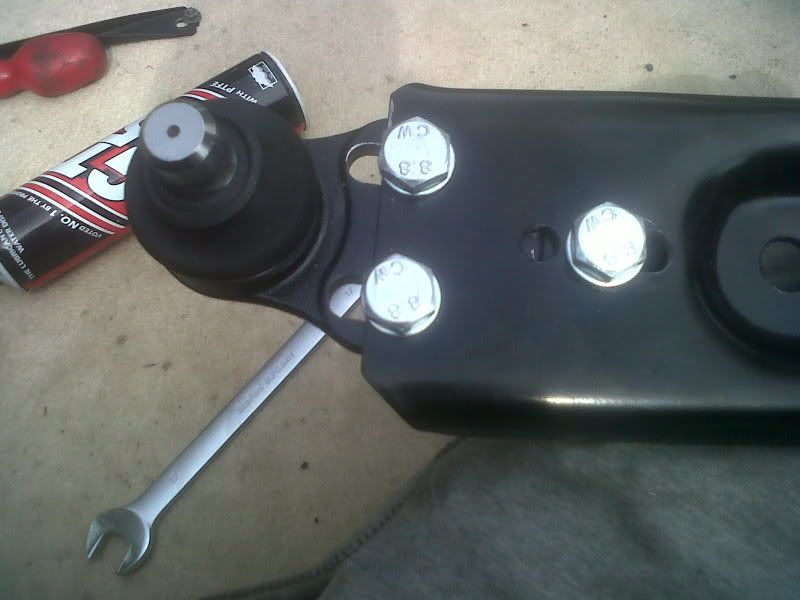
So first things first, i removed the caliper(s) and arch liner(s)....The calipers ready for paint, and the arch liners so i can look at what needs modifying for me to be able to touch the floor with the car ;)
So with the caliper off, it was time to get to work whopping the bottom lower arm off :D The O/S came off within about 5 minutes as you'd expect only removing two nuts and bolts, however the N/S had other ideas.
The front lower arm bolt, had taken an impact at some point, and had managed to bend within the bush. Therefore meaning i couldnt remove it. Hammering it, smoothering it in WD40, heating it up...No. It wouldnt have any of it. Therefore i took serious action with an angle grinder after a hour of messing about.
So, the pain of a bolt in question...
...SO all painted up fresh!..
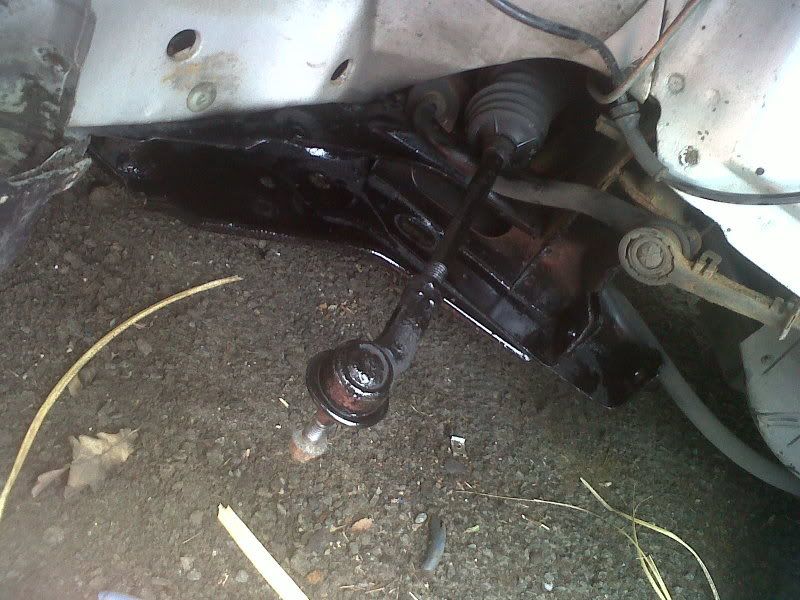
And one with the track rod all painted up too :)...( Still wet mind..)
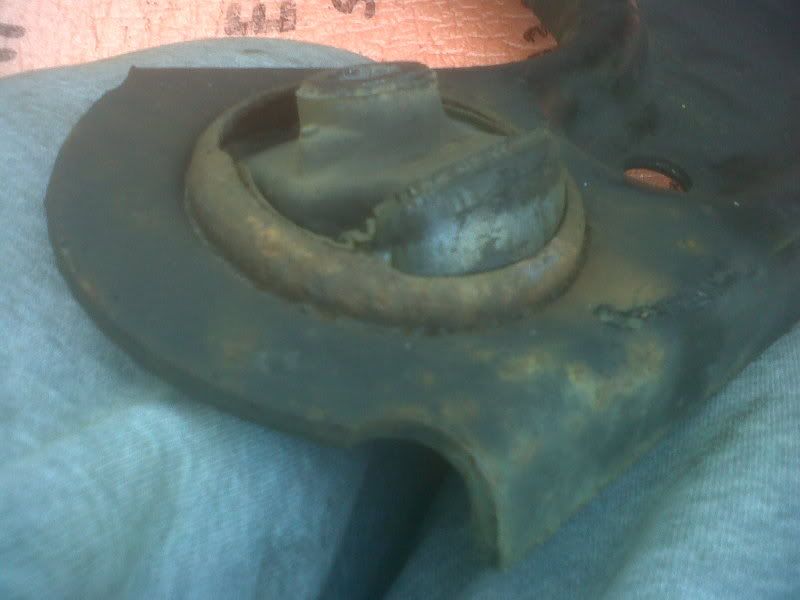
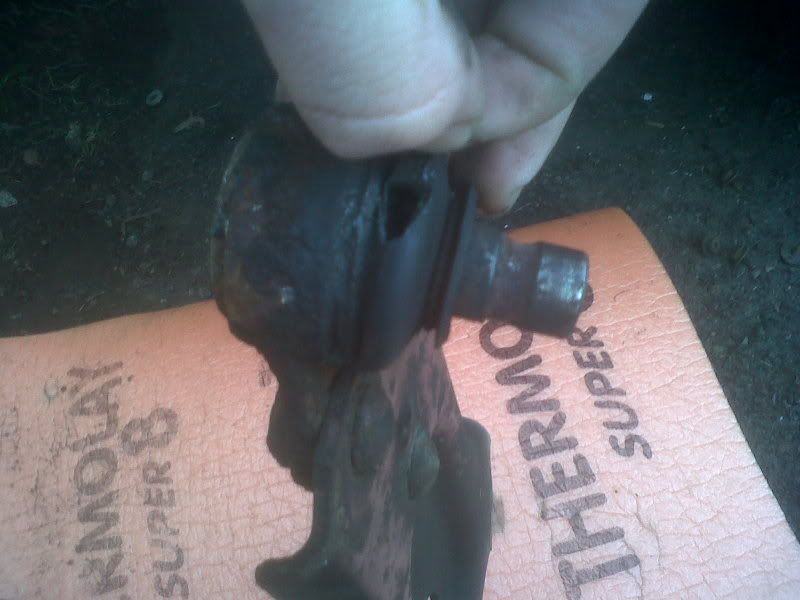
And this is the reason for changing the lower arms. Both bushes fucked and the balljoints seeing better days..
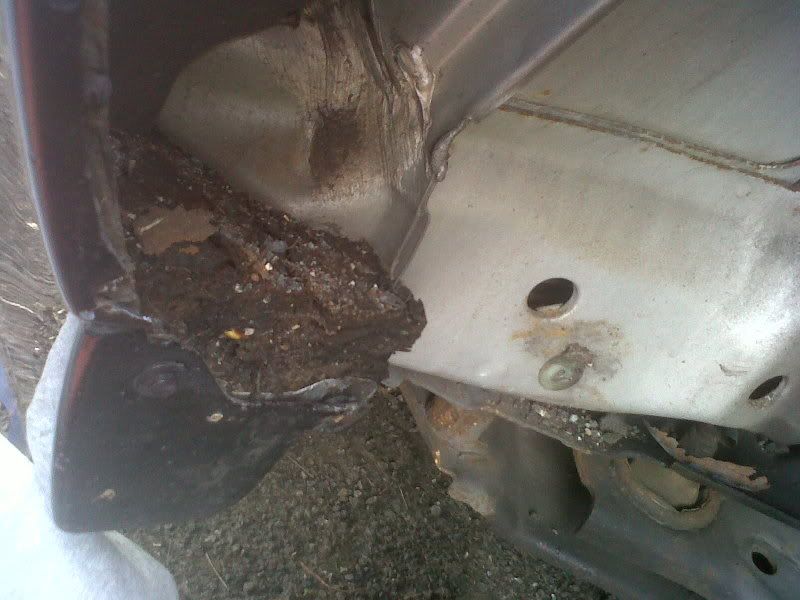
Behind the arch liners the inner arches etc are all pristein! I was quite shocked, no rust, not even surface...So thats a bonus! Just a nice build up of shit behind the bottom of the liner and side skirt...
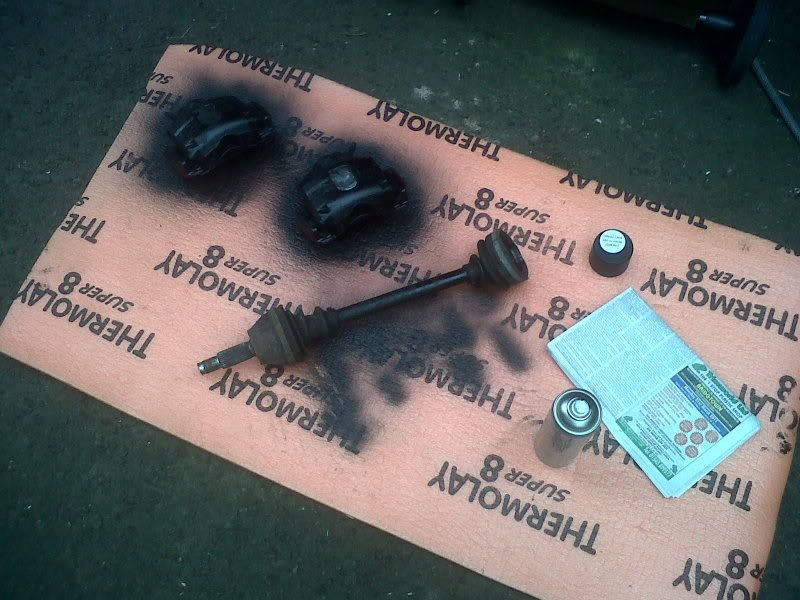
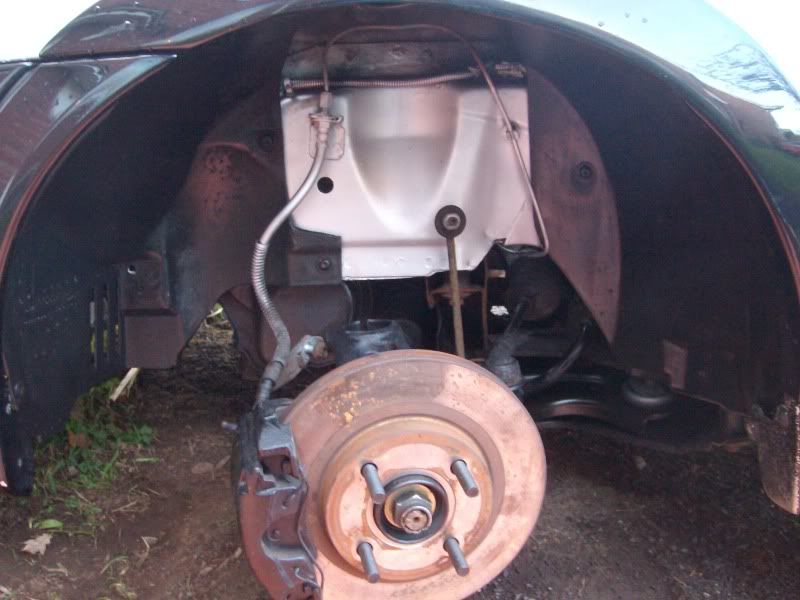
And then to finish up, my painted O/S Driveshaft and brake calipers :)
Satin black...
Wednesday 23rd March 2011.
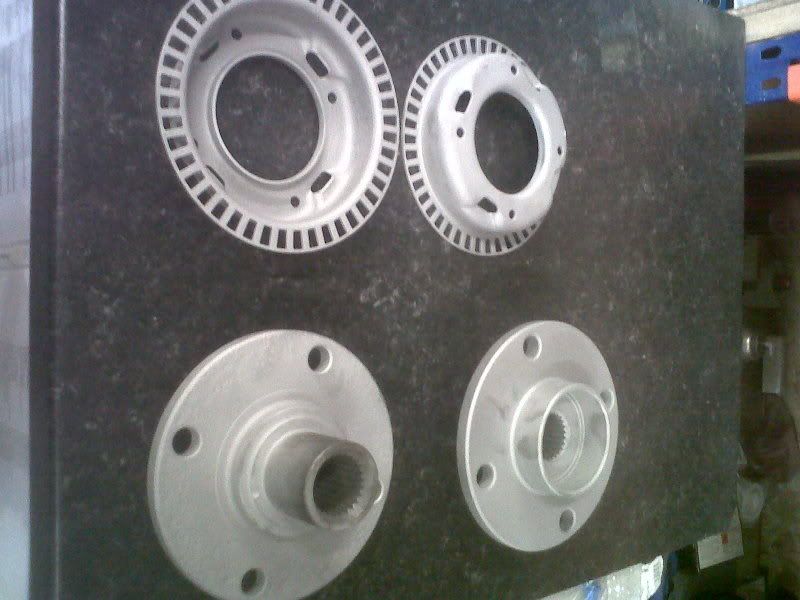
Well today ive got a little closer to being able to get the front of the car back built up. As you could see in the above pictures the front hubs had corroded, rusted and what not, so first things first, i decided to take them into work and get them sandblasted.
This will allow me to get them freshly painted to completely tidy the complete front end up :)
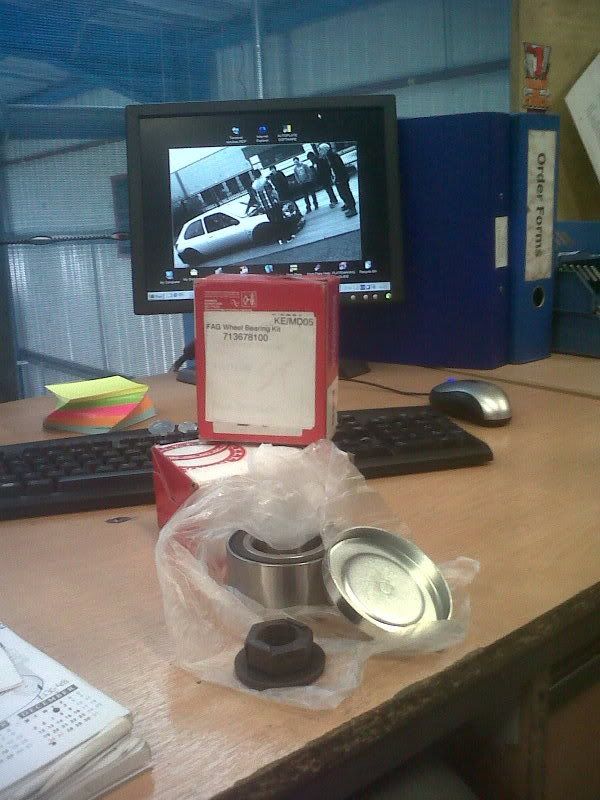
And then went up to CES on my dinner and bought my replacement wheel bearings :)
Check out the swankey computer wallpaper ;)
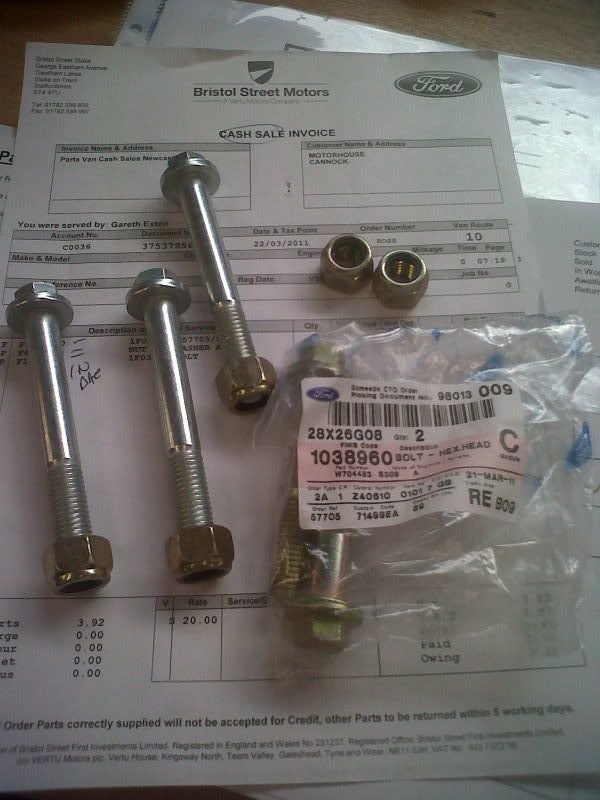
I also forgot to update my blog yesterday...But i also recieved my lower arm nuts and bolts from ford, to replace the origional ones, that were rusty, and beggining to round off...
So not the most exciting of updates, however all stuff that needs to be done before the fun can begin! All being well, i should be set for painting all the inner arches the weekend, ready for me to start rebuilding the front end minus lines and struts sunday :D
Thursday 24th February 2011.
So, today i went to rebuild my front hubs so i could reassemble the front end the weekend, but due to someone removing the guides from the press earlier at work, i wasnt able to acheive todays goal. However, ive managed to get the rest of the hub peices all sandblasted, ready for me to hopefully get them rebuilt tomorrow and then painted & fitted the weekend :)
Saturday 26th March 2011.
So with my hubs still not built *Major job for next week as its holding me up rebuilding the front *, i thought my arches needed a tidy up, so out came the arch liners, and in went the wet and dry and Moondust silver paint :) I havent got many pictures of this, but here's on showing it all masked up and painted :D Im aware ive painted the brake lines, but with these being changed due to pitting and them splitting it wasnt a major issue :D
Progress has slowed down alot recently. Mainly due to funding however there's still small bits i can be getting on with :D Tonight ive had stock take at work, but egar to get some more done ready to start reassembling the boring bits and get on with the fun, ive cleaned and painted all my arch liners up :)
So, as they came out the car. Full of shit from the winter roads, and the loss in colour. Im guessing these were once upon a time black, but theyre looking a not very nice shade of faded grey.
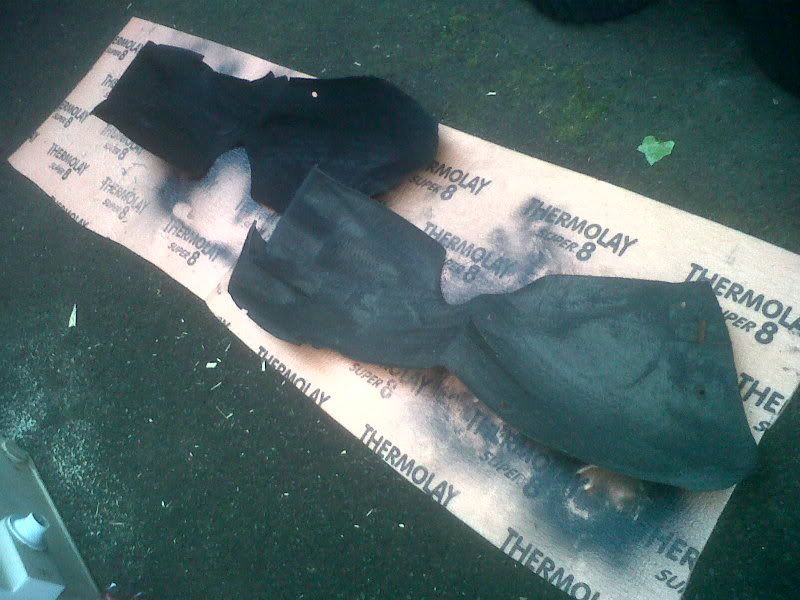
So, with them all cleaned out with a paint brush to get in all the nitty gritty areas, out came the satin black aresol. After two coats of satin plack, they looked brand new again :D
Here's a picture to show the difference between them...
I then also got out my turtle wax tyre dressing, and my paint brush....Cleaned and dressed the front arch liners to regain them back to their former glory.
Ok, so thats those looking a million times better, ready to go back in!
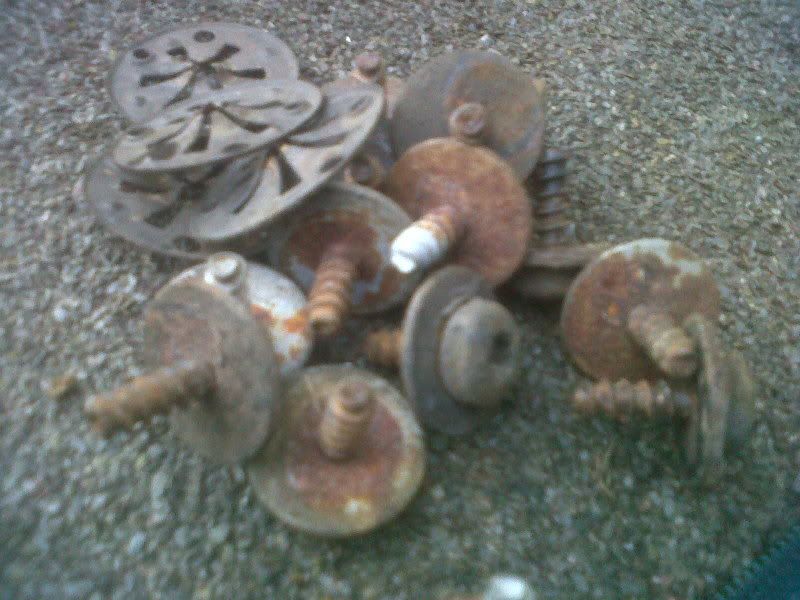
However, all the fixings had rusted and therefore obviously gone brown. Im not forking out money for new bolts, so i just gave the old ones a quick blow over with the black aresol, and theyre looking a million times better too!
So before, rusted bolts and fixings...
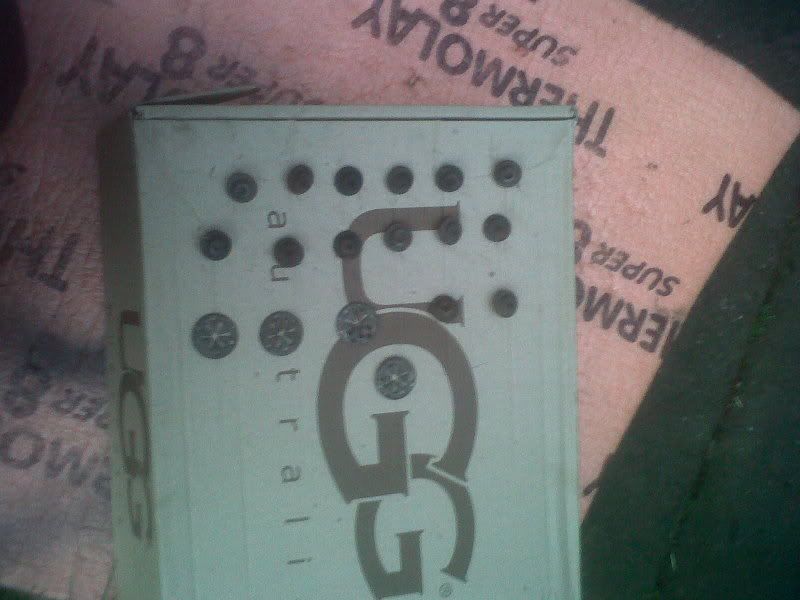
Then sank into a cardboard box ready for painting...
And then painted. Now theyre painted they shouldnt stand out wich was the idea. Theyre arch liners, serve a purpose and not a feature of the car.
So thats those ready to go back into the car! Next on the list, is to tackle these hubs. Get them built, painted and back onto the car :D
Wednesday 30th March 2011
So today with some help from the guys at work, ive managed to get my new bearings pressed into my hubs, longer studs pressed in and got them all built up. SO, needless to say as soon as i got home, it meant i was working on my car! First of all, i painted the hubs, and ancilaries satin black. unfortuately i dont have any pictures of this.
I then began rebuilding the N/S front of my car :D First of all, i fitted my new replacement lower wishbone & genuine Ford nuts & bolts. I then contined to fit my freshly refurbed arch liner and treated secruing bolts. So this left the arch looking like so...
So with the rebuilt front corner begining to take shape, i couldnt give up for the evening. So i had to fit my refurbed hub...So on it goes! I still have my new droplink to go on too, but im not planning on fitting it until the new struts come :)
I then continued to fit my brake caliper & disc...The brake line is still yet to be changed to braided models, but thats no rush at the moment. The calipers also need bleeding, but ill save that for later on in the project seems its not going to be moving :)
Right, now here comes my big achievement for this evening. The night was still holding some light, i had my motorsport stud conversion on, and all i lacked was a strut. But who said you couldnt stance a car in the air using jacks? ;) So out came a 9j schmidt for the rear, and an 8j ready for the front, for the trial fitment so i can get a rough idea with what im working it, and to build a brief picture of what its going to look like. Whoever said you cant stance a ZS on 14's is lying...;) Here's the evidence...
And hellaflush yo! The arch sits on the tyre...;) This means im DEFFINATELY going to be running a 3mm spacer on the rear, or possibley a 5mm just so the stance is tyre sitting all the way round ;)
''Offset is everything...''
Sunday 10th April 2011.
Not much progress today, but some serious vital progression.
Im now in a good position to order my air ride, but as theyre hasnt been a kit EVER produced for a mk5, nobodys really wanted to do it. Ive choosen to go for a Havair kit.
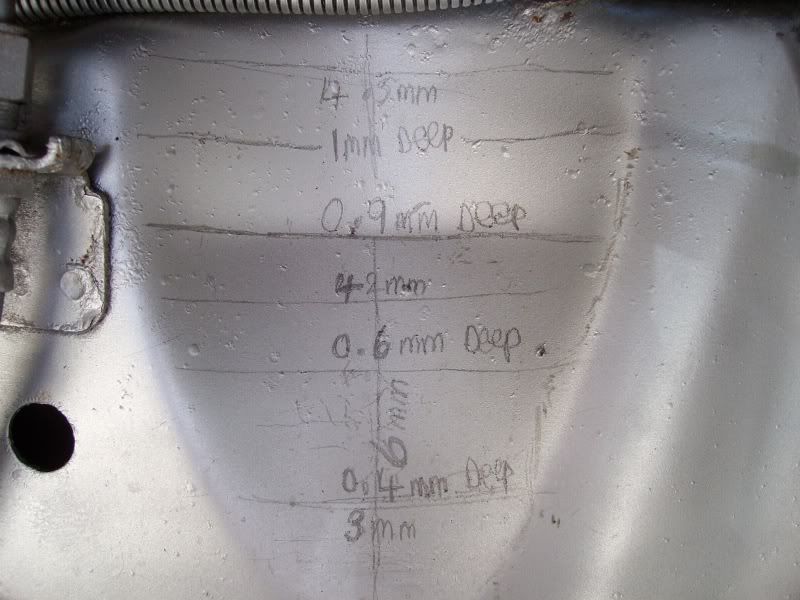
So, today i needed to measure up the struts/wheels so i can get my custom struts and bags made up!
Not many pictures, just a picture of the struts all marked :)
The bottom white line is where my new strut cups will be, or should i say where the bag will be :p
If you look at the front strut, you'l notice the bag will sit where the droplink should bolt too.
So, easy solution....Remove the ARB! Ive already bought new droplinks, so ill get those returned tomorrow...and then when i return home tomorrow i can get on with removing the arb :D
Ill be sending the struts off to geoff tomorrow along with my deposit. and then its a waiting game for 5 weeks whilst the struts are made in Germany.
Specification of the Kit...
- Front GAZ struts with Firestone bags
- Rear Air Chapman legs with Airlift bags
- Byair 380c compressor
- 2 gallon Firestone tank
- Byair twin needle gauge
- 2x paddle switches
- 20meters 6mm airline
- Fittings
- Braided lines from tank to compressor
Tuesday 19th April 2011.
How longs it been since i updated this? It feels like ages!
I havent given up, ive been saving for the air ride hence the lack of updates.
Anyhow, Apart from washing her, i havent really done much! On the plus side however, the template struts have been sent off to geoff, and ill be sending the massive deposit over to him tomorrow to get the ball rolling. Then its just one big 4-6 week wait for the struts to be made in germany, and then for him to get the kit out to me...
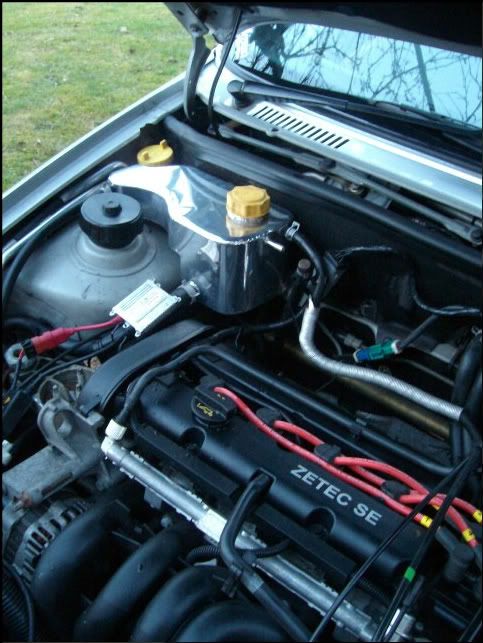
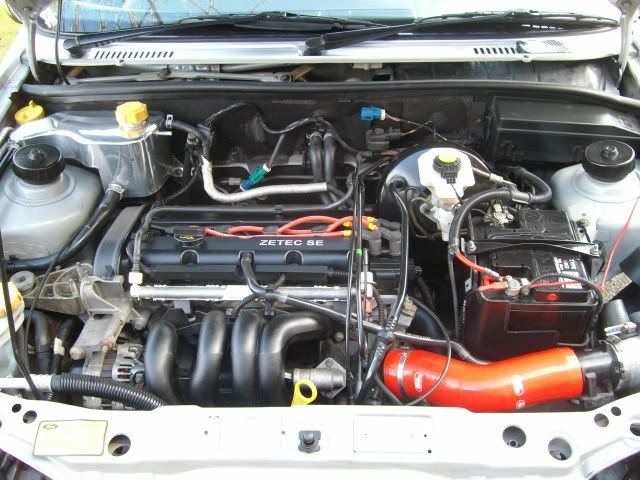
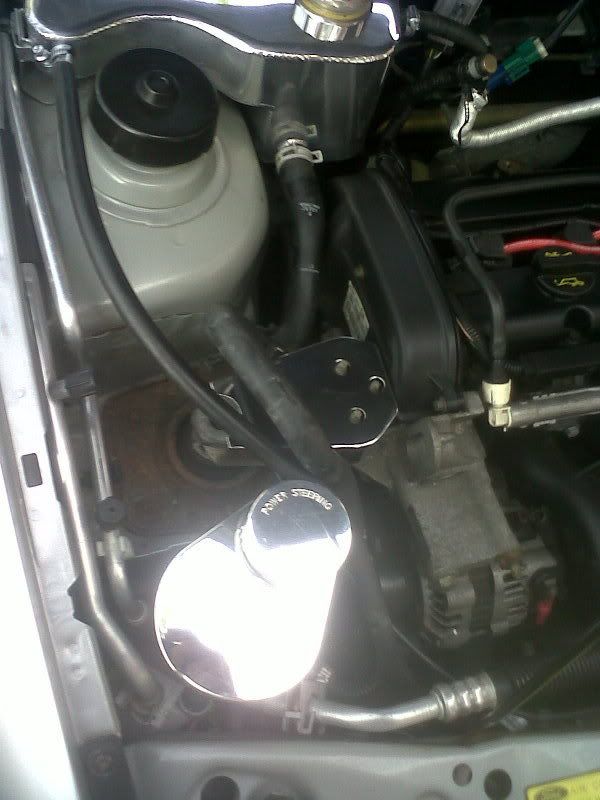
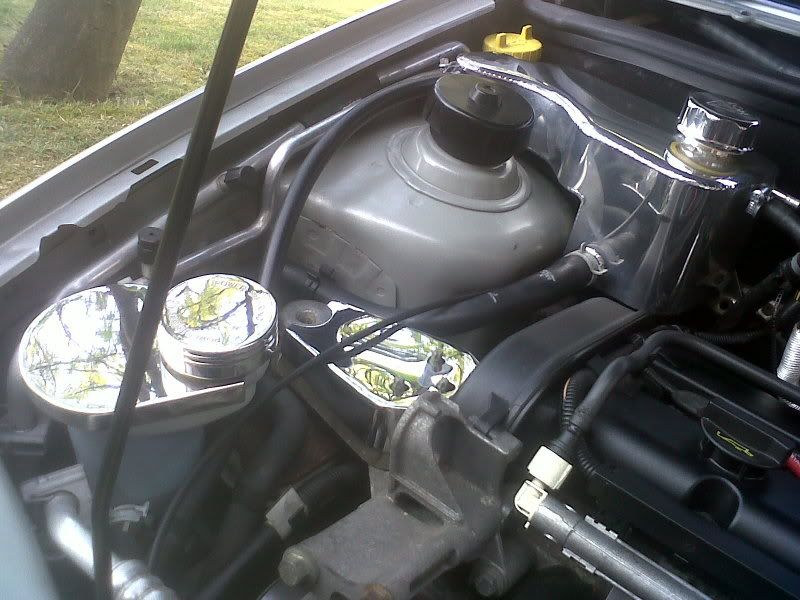
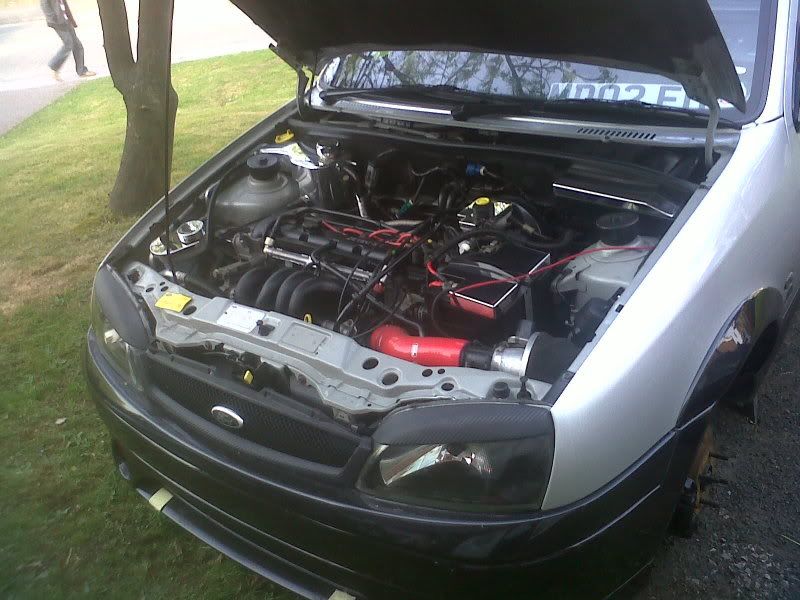
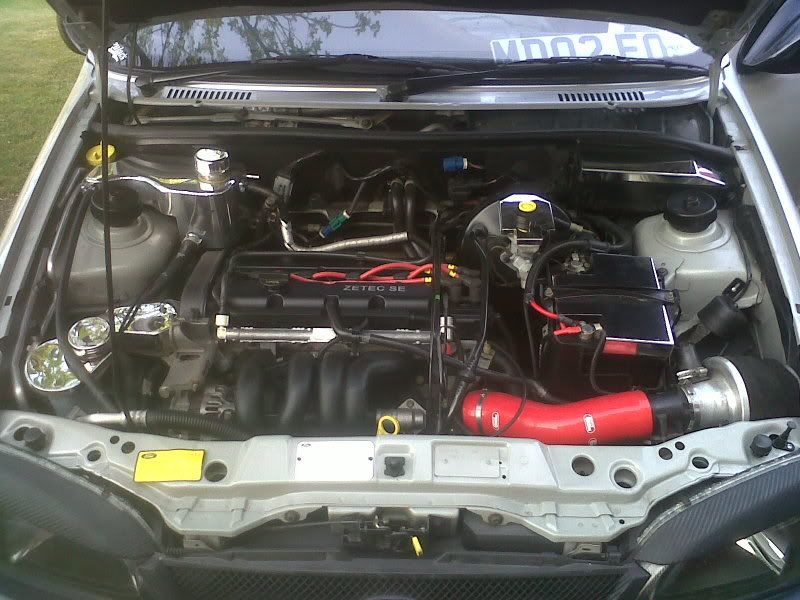
Ive also just taken delivery of my chome/polished engine bay dress up kit too...Boyyyarrrrr!
So me being me, knowing "chrome will get me homeeee..." ;) , had to go out and fit it.
So, a fresh one as it stood before...Clean, but nothing special apart from my Radtec Polished headertank...
Polished Headertank.
Polished Headertank Cap.
Polished Power Steering Resovoir Cover.
Polished Power Steering Resovoir Cover Cap.
Brake Fluid Resovoir Cover.
Fuse Box Cover.
Batter Cover.
O/S Engine Mount Cover.
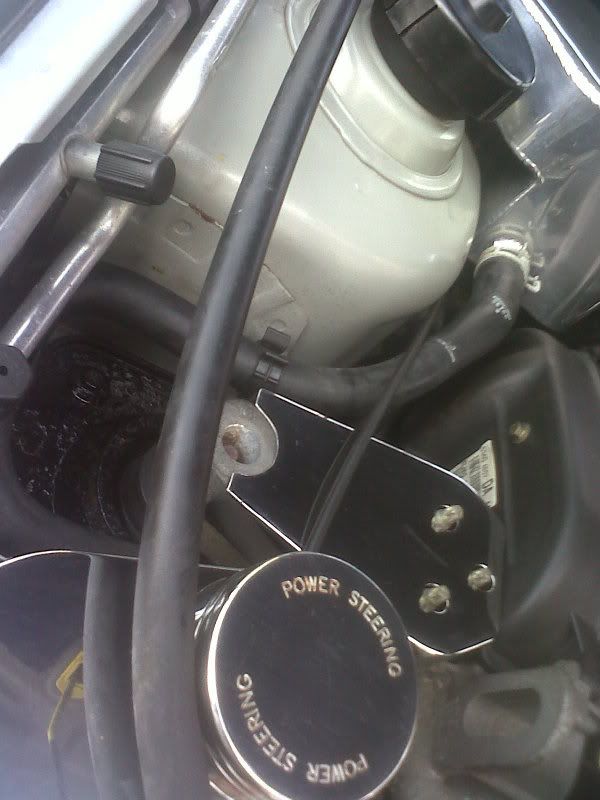
Now, it was all looking good, apart from the O/S engine mount where it bolted onto the chassis was all rusty and looked shit in the bay...Majorly letting it down in my opinion.
So, i removed all surrounding parts, and painted it Satin Black, the same as the rest of the parts ive painted. Nothing special, and to be honest, the engine mount cover hides alot of it. Its just the little things i dont want to let it down.
All painted up...
I know the bay now needs alittle clean up. I know its alot tidier than the majority of bays, but im planning on a few braided lines, and a few more polished/carbon bits to make it look a little more trick.
As it stands now though...* i know ive got to sort that shitty red wire coming off the battery. God knows what its for, ive got to find out! I think its for the Sony DVD player thats installed :S
Not much interesting, but a lil' more work non the less!
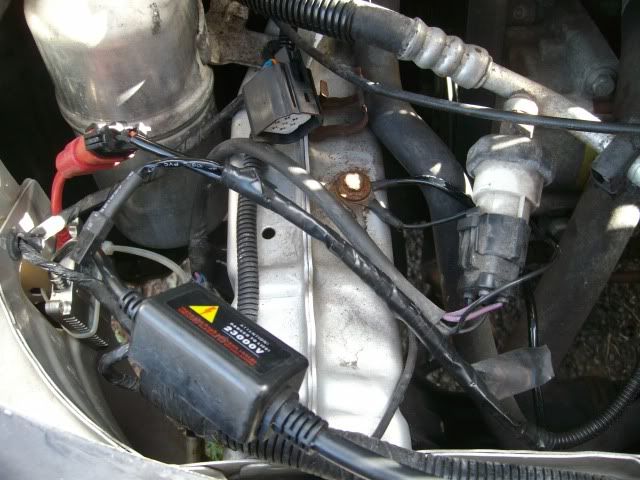
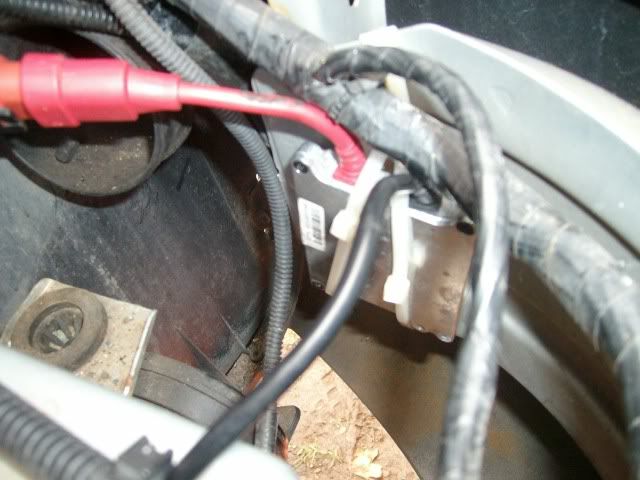
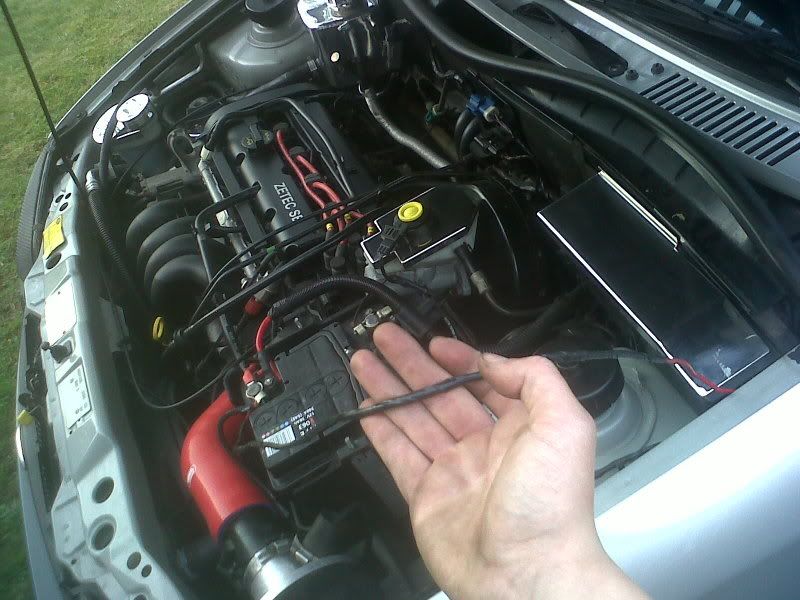
The red wire in my bay was seriously bugging me, so i got to work on that.
First task was to find out what it was for...and it turned out it was for the Sony DVD player installed.
So, i checkd the interior to see how much wire i had left, and there were loads...EASY!
And here it is. The red wire in question...( running over the battery/ strut tops...)
So first things first, i covered the red wire in question in black insulation tape to make it less noticable.
I then ran it round the side of the battery tray, under the fuse box and then through the bulk head...
...And then wolarrrr! Snorted...Gone :D..Much better...
Whilst browsing the net at air ride, as i cant wait to get mine...
I also noticed how poor alot of the cars looked whilst raised ...IE, rusty arches, beams, fuel tanks etc.
And with mine all being freshly painted bar the fuel tank, i thought it was in need of a lick of moondust silver.
..So on it went!.
So today, i prepped the car even more for the air ride. After measuring it all up, it was noticable that i wasnt going to be able to run my ARB, so today i got to work removing the droplinks/ ARB. Not many pictures of progress as its not major, but something that had to be done!....
There....
Gone...ahem a little dusty from the roadside...
Apart from being dusty from the roadside, pretty much all the mechanical side of the build is now complete. Im still to change my brake lines, but this isnt feesable until the air ride is on, as i dont know how high the cars going to be lifted, but until then im nearly there...
Wednesday 27th April 2011.
Been at work today, and no physical progress on the car, however i have been on the phone to geoff again at Havair. Now hes analysed the struts etc, and done all his measuring up, it appears im going to struggle to run the front firestone bags. The firestone bags are 5 3/4 inches wide meaning they most likely wont fit as the chassis will be in the way. My only other option is a Dunlop bag, which is 4 1/2 inches, however it wont raise and drop the car the car like the dunlop do, and is more than likely going to cost more..Ive got to do some measuring the weekend, and get a few more measurments to see exactly what can be done/fabricated.
Sunday 01st May 2011
Ok, so today im just planning on doing some more measuring on the car for the air ride. Phoarr, im beggining to feel i wish i hadnt started this all now. Im looking at it thinking 'whats the point'...but im sure when its all come together my impression will of changed. Im just struggling seeing it all come together.
Anyhow, more measuring.
If you look at this picture, you can see that the inner arch is indented to accomidate the origional spring/strut.
Now, ive had to measure all this up for a start so we can get some ideas of more room im able to gain.
God knows why ive wrote mm' after everything, you all know what i mean ;)
and with the origional strut fitted, you can see i can just about get two fingers between the strut and arch. Now just about getting two fingers in there usually would be classed as fairly tight...you all know what i mean, but in this instance, it means ive got another...
- 2'' between the Strut leg & arch
- 1.7'' between the Strut Cup & arch
- 1.5'' between the Strut Cup & the closest point of arch.
This should help me gain some more room getting the bags in. If not, it looks like the angle grinders coming out, and some fabriaction is needed! Ill give geoff these measurments tuesday after the bank holiday, and see what he can come up with.
Monday 09th May 2011.
Ok, so after having many a discussion with Havair, Several measurements from my car trying to get my air ride to fit, its looking like its not going to happen. Not just with the Havair kit, as Geoff has been very helpful in assisting me with the air ride kit, but full stop. Therefore, with Air not comfortably fitting, and coilovers not giving me the flexibility i want, ive decided to research the route of Juice; hydraulics.
Ive had an hour and a half telephone conversation *Its a good job my mom pays the house phone bill* with Ray at Rayvern Hydraulics; a VERY knowledgeable person within the hydraulic and air field. Within that hour i learnt the pro’s and cons of both air and hydraulics, and it turns out the hydraulics would suit me better also!
When a company sells an air ride kit as a *Slow Air Kit they don’t half mean it. I presumed a slow kit would be a full lift within 25 seconds and a *Fast kit within 5-6 seconds, but it turns out a slow kit can be anything upto 2-3 minutes for a full car lift depending on specification...Where as an Hydraulic kit is instant..Meaning i can get my Ja-Rule bad Billy bounce on at traffic lights when some bang tidy mandem pull up alongside me haha! Also, you loose quite abit of a drop with air ride, due to the plates for the bag to sit on either side, a bag etc..where as a ram is welded onto the eyelets of standard suspension and fully decompressed is 11 inches overall! Lowzzzzzzzz!
Anyhow, Ray is sorting me out a Hydraulic suspension kit for my car...as it will be a direct guaranteed fit. The reason being the rams are based on a standard strut, meaning i wont have any issues with it hitting the chassis! Result! He is supplying all the main items i need for the kit, and building all my rams into a frame housed in the boot, so they’re shouldn’t be too much fabrication needed by myself.
Im picking the kit up on the 23rd May 2011...I just need to take some measurements and obtain standard suspension so he can use the eyelets to go on the bottom of the rams, and to get them over to him so he can start fabricating my kit.
Tuesday 10th May 2011.
So today I’ve managed to get my standard suspension all stripped at work, and sandblasted to give Ray a clean basis to work from. Unfortunately, i haven’t got any pictures, but its just standard sandblasted suspension. I’ve also checked all the bushes, and they’re all sound as expected for 50k suspension, so that’s one less thing to change J
Thursday 11th May 2011.
So today I’ve got the measurements ray asked for so he can start fabricating my kit for collection on the 23rd May...Basically i have to fit a front and rear wheel, and jack the lower arm/ axel up until the wheel is physically wedged in the arch...This will be the ram on its lowest limit, to determine the perfect stance.
· Front
11 and a half Inches from the eyelet on the hub to the top of the inner turret.
· Rear
19 Inches from the centre of the eyelet on the beam to the top of the inner turret.
The front measurement of 11 and a half inches measured to a standard strut comes up to just below where the spring cup is on a standard shock absorber. So, my new rams fully built will be roughly an inch and abit shorter than a standard shock absorber running no spring, so you can appreciate how low the car will be! Canny wait!
Monday 23rd May 2011.
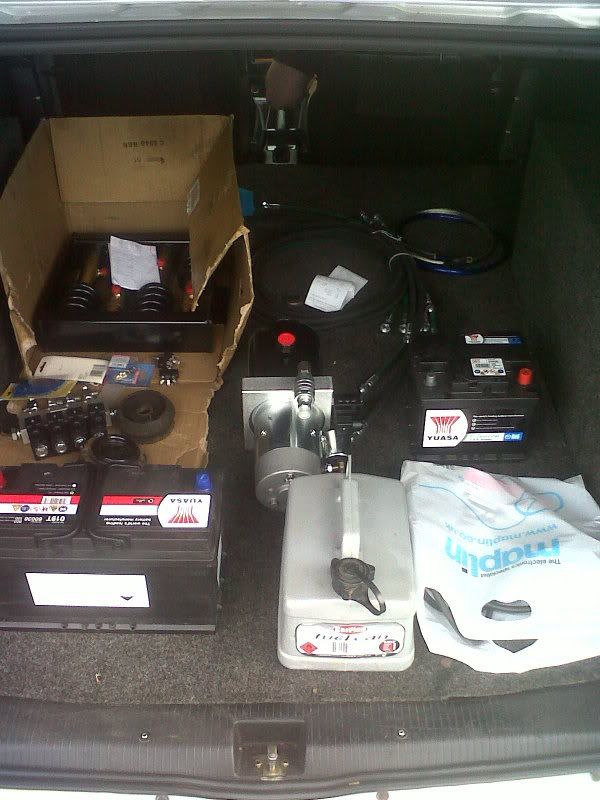
Rayvern Hydraulic Collection Day!!!!!
So me and my closest mate Chris, set out at 6am for the 2 hour 15 minute journey up to Peterborough. Abit of a rough ride due to an early morning Sausage & Egg McMuffin Meal *otherwise known as a laxative in a bun, meaning in several service station pit stops and hitting major road works upon entry to Peterborough, meant it took us nearly 3 and a half hours to get there...
Got up to Rayvern, and gave him my standard shocks to work from, but realised id left all my top mounts and bearings at home, meaning he couldn’t start work on them straight away..Totally my own fault but its fallen me roughly 3 days behind schedule now as I’m not going to get them until Thursday roughly..:( Anyhow, the rest of my kit was waiting for me and I honestly can’t fault his work, its second to none. The frame he built was a work of art, with all the welds being perfect and complimented by the finishing black powder coated.
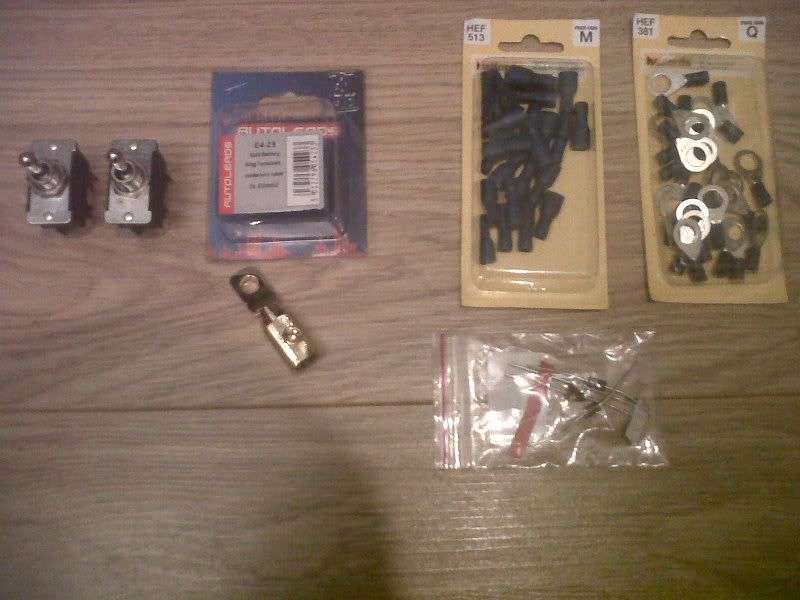
So once i returned back home, we set back out on the roads after the bits required for finishing the kit. ..Spade Connectors, Ring terminals, 0 Guage earth adaptor, 4x diode IN5400, 0 gauge earth lead, 0 guage power cable, 900amp battery, 340 amp battery & 5 meters of 7 towbar cable.
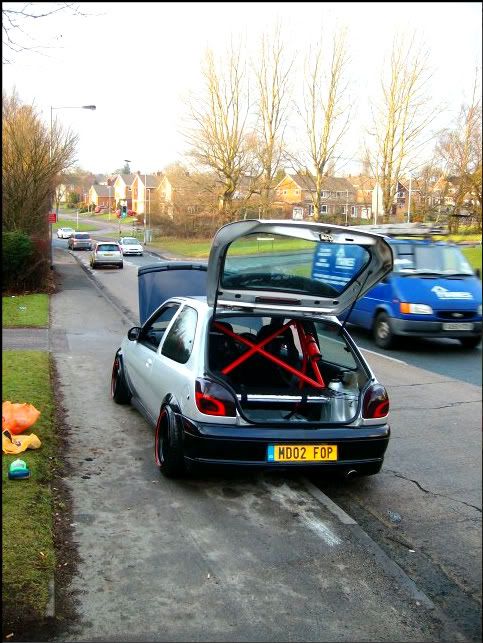
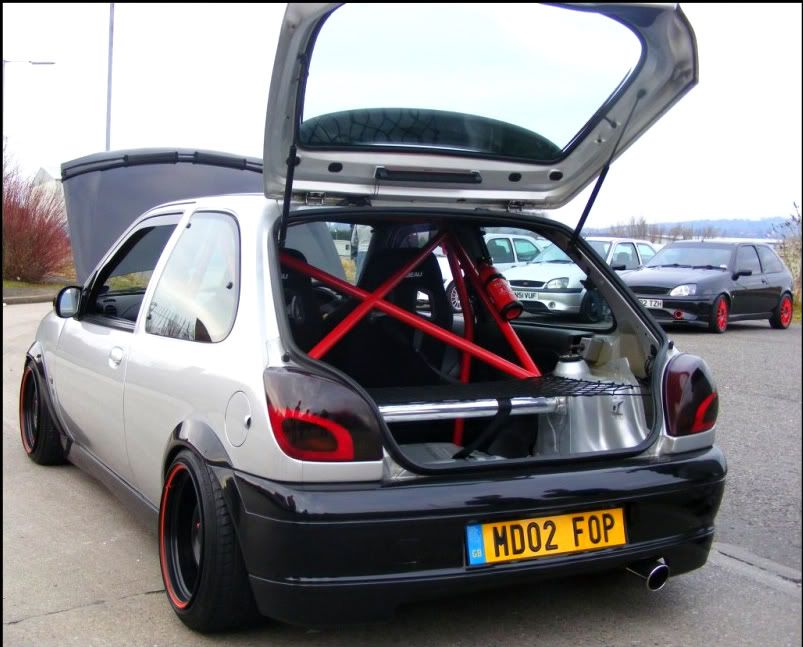
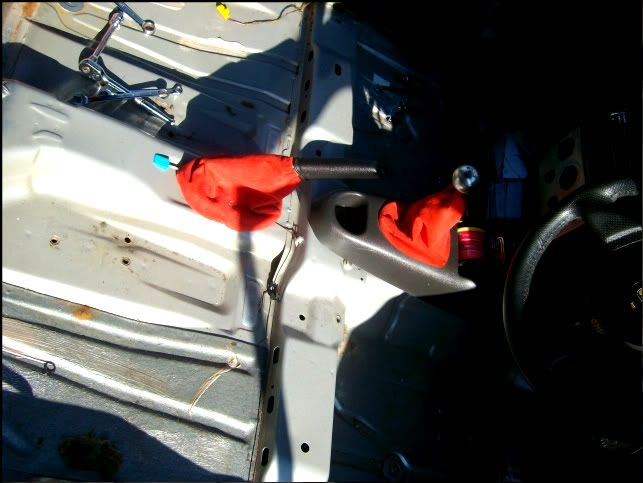
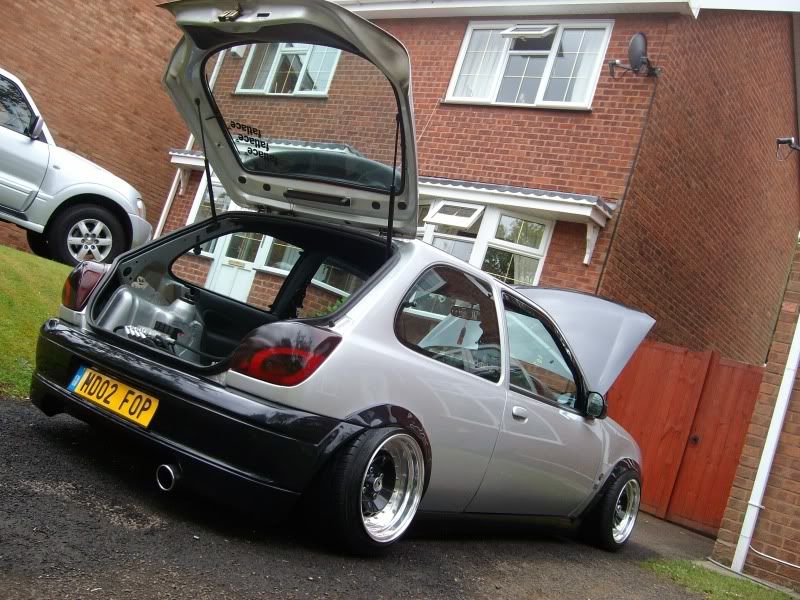
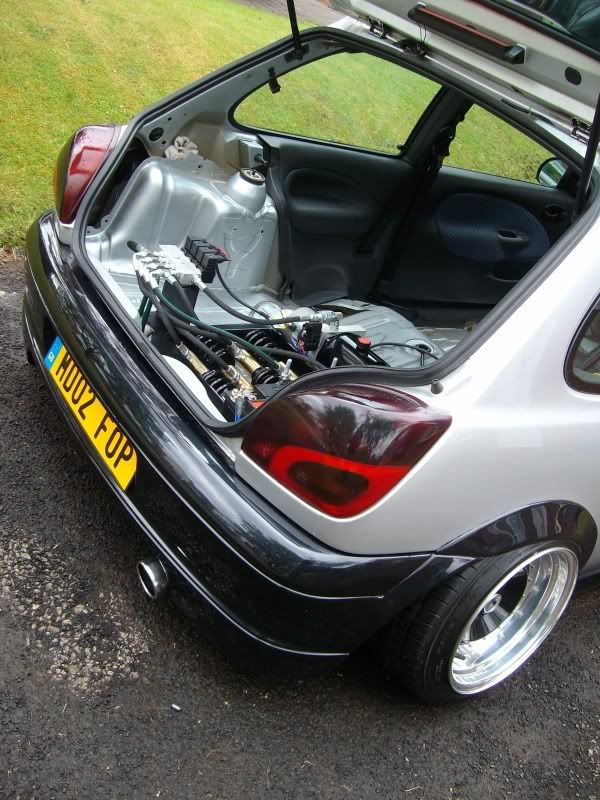
So, again we returned home, and decided we’d give it all a QUICK test fit in the back of Frankie the Fiesta...:) Unfortunately I’ve had to loose my rear strut brace to get it all in, but hey ho! You win some you loose some :D...So, a very quick test fit...And as you can see there’s not much room!
Everything seems to be perfect, bar the N/S/R hydraulic hose which im doubting is going to fit from the valves to the strut comfortably, as it appears too short...ill ring Ray tomorrow and get this confirmed though :D
Tuesday 24th March
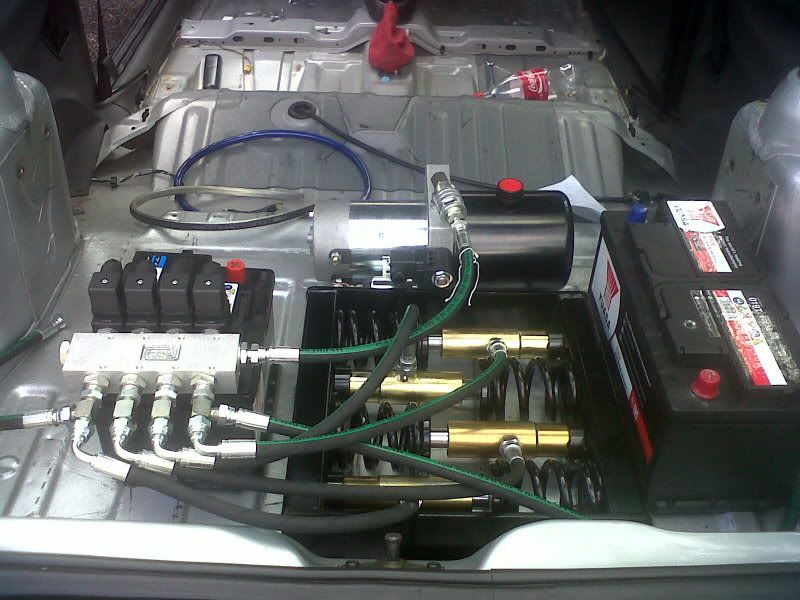
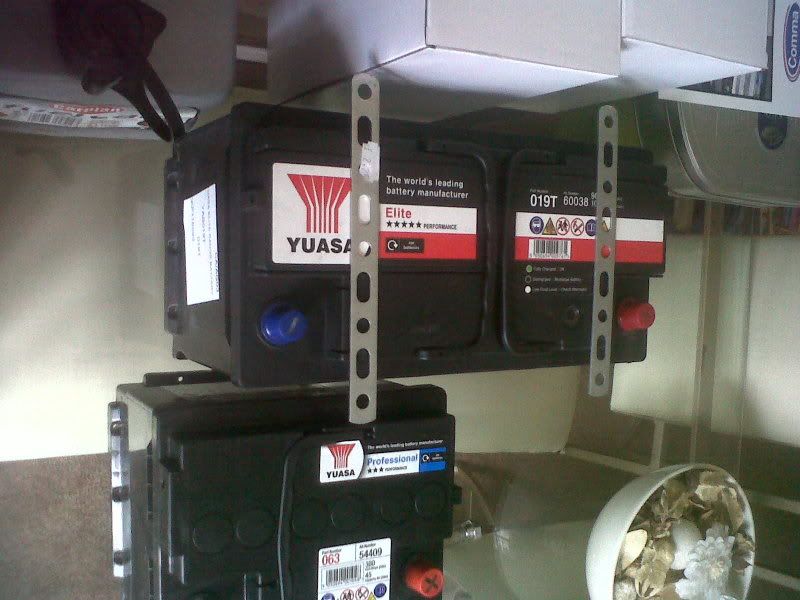
So today, with no struts, i don’t really want to start fixing anything down, so im pretty much at a loose end until they arrive. But there’s always something you can be doing no matter how little J. So, first of all i painted my boot floor in Ford Moondust Silver so its all fresh for the hydraulics to be sitting on. You won’t see any of it, as a custom false floor will be installed at a later date, but its just so everything looks neat no matter what.
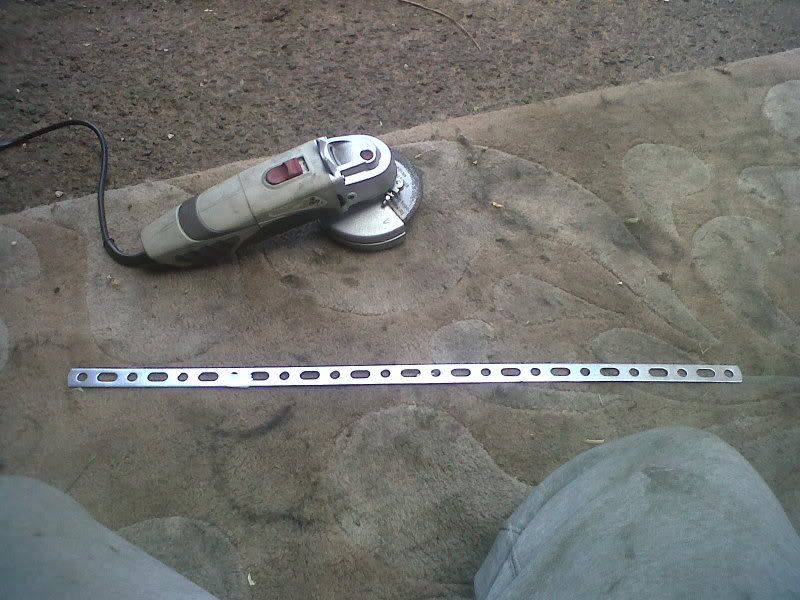
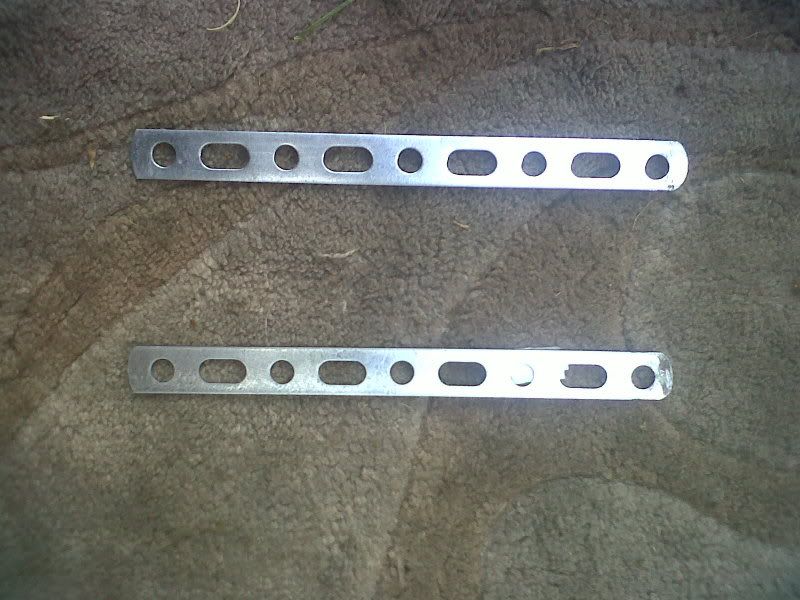
I also made my custom battery clamps to clamp down the rear 900amp battery thats powering the hydraulics.
So it started as so...
Then cut down to the required lengths...
And then all painted Ford Panther Black to smarten it up...
And then ive bought some threaded bar, nuts & washers to clamp it all down..
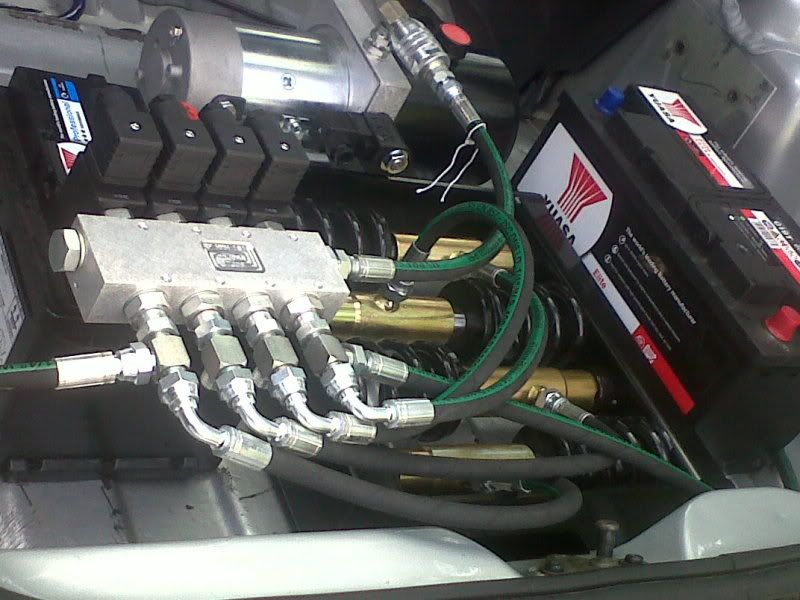
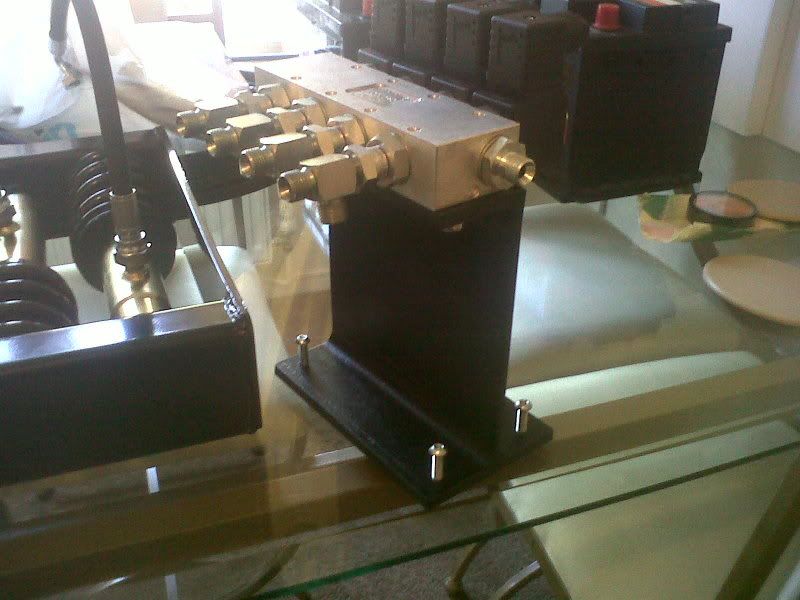
Also today, ive received a gift from Andy; Chris’s dad who works as an Aircraft Engineer. My valves to sit correctly, needed to sit 7 inches off my boot floor, so Andy was able to make me a bracket for the valves to sit proud on. Again, another peice of engineering art...
Ive also spoken to Ray today, with regards to the N/S/R hose length. He confirmed it would fit, but to put my mind at rest, would also send out a longer hose to compliment the kit just incase. Perfect customer service! Its all getting there, and i just cant wait for the struts to arrive Thursday with my longer N/S/R hydraulic hose so i can start putting it all together!
Big time love at the moment for the kit....
Thursday 26th May 2011.
Ok, so i got up this morning bright and early as today i should have been expecting my struts and didnt want to miss the delivery van. However 9am came round and Ray rang me, apologising that he hadnt managed to get them out, and he was waiting on a 24hr courier to come and collect them, so i would deffinately be reciveing them tomorrow. No loss to be honest, as its absolutely belting it down outside, and no matter how much i want them on and working, im not going and working in the rain!
Friday 27th May 2011.
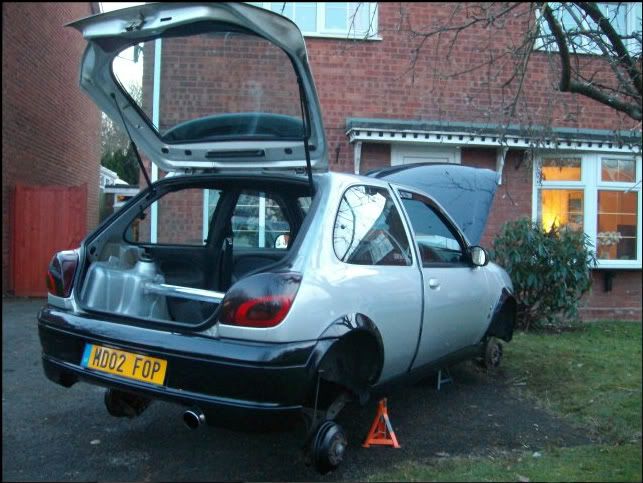
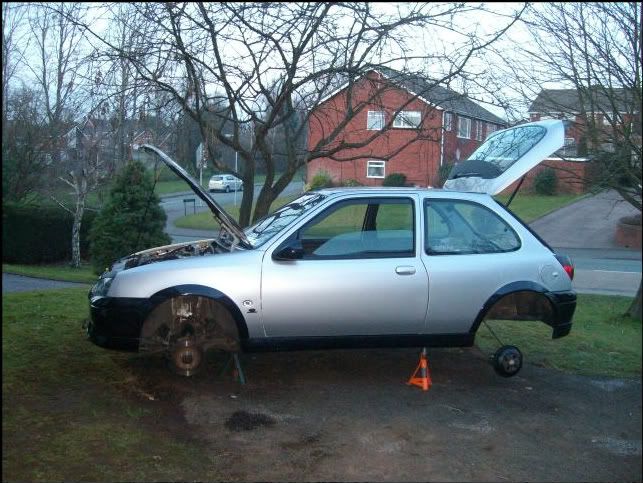
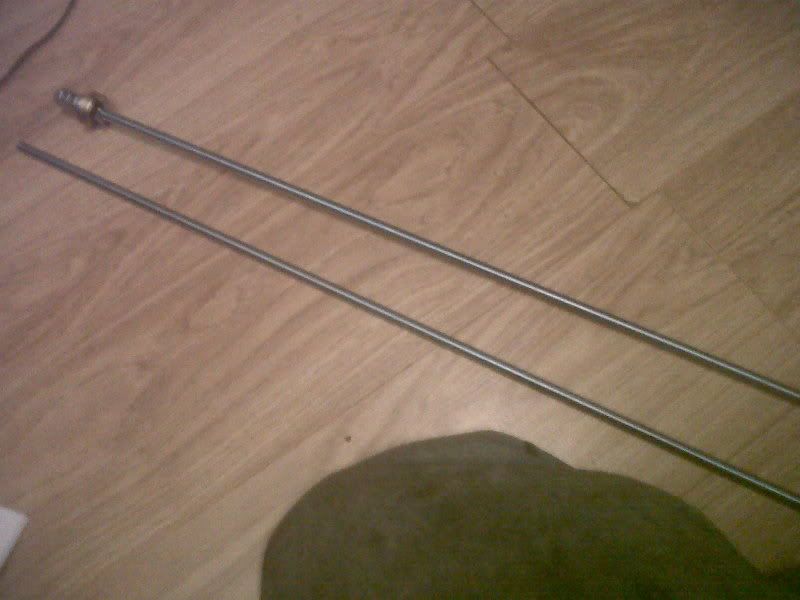
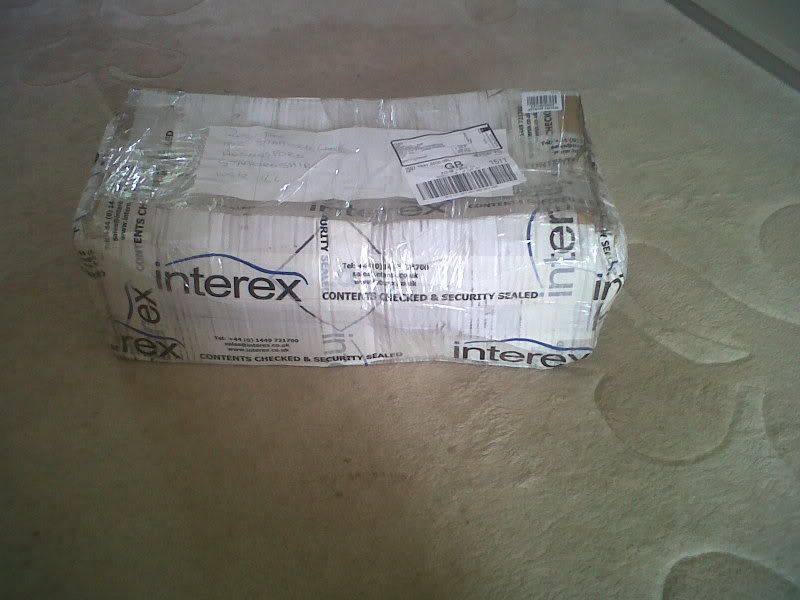
Strut arrival day :D...So i woke up a 7am so i wouldnt miss the delivery van, as its bank holiday this weekend meaning i wouldnt recive them till tuesday if i missed them!
So, 8:30 bowls round and a van pulls up outside...
with an awful nice package for me...
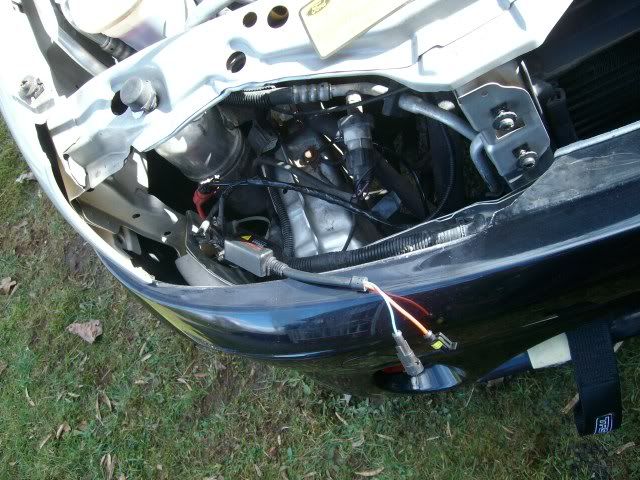
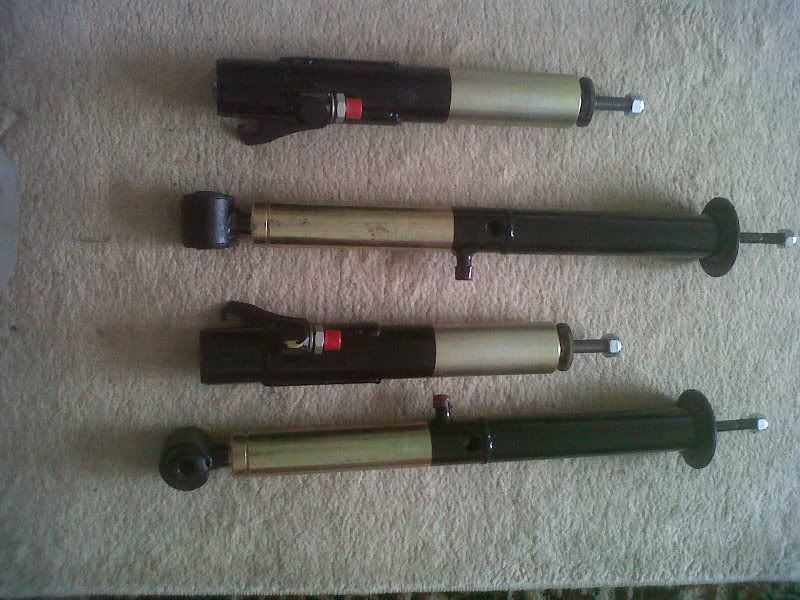
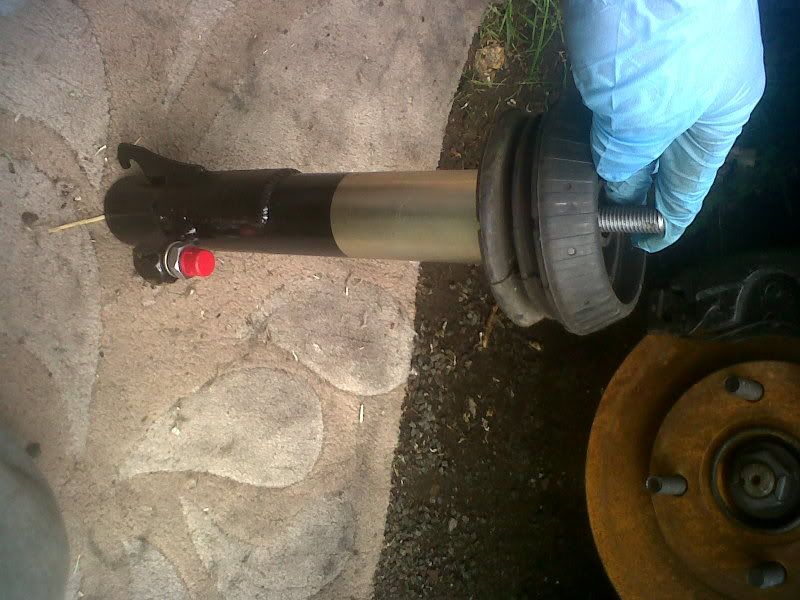
And inside? Oh yes...2x front & 2x rear hydraulic struts..
So straight outside i went, to get to work on frankie the fiesta :D haha...So first was to get the rears on...
With the custom top mounts on the rams, it means i dont have to run a bearing or cup top mount, so on went the rubber top mount...
And repeated for the other side, and all on the car in place...:D
And then we moved onto the front half of the car...First things to get the rubber top mounts on the struts..
And then all fitted up to the car...
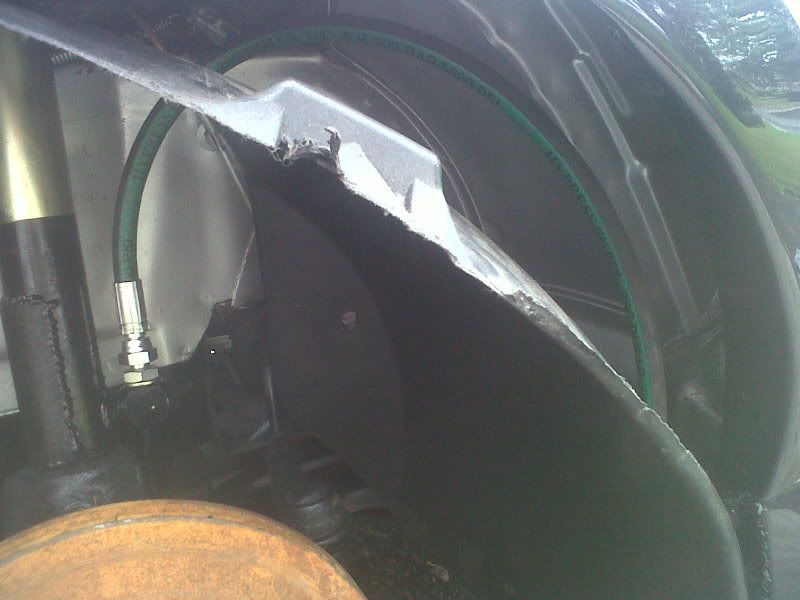
So with that in place, i now had to root the hoses.I decided to root it over the top of the arch liner, then down under the car, so i had to slightly cut my arch liner to get it comfortably fitting...
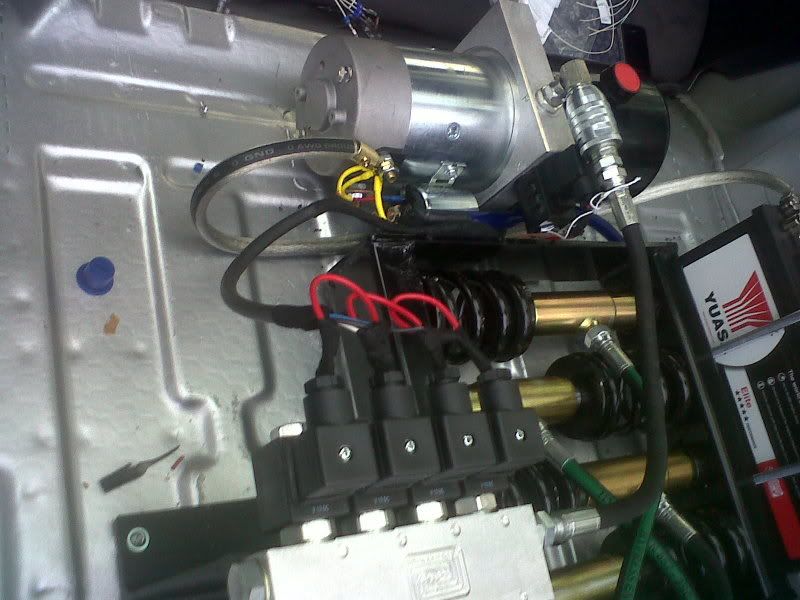
So with those on, i now had to mount everything perminately in the boot. So with all my brackets made, and everything trial fitted, i continued to bolt everything down...
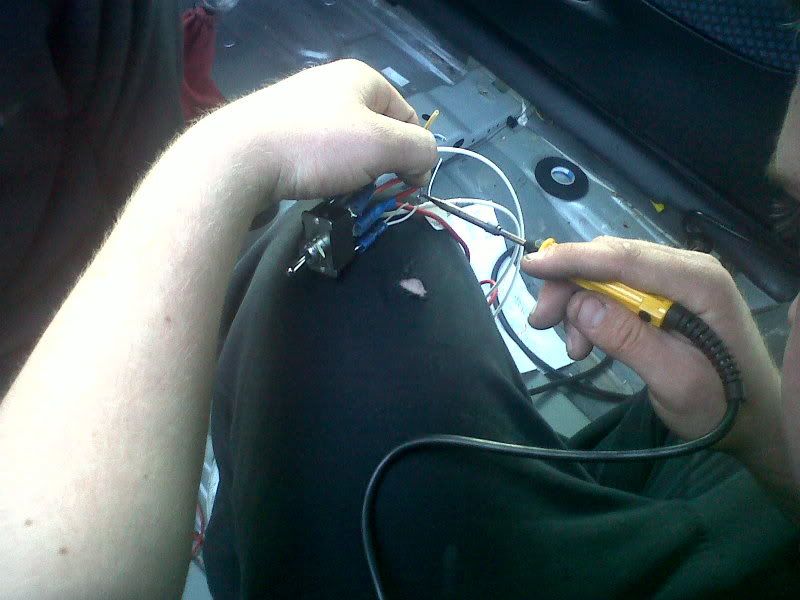
And now it came to the wiring loom. Now, wiring isnt my stongest point, infact far from it...So Chris; my best mate who's very familiar with electrics working for vauxhall, made my loom for me. Now i left him to it, and just fed him with Double cheese burgers from Mcdonalds..keeping out the way, but managed to grab a quite snap of him at work..
And with chris being a perfectionist, everythings bob on perfect!
And then it was time for the first bounce of the night!...First time we managed to get it up in the air, but for some reason it wouldnt dump the fluid...No ray told us we had to wire diods into the loom, to stop the currect flowing and doing funky stuff...But once we'd removed them it works perfectly..So im going to continue running it like this until the first mishap. But in all honesty, the kits working perfect so i can see theyre being any issues!
Saturday 28th May 2011.
So, Bright and early with the car on all fours, so i decided to give it a good clean and get some picutres to show the hard 3 month saving and a full hard days work getting them all fitted up.
Im not going to say much, just leave the pictures to do the talking...
Front up, back down...
Back up, Front up..
Back up, Front down..
Down on all fours..
Cant get my hand under the side skirt...
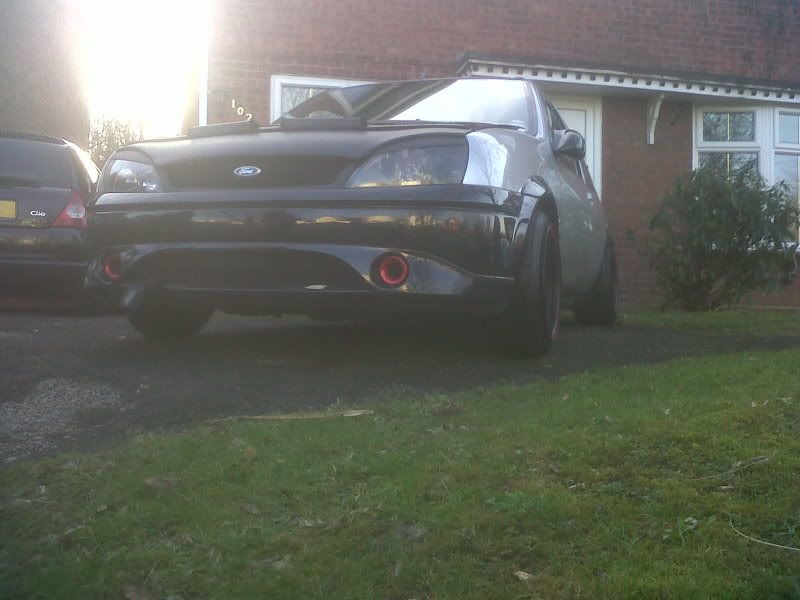
Friday 10th June 2011.
Just a few quick pictures after a wash...Hope you all like :)


Picking your fiesta's arse up after a day of being Tank...
Sitting on the bonnet of your car and making it touch the floor after a day of being Bigrage
No real update, but ive just been tagged in a load of photo's on facebook.
This picture was taken just before i took it off the road, the weekend before i think?.
Looking different much? :D

Sunday 03rd July 2011.
Right, now its been absolutely AGES since ive updated my blog which id promised id update regularly as i dont have a build thread on any forums...SO, here's an update of whats been happening up to date.
Now the cars on all 4 wheels, and mechanicaly perfection bar the brake lines, its time to get the exterior/interior up to standards.
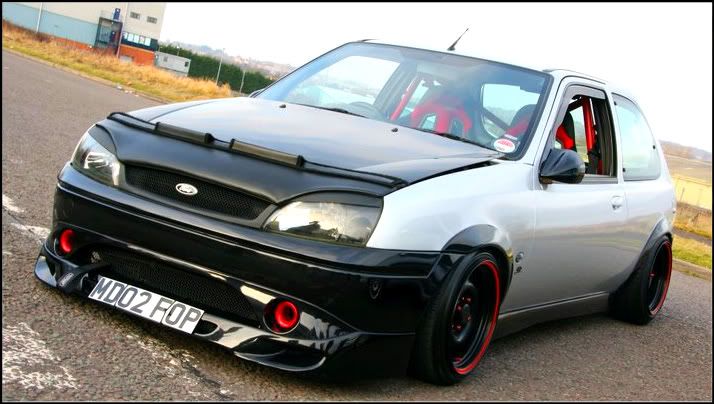
SO, first things first...The schmidts are boring. ENDOFKTHXBYE.
Ive managed to borrow some standard sapphire steels off a chap at work; Layton...Appreciate it mate! So, here goes the rat look ...
So, whats crackling on the wheel front? Well, the schmidts are stopping, but undergoing some VIP treatment ...As you can see from the next few pictures...
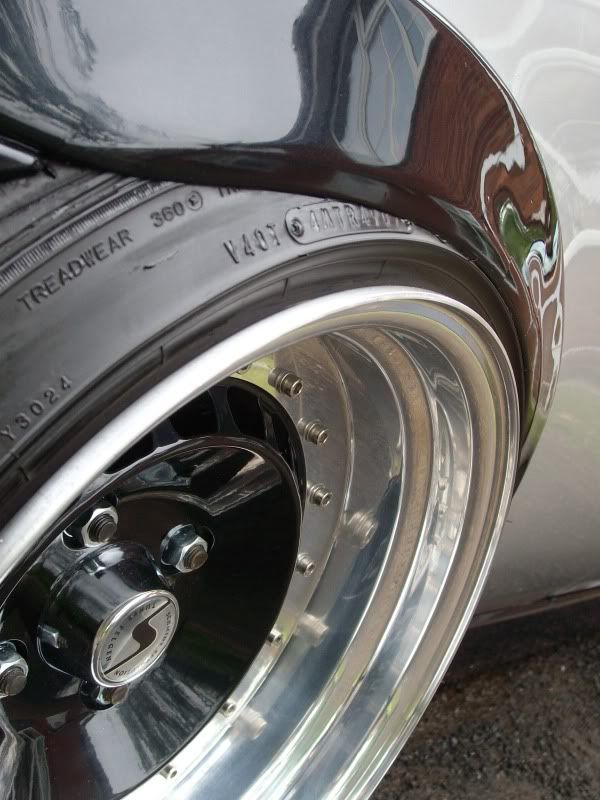
So, you take a 14x9J ET15 Schmidt Th-Line...*in need of a polish ;)
A new Bluepoint socket/service set...
And split all four wheels...!
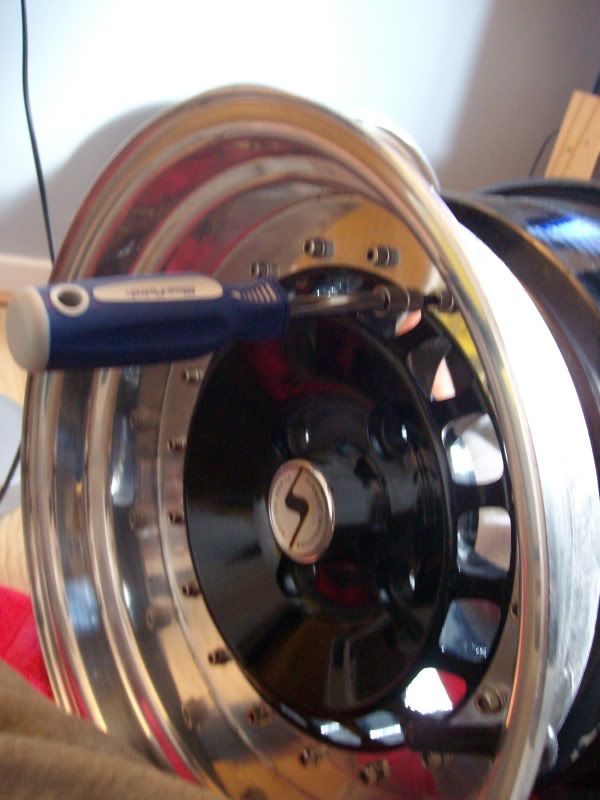
And whalllaarrrrrr, a split wheel!
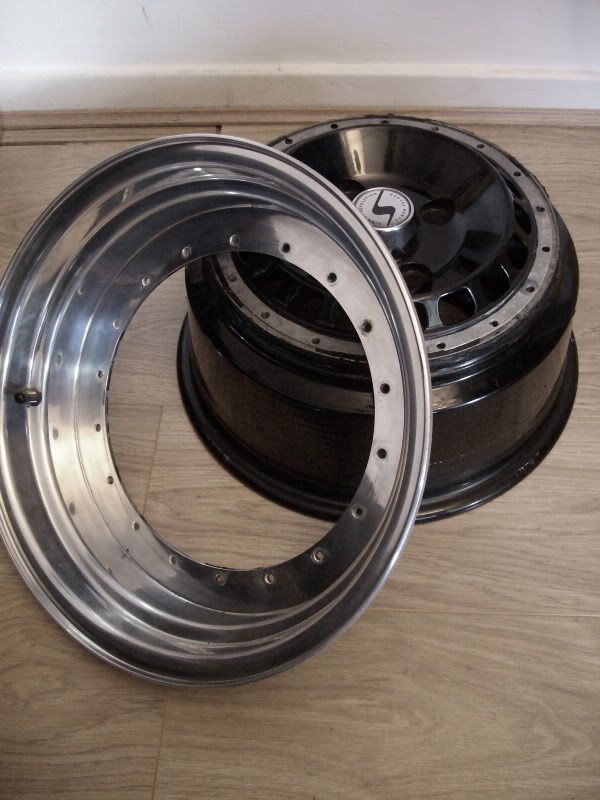
And all four dishes minted silocone free...ready to be sent off!
Now, im not going to say just yet whats happening with the wheels/dishes/nuts/bolts you'l just have to watch this space...But theyre being sent off tuesday 05/07/2011, and the turnaround on them is 5-6 weeks. I cant wait!
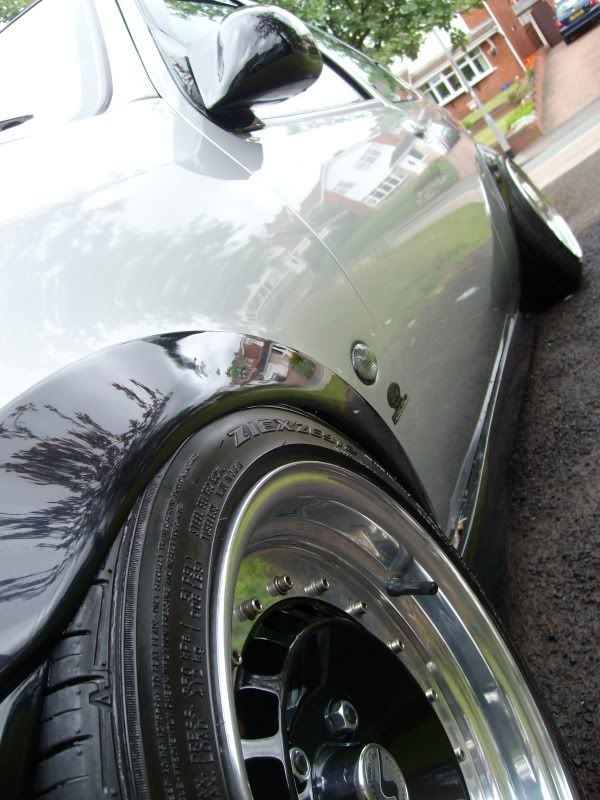
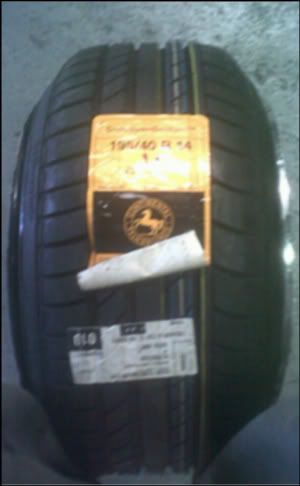
This evening, ive also sold the origional falken tyres too, 195/45/14, as im now going to run a Continental contactII 195/40/14. Get abit more stretch, and hopefully aid the issue of the low offset to help pull them into the arches better.
The cars booked in at Bristol ST.Ford for a full respray in a Bugatti colour, again im not going to let on what colour it is yet but it should look PIMP! Before it goes down there, it will be taking a visit through AutoVogue, for the standard Ford ZS sideskirts and front bumper to be deepended to perfect the stance of the car. It will be down to Autovogue the second week of August, and immediately followed by the bodyshop!
Ross.
04th July 2011.
Hiiii :D
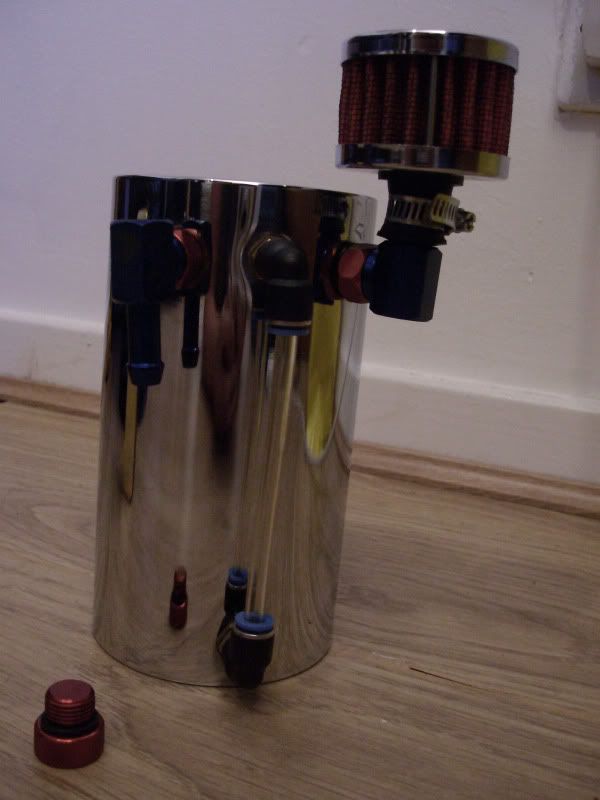
This evening ive been working on my mates 20VTurbo Mk1 Golf, sorting out the engine loom and tucking the bay. As we were packing up, he pulled out a, what looked like brand new crank case breather & tank and asked me if it would be any use on the fiesta. Greatstuff! Fully appreciate it!
Ive just given it a quick go over with some autosol and its perfect! Ill get some hosing tomorrow and a bung, to bung up the air filter when the origional went in, as im not too sure if it'l create a missfire if i dont bung it up? Its after the MAF, so i dont think it will, but even so! Ill also attempt at making a bracket to mount it on my bulkhead, so ill update tomorrow with anything i get done.
Here's a picture....
Im also taking my wheels tomorrow to have the VIP treatment, so all in all, a busy day around work!
Monday 11th July 2011.
Ive full blown be slacking with these updates, and as a result...slacked in the picture department.
Ive since made a bracket up for the header tank, plumbed it all in...Tucked some more of the engine bay and got the whole bays wiring loom wrapped in a VW loom tape. Buzzing.
Just a few pictures to show the update in progres..
Front end off, retucking the HID wiring, and wrapping part of the loom..


And the engine bay after abit of cable re-routing, and tidying up :)

06th August 2011.
Todays the 6th August, and my March 2012 deadline is getting closer for getting the car to be finished intime for shows etc...
This month ive got a fair bit done...
My wheels are still off having the VIP treatment, ive now got a date of the 19th September to collect those, so thats something i cant wait to collect ;) But in the meantime ive bought some new goodies.
First of all, i wanted to dial in some negative front camber, to match the rear. Due to the way my struts/turrets are designed, the only way i could do it were either rose jointing, or adjustable lower arms. Only two companies make the lower arms for the ZS, and i chose the Area Six models, that can dial up to 2.5' negative camber.
So...Area Vs Standard.
Needless to say, ive whacked them straight out to their maximum 2.5' negative camber...
And then a picture of them fitted to the car. It stances the car ALOT better in my opinion, and when my Schmidt wheels are on, is where i should be able to notice the camber at most :)
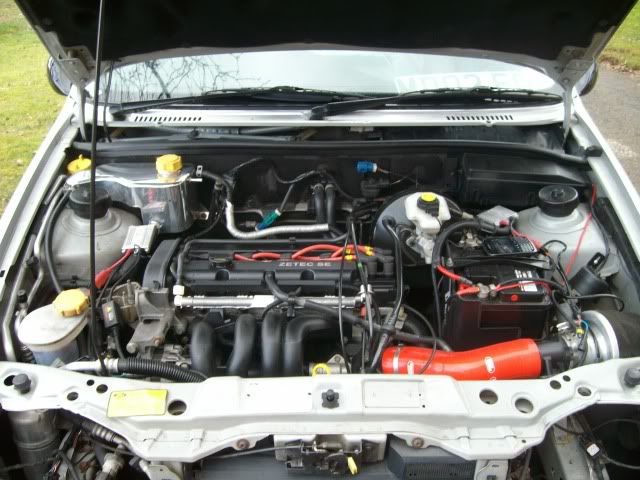
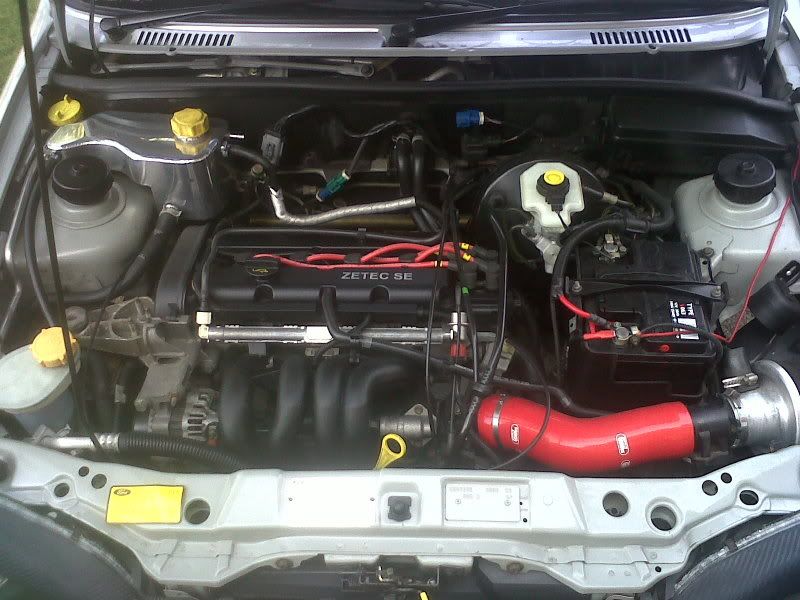
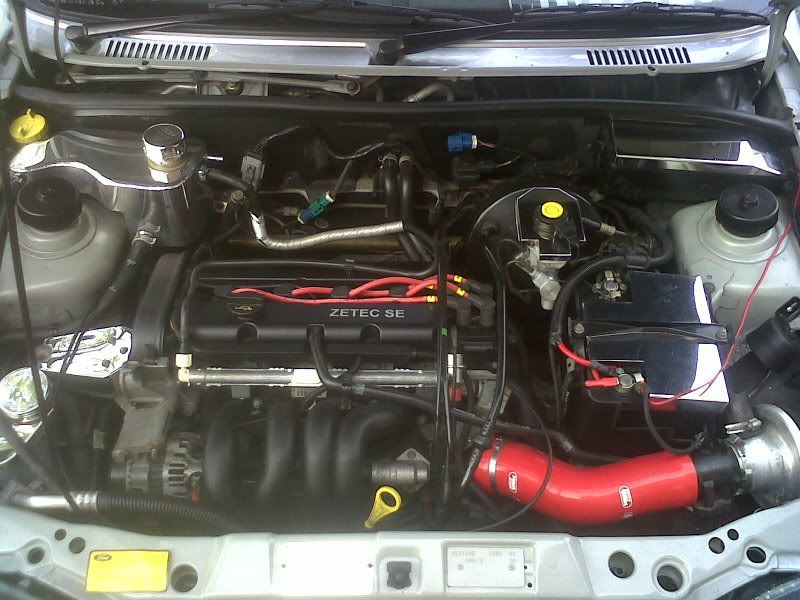
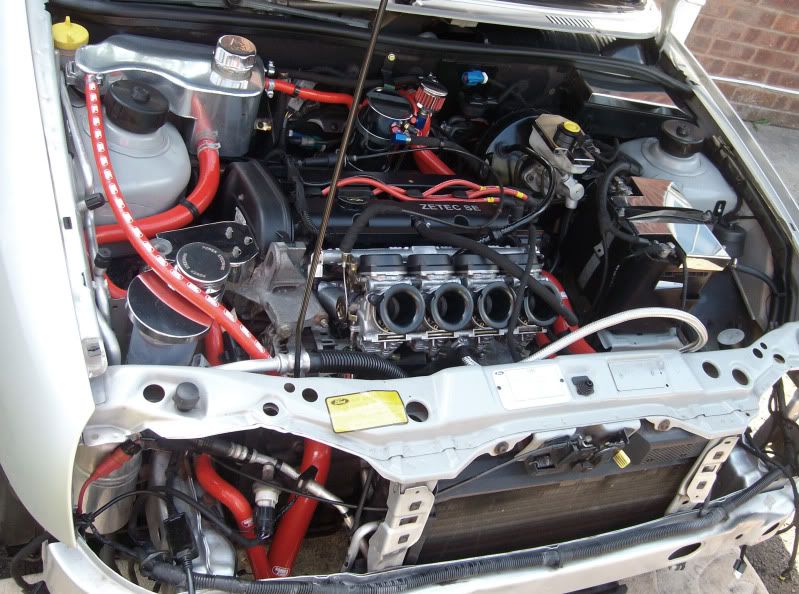
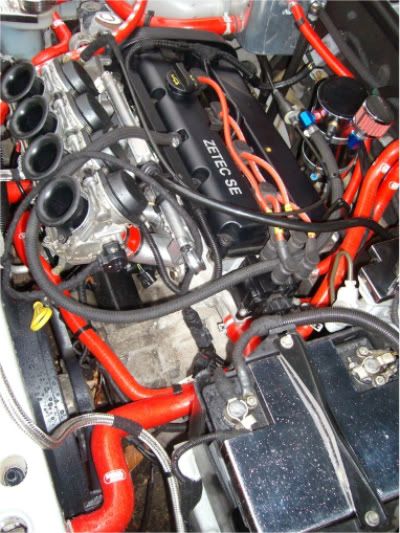
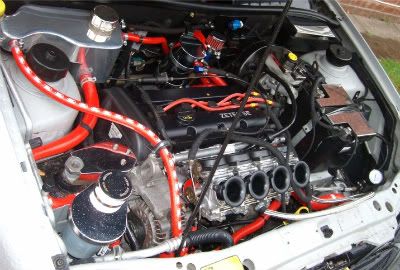
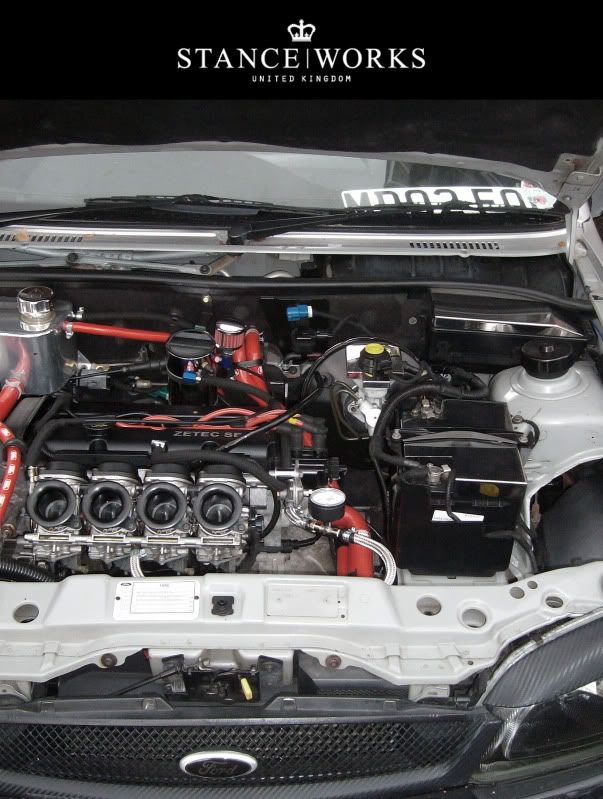
Right, ive been tidying up my bay now quite abit recently, got a few shiny things in there but felt it rude not to have something cheeky sitting under the hood. Ive always wanted Bike Carbs/ ITB's and when some came up on the owners club, i had no choice but to have them. As soon as i bought them, a nice set of Samco's were needed, so i had the water/ancilary and extra hoses in red.
Im expecting to run circa the 135bhp/140bhp mark, which i think would be great. Im not building a race car, im buiding a show car daily driver. They sound f'in awesome, tidy up my engine bay and look the part when the bay is now on show..
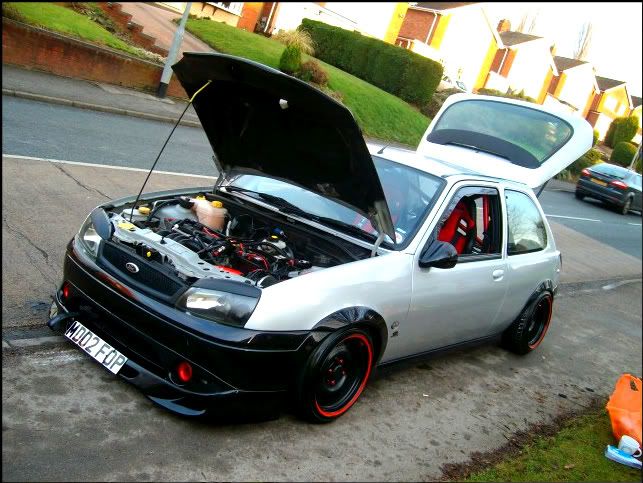
Specifitcation under the hood now...
1.6 Zetec SE Sigma engine, with 8.5mm magnacor leads, Full Samco hoses, Milltek 4-2-1 manifold, Milltek decat, Milltek full stainless system, Cusco oil catch tank, GSXR 600 bike carbs, Megasquirt stand alone management, BogBrothers inlet manifold, malpassi fuel pressure regulator, FSE fuel pressure gauge and braided lines.
Just a few pictures to show it all off...
Cars aren’t built on the internet. Anyone can watch a 10-minute Youtube tutorial and suddenly “Know what they’re doing” but at the end of the day,
the only way to learn is to get out in the
garage, get your hands dirty, and do it...
You can do anything if you give it a
shot and set your mind to it.
Your parents weren’t lying
to you. It doesn’t take much
more than heart and dedication
to build whatever you can come
up with. Detail is paramount,
but what makes a car more
impressive is doing all the
work yourself. Its all about
eating, sleeping, and
breathing motor oil.
Or wheel sealant.
Or paint.
Or something,
either way. Its all about
spending paychecks on
chrome-dipping engine
parts instead of fresh rags, Jewls & drugs.''
Wednesday 24th August 2011.
Done abit more to the fiesta tonight upon arrival of a few new parts.
4x 195/40/14 Continental Sport Contact tyres - Ever so lucky to be able to get these! Continental have stopped making them, and there's no other brand that makes them, lukily there's 10 left at the continental factory, so depending what the bank balance looks like, i may order another 4 tomorrow as back up for when the camber fucks these up!
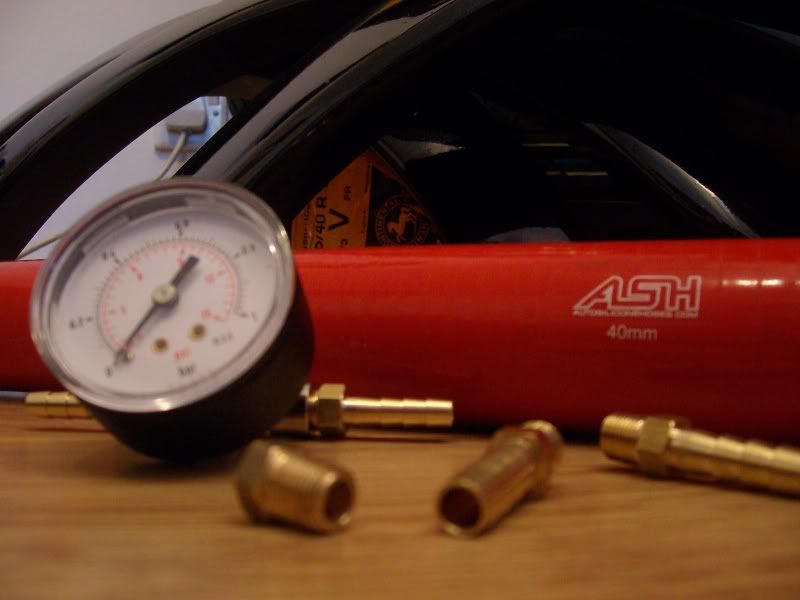
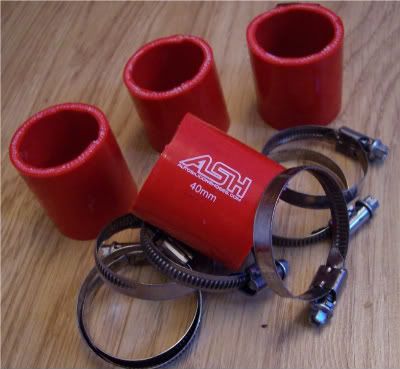
1x meter of ASH Performace 40mm silicone
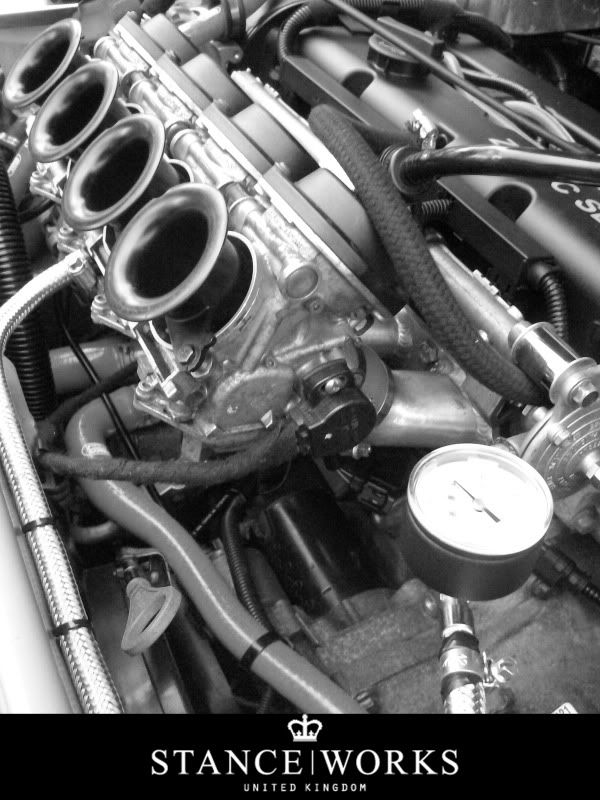
1x FSE in-line fuel pressure gauge
4x Turismo arches
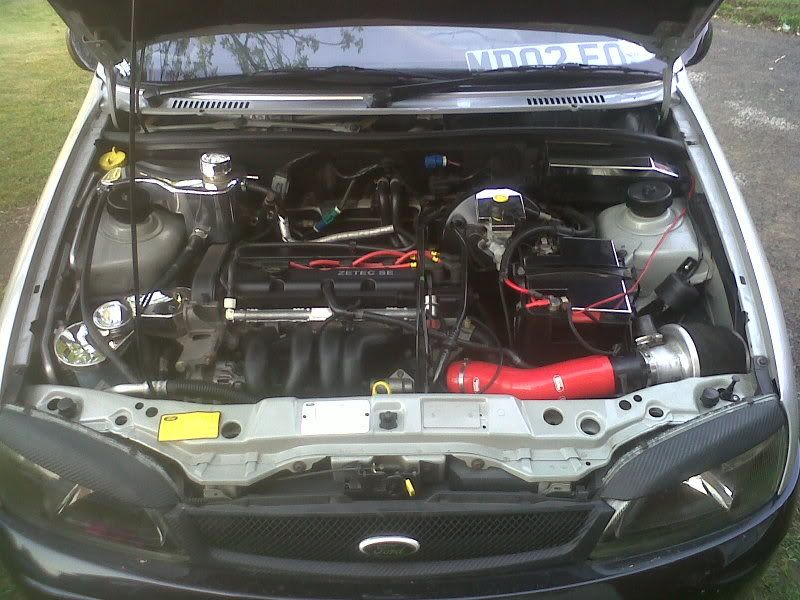
So, tonight i picked the parts up from the post office, and got a few bits fitted to the fiesta.
All in my bedroom...
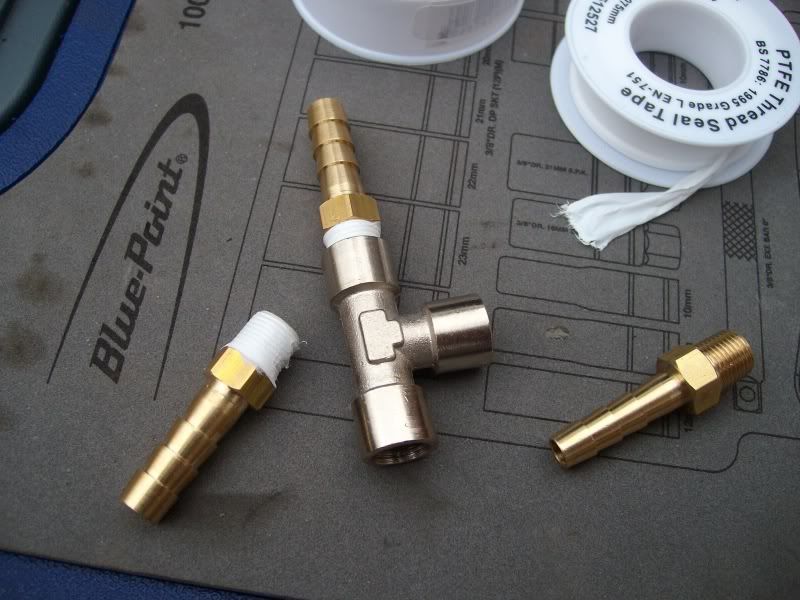
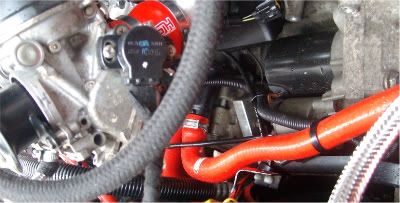
Next job was to cut the silicone up, so it would sit on the Bog Brothers inlet manifold, to the bike carbs...
Ptfe tape up all the new inline fuel pressure gauge...
And then a few pics all fitted today. Please note though, i fitted these in the pouring rain hence the water all in the bay!
Not much of an update since the last lot of shiteee pictures i uploaded of me fitting my new 40mm silicone in the rain..But id done an awful lot of tidying up in the bay. Soldering, tucking, fabricating, Removing.
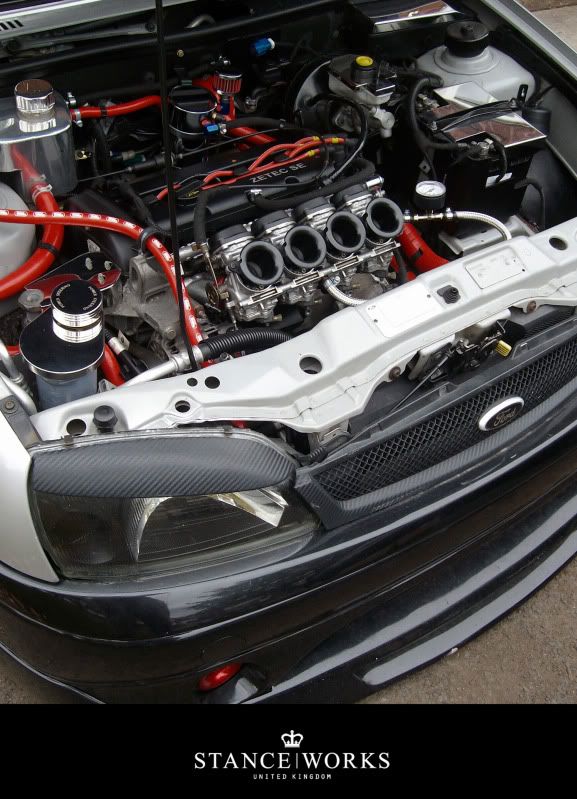
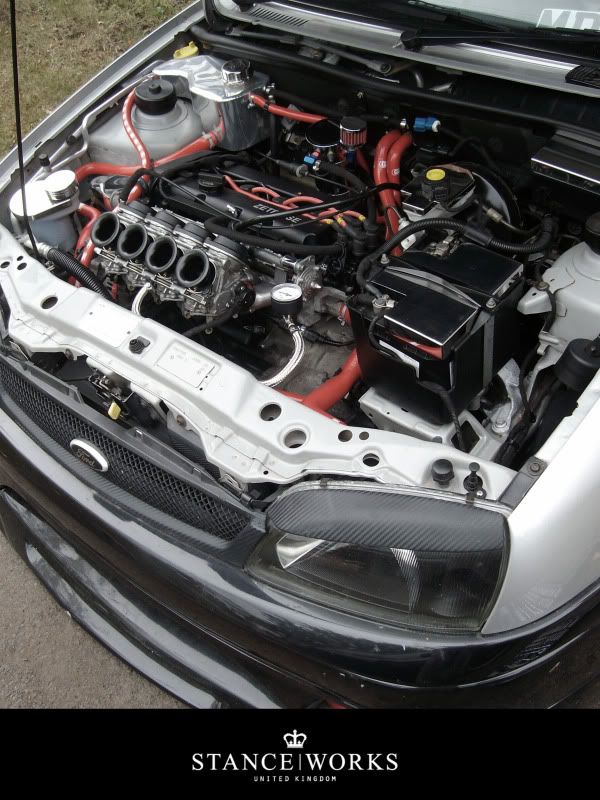
The fuel line had been bugging me since id initally routed it, and i just couldnt figure out a way to mount the fuel pressure regulator, gauge...Just generally make it look tidy. After abit of playing..Here's what ive came up with, repping Stanceworks; United Kingdom...a name everyone inspires to in the game. Bit before...take note of this picture...how it was 6 months ago!
And how it looks Now...I think its came a long way...Sometimes i feel like im wasting my time and messing for the sake of messing..but when you compare two pictures like this...This is when you notice all your hard work, and it looks like its slowly paying off....Maybe?...There's still more i can do ;)
One only showing the hiding/tucking of the alarm. This will be changed for a Clifford all singing all dancing item once its finished, but for now it offers sufficient security for the driveway.
Bring on the trumpets.....!
So thats all the progress up to date. I want to add Carbon to the engine bay...most likely 1000 weave and it needs the standalone management mapping, but that will most likely be the engine bay finished in all honesty. Its as far as i can physically take it without removing the engine and taking it to the next level, and with the deadline ive set myself; March 2012, it just wont be possible to meet.
Good news though, my wheels are all finished!. Well kinda... the finish needs to be polished, but apart from that theyre finished and ready for me to collect on the 20th of this month...About 2 weeks from now :D Cant wait to get them back, built up...tyres on and what not. The car can eventually get to the Bodyshop, and get some serious TLC.
Thats it up to date!
Tuesday 19th October 2011.
S'happening,
Once again i haven't stuck to my word and updated my build blog like i said i would. I'm male. Would you expect anything less?...Anyhow not much has really happened. Lack of enthusiasm with it, lack of money, it all plays a factor.
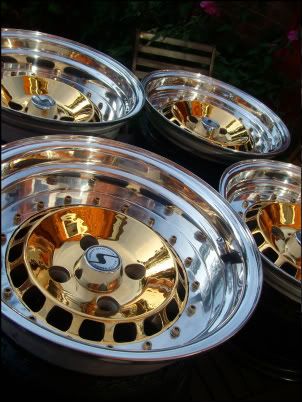
So, i sent my Schmidt Th-lines off to a place in Shrewsbury called TK Platers for some Vip treatment. I dropped them off four months prior to collection, to allow plenty of time for the best finish to be obtained...But as with anything, they were left to the last minute and not ready for collection. Fail.
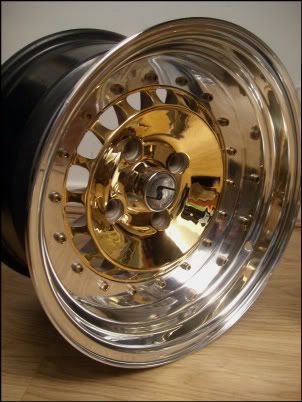
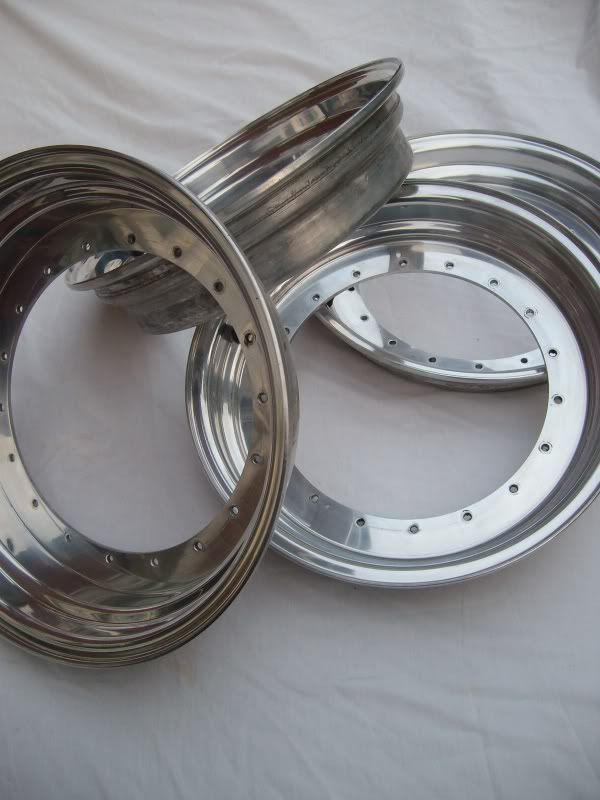
Being slightly pissed off with them, i ended up with a nice £400 bill a set of half prepped wheels, and some mirror polished lips. I researched what i wanted doing a little more, and found a company called Goldrush in Buton On Trent, who specialized in 24crt Gold plating. After a healthy discussion with gold being at its most expensive ever at the moment, the Th-Lines were down there, along with 140 split rim bolts being plated. :WUB:.
I picked them up the following day buzzing like a bee.
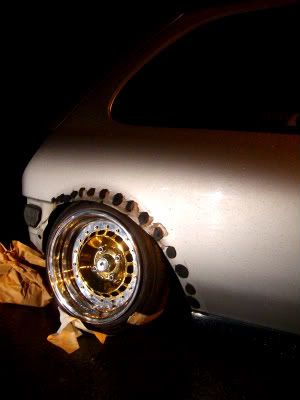
After researching how to rebuild a split rim wheel, i figured the best sealant to use were multipurpose bathroom sealant as recomended by many. What a load of bollocks that was. I built them up, went to have the tyre's fitted and they all leaked air. I rebuilt them with Tiger Seal and they were great! I built them all up, and left them to dry for a few days before going to have the tyres mounted back on; on the dining room table. Oh how my mom loved me those few days. Little did she know that they were going to be there a little over a week. I was sitting playing the Xbox, looked at them and something didn't look right. After maybe 20 or 30 seconds hard examination..they don't call me Inspector Rage for nothing...id only built them up wrong. Aswell as the lips being different sizes, the barrels were too..and with me rushing to get them built slapped them together without realising. I was left with 7.5J, 8J, 8.5J & 9J wheels..great!
So after yet another rebuild...Were onto the third rebuild here..They were all complete and ready for the tyres to be mounted....
And that leads me pretty much up to today.
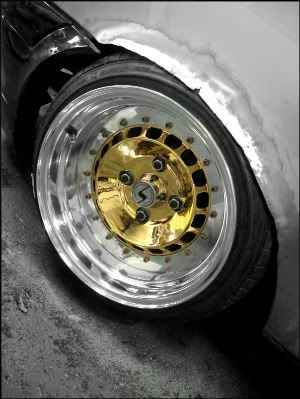
The wheels went on, and the car went to the bodyshop.
I've asked for the plastic arches to be removed, and custom arches fabricated to house the ET0 9j & ET15 8J Schmidts, however The body shop wern't able to do this, so after a healthy chat with a chap from work; Layton, he's agreed to put in the wrench time and build me something completely one off. Work will be starting this week, however here's a quick picture with the wheels fitted & the plastic arch removed exposing some lovely Tiger Seal blobbs.
Saturday 22nd October 2011.
Hey,
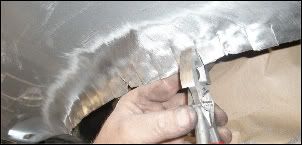
After finishing work this afternoon i managed to get down to the unit with Layton, to start work on one of the rear arches. We managed to clean the arch up, cut it to style to shape, and mock up a cardboard cut out to get a rough idea of shape...
Here's the outcome. Hopefully ill be able to get down the unit again at some point this week, to finish cleaning the arches up ready for the templates to be welded to the chassis.
Subscribe to:
Posts (Atom)